Give clothing a skeleton to follow—and carefully blend how the bones pull each part of the fabric. We will show exactly where to click, how to copy weights, and why painting is only half the job.
Rigging vs. weight painting—what each actually does
Where to find the avatar rig and garment
How to copy and smooth body weights
How to test bends and export skinned clothing
BEFORE YOU START
Bring the correct avatar kit
Use an approved, compatible body developer kit and a fitted shirt or tunic. Work in its original rest pose and save a backup first.
✦
START HERE · THE DIFFERENCE
Clothing That Dances with Your Avatar
Imagine designing an amethyst-colored tunic. It looks lovely in Blender—but without rigging, it will not bend with the body. Rigging connects the clothing to the avatar's armature (its skeleton); weight painting controls how strongly each bone moves the garment's vertices.
We'll practice on a simple, close-fitting top over a compatible body developer kit. Once this is comfortable, use the same principles for dresses, skirts, boots, sleeves, and other garments.
Important: Weight painting makes clothing follow bones; it does not automatically make skirts swish or fabric flutter. Those effects require additional animation or simulation methods and may not transfer to an in-world viewer.
✦
TWO JOBS · ONE MOVING GARMENT
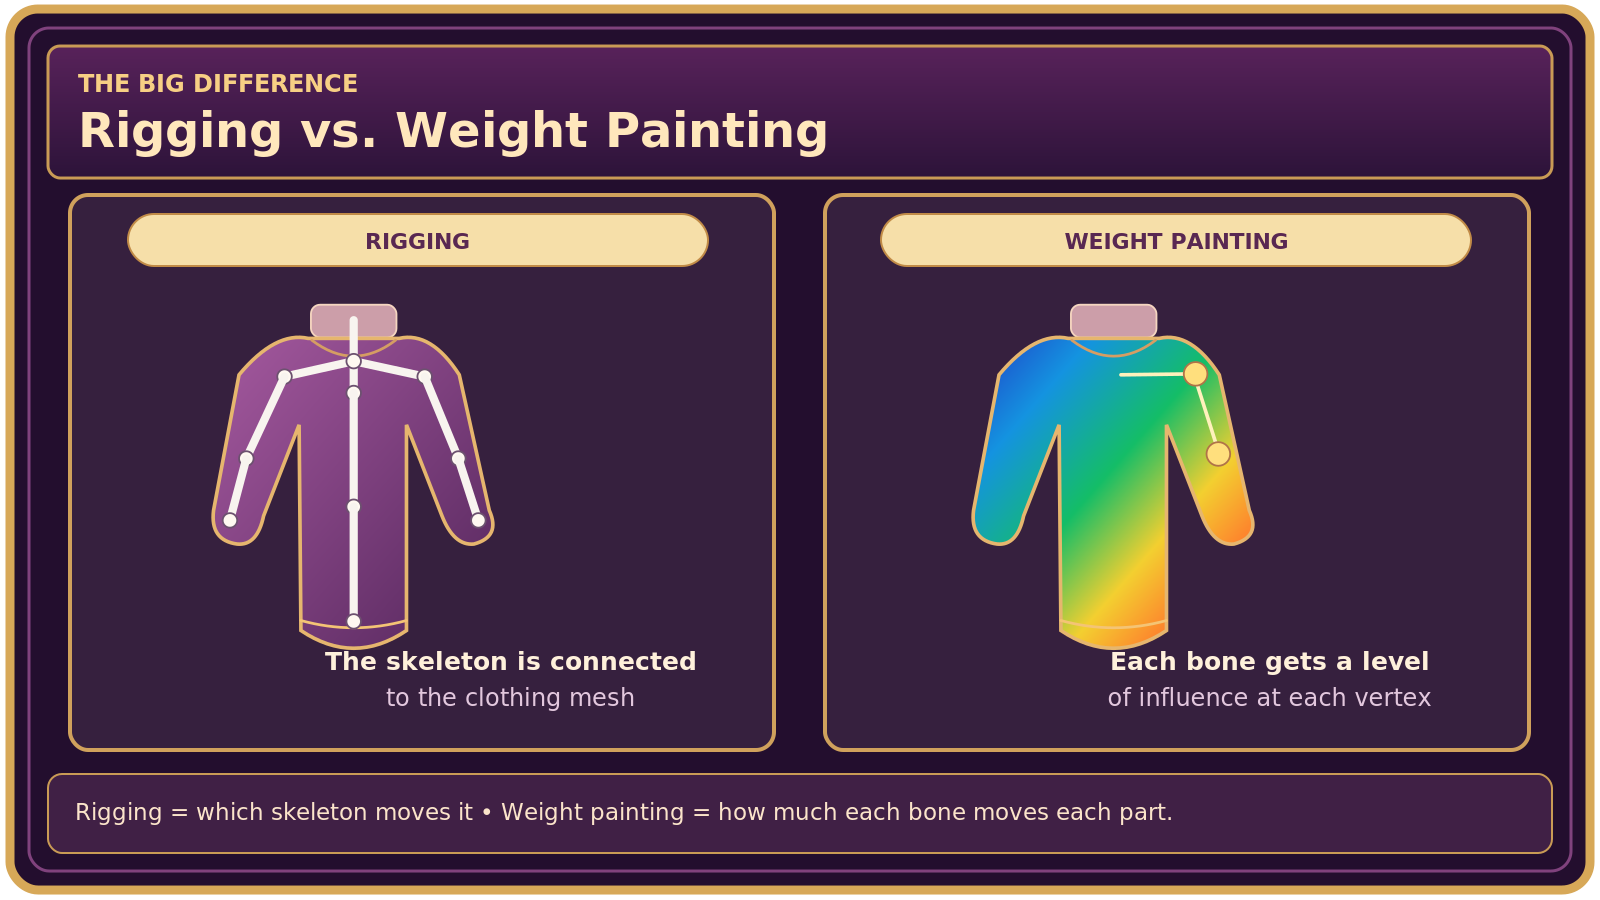
Rigging vs. Weight Painting—What's the Difference?
RIGGING
What bones can move the garment?
The armature is the skeleton. Rigging connects your clothing mesh to its bones through an Armature modifier and the correct bone-named vertex groups.
Imagine attaching sleeves to the avatar's upper-arm and forearm bones.
WEIGHT PAINTING
How much does each bone move it?
Each vertex can receive different amounts of influence from nearby bones. Weight painting blends those influences so joints bend smoothly rather than snapping or stretching.
At an elbow, the sleeve blends between upper arm and forearm influence.
Two parts of the same task: attach the rig, then refine its influence.
Illustrations are labeled Blender-style teaching diagrams, not exact Blender screenshots. Controls can shift depending on your workspace and developer kit.
Remember: Rigging tells the shirt which skeleton to follow; weight painting tells it how to bend with that skeleton. You need both for usable rigged clothing.
✦
KEEP THIS HANDY
Your clothing-rigging spellbook
ARMATURE
The skeleton
Use the developer kit's existing rig.
VERTEX GROUPS
The bone names
Names must match the deforming bones.
WEIGHT PAINT
Bone influence
Blue = 0, red = 1 for the selected group.
TRANSFER
Starting weights
Copy the body weights to the shirt.
POSE MODE
Test movement
Raise arms, bend elbows, and sit.
SKINNED GLB
Export route
Shirt + armature, then Mesh Refinery.
✦
FIRST, A LITTLE SKELETON MAGIC
What Are Bones, Vertex Groups & Weights?
♧
Armature
The avatar's skeleton. Its bones move when the avatar animates.
◇
Vertex groups
Collections of mesh vertices named for the bones that influence them.
🎨
Weights
Values from 0 to 1 that describe how much each bone influences a vertex.
Blender's familiar weight-paint colors
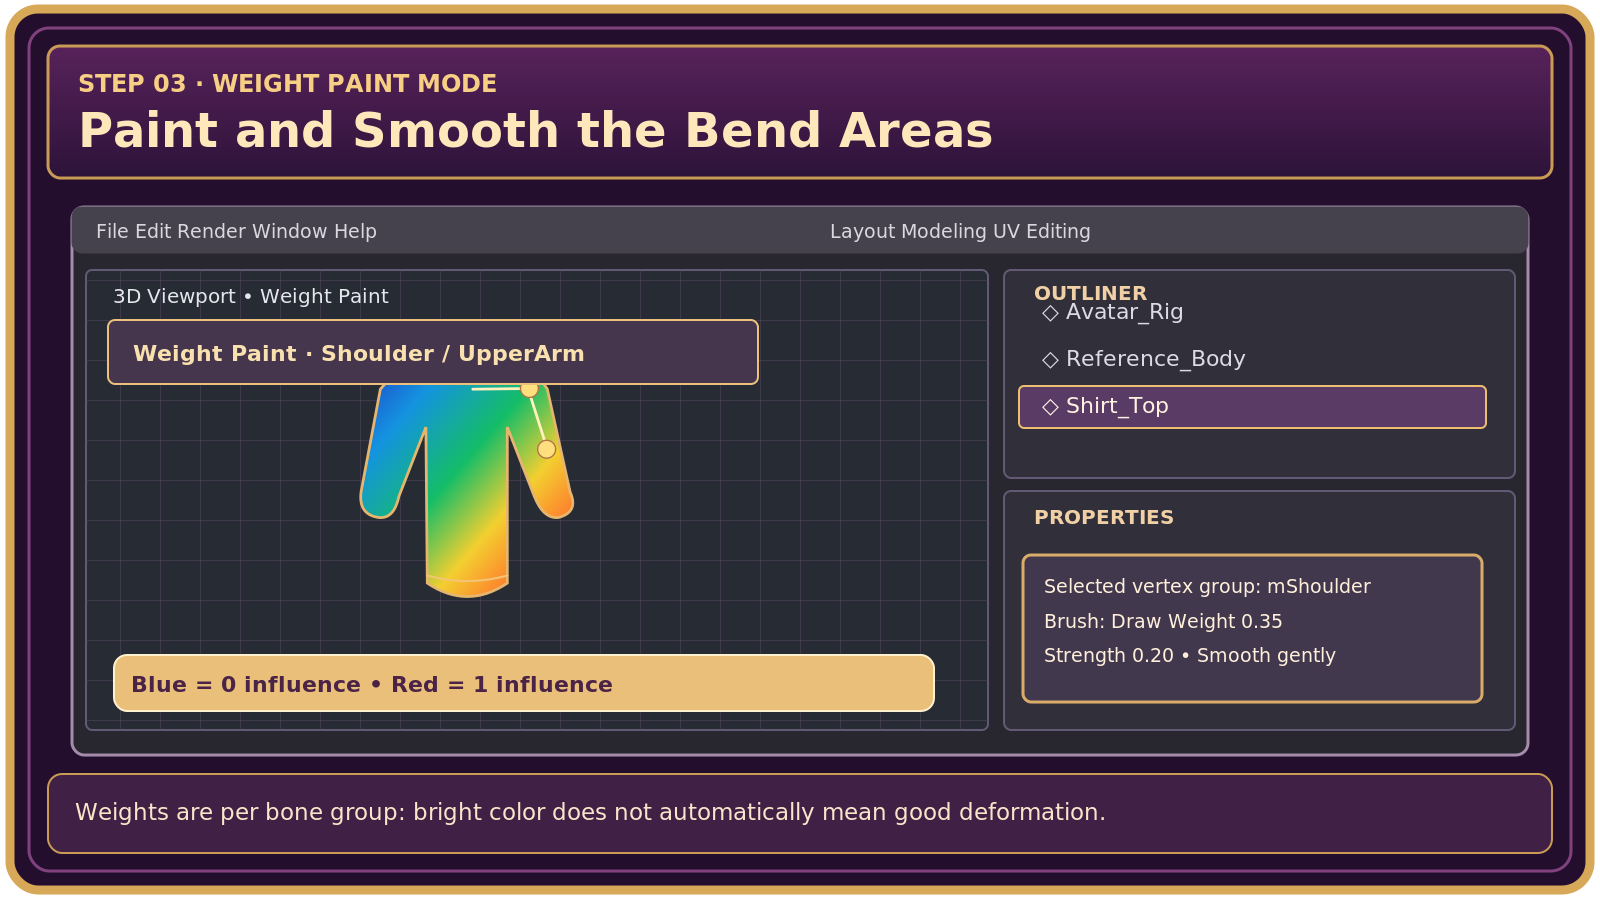
Blue = 0 no influenceRed = 1 full influence
At an elbow, for example, some vertices are influenced mostly by the upper-arm bone and others by the forearm. A smooth blend between them lets the sleeve bend naturally.
01
STEP ONE
Start with the Correct Avatar Developer Kit
Get an authorized body developer kit. For a mesh body, use the kit provided or approved by its creator. For classic avatars, use an appropriately compatible Second Life/OpenSim skeleton reference. Follow the kit's licensing and export rules.
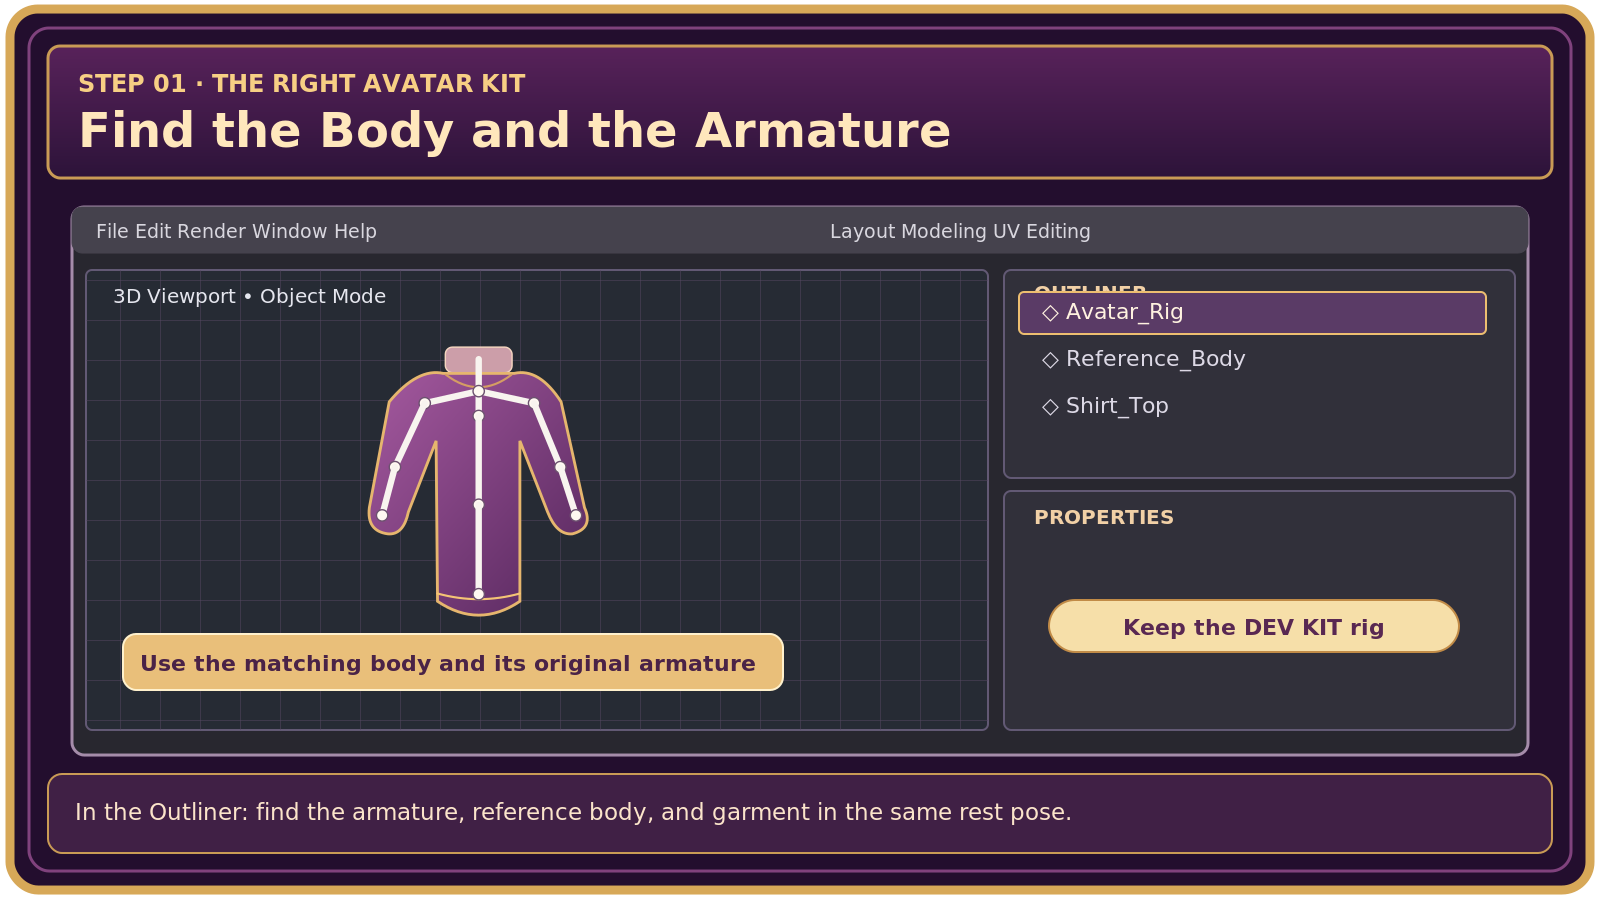
Open the kit in Blender 5.2. Find the body mesh and its armature in the Outliner. Keep the rig in its rest pose; do not randomly rename or reposition bones.
Fit a simple shirt or tunic over the body. Keep the garment in the same position and scale as the reference body. Avoid extreme intersections or large gaps.
Save a working copy (File → Save As) before you transfer weights. Preserve the original developer-kit file as your backup.
Look here: the body, armature, and shirt should be visible in the Outliner.
Classic rigged vs. fitted mesh: Standard skeleton bone weights make clothing follow animation. Some fitted-mesh bodies also use collision-volume bones for body-shape sliders; those weights must come from a compatible fitted kit. A perfect fit on one body does not guarantee a fit on another.
02
STEP TWO
Transfer Weights from the Body to Your Clothing
Using a body that is already rigged is usually much easier than painting every bone from scratch. Weight Transfer gives your shirt a starting point.
Coming to The Enchanted Workshop: A future Workshop tool will include a feature to help weight paint clothing for an avatar body. It can give you a useful starting point, but the weights will still need manual tweaking, particularly around joints and other bending areas. Always test poses in Blender and in-world to check how the clothing moves and fits. This tool is not yet available.
Make sure the body and shirt overlap in the same rest pose. Temporarily hide parts you don't need, but keep your source body and shirt visible for the operation.
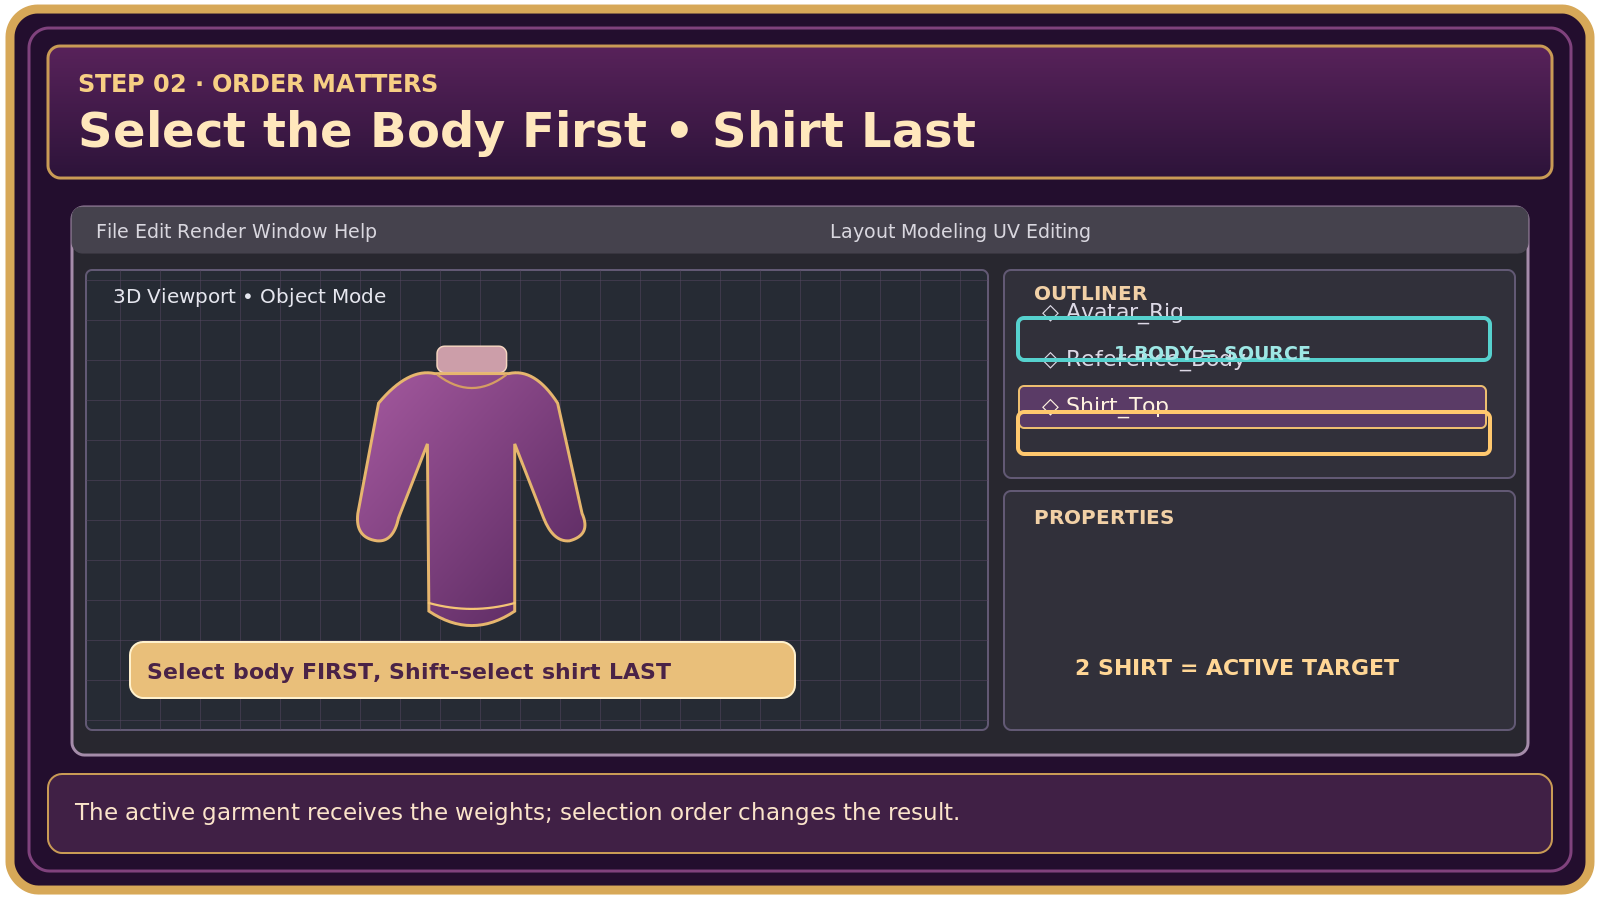
In Object Mode, select the body first (source), then Shift-select the shirt last (target/active object).
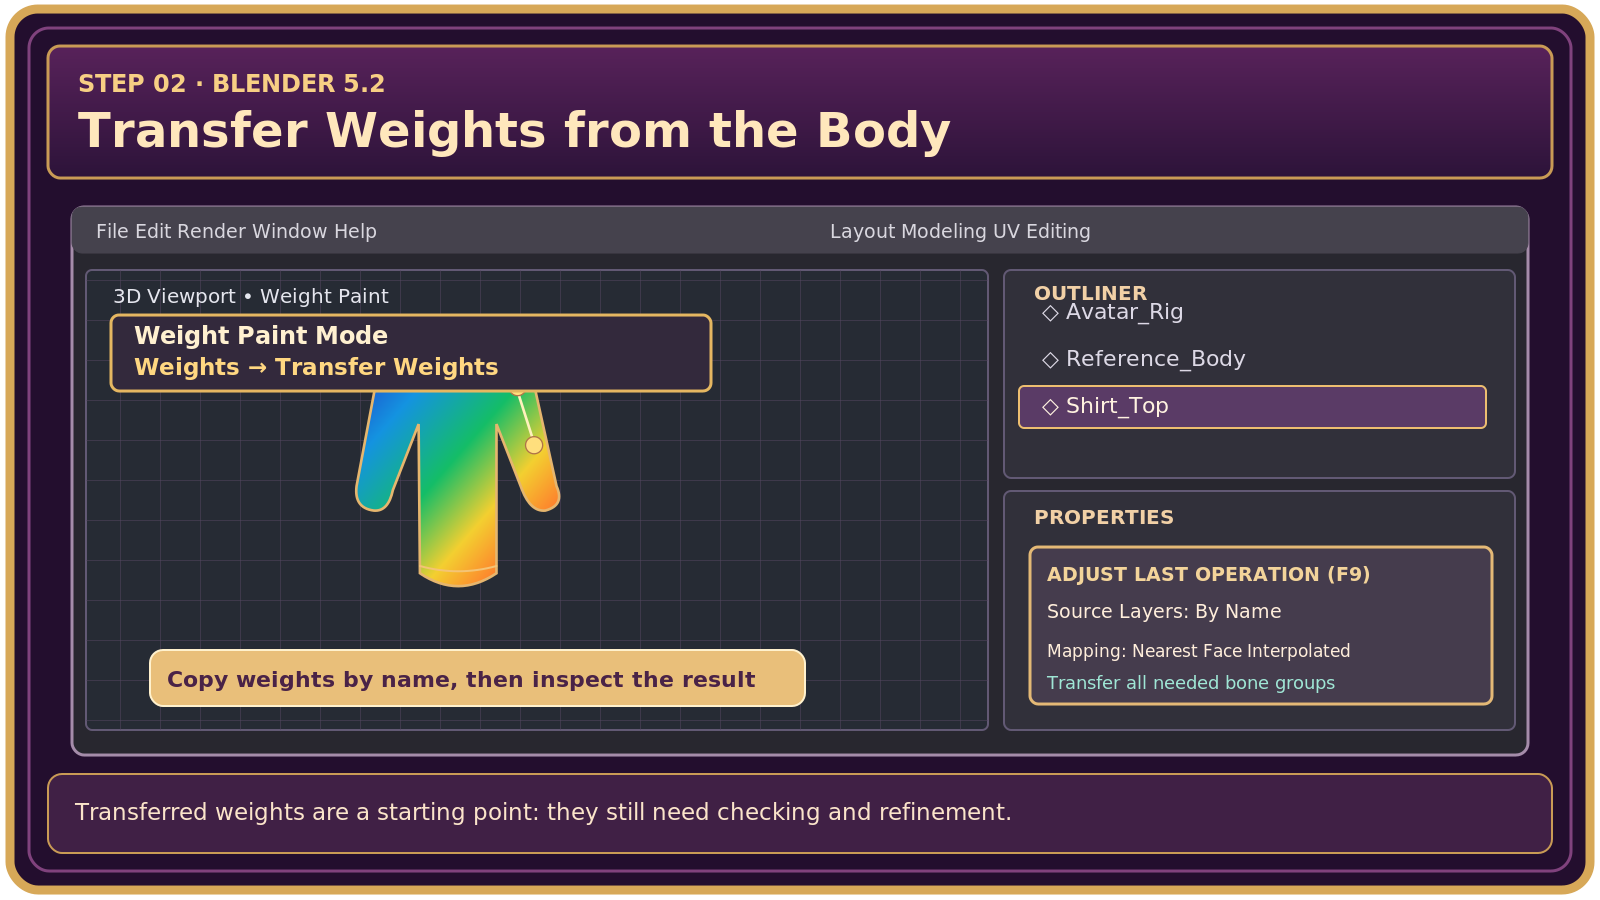
Switch the shirt to Weight Paint Mode. Use Weights → Transfer Weights (you can also search for the command with F3).
Open Adjust Last Operation (F9) immediately afterward. Set the transfer to copy the body's vertex-group layers by name / all groups, and choose a nearby-surface mapping such as Nearest Face Interpolated. Labels can vary by Blender version.
Return to Object Mode, select the shirt, and check Object Data Properties → Vertex Groups. You should see groups matching the avatar rig's bone names.
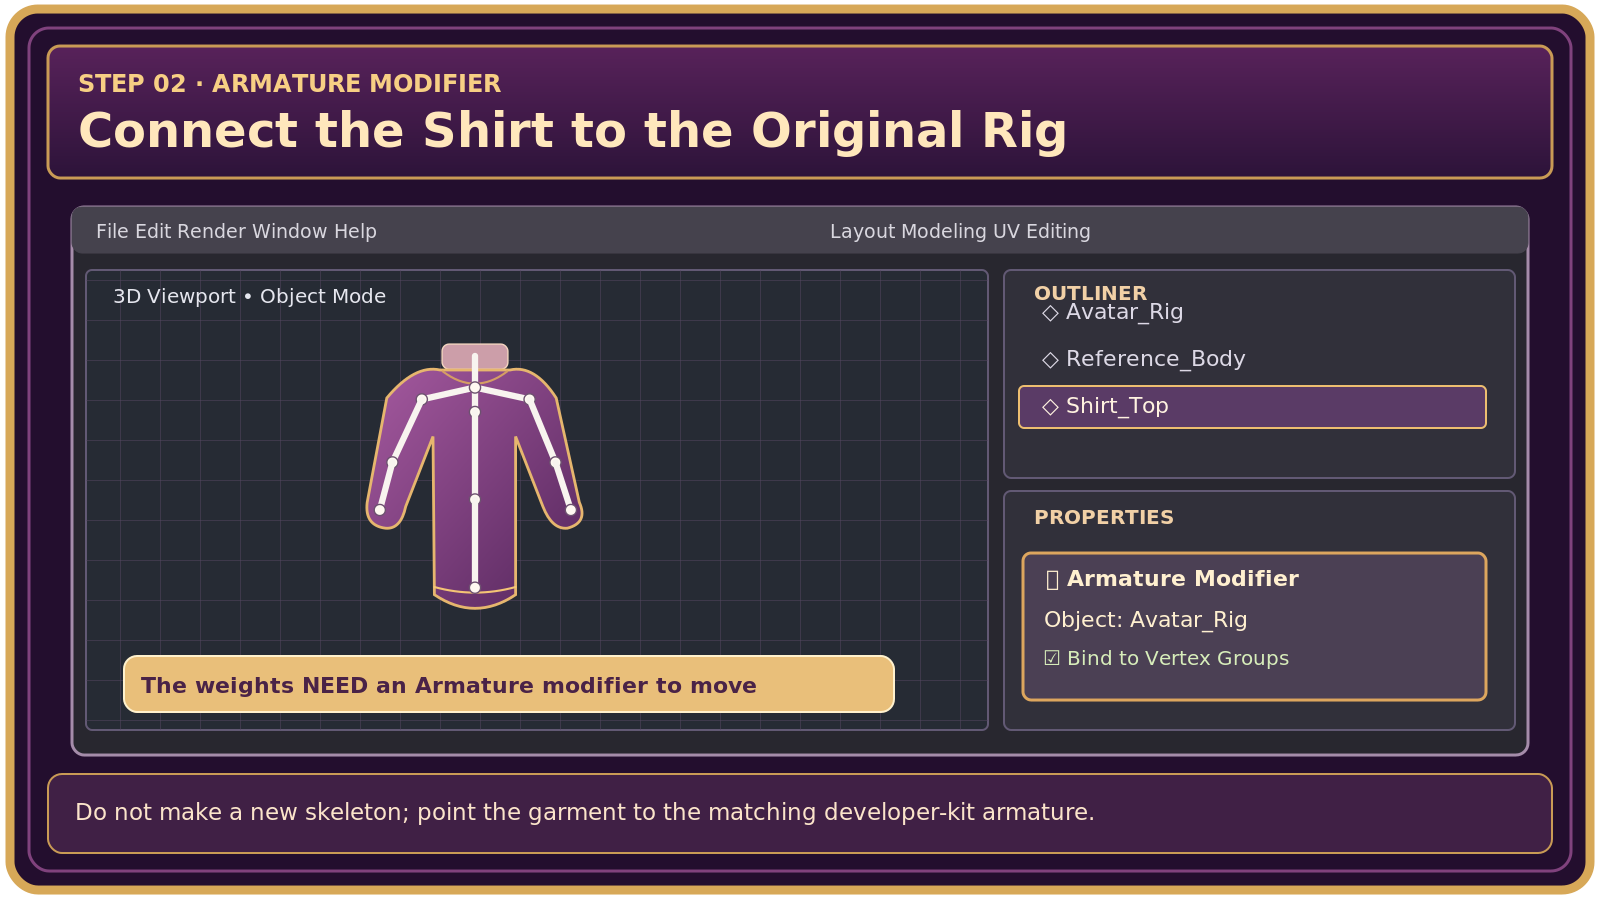
In Modifiers (wrench icon), add an Armature modifier to the shirt. Choose the existing avatar armature in its Object field; enable deformation by vertex groups. Do not create a new random skeleton.
Why two steps? Transferring weights supplies the vertex-group values, but the Armature modifier is what tells Blender which skeleton should use them. The clothing needs both.
Selection order: body first, shirt last—then the shirt is the active target.Weight transfer: choose the Transfer Weights command and adjust By Name and Nearest Face Interpolated.Important: the shirt also needs an Armature modifier pointing to the avatar kit rig.
①Rigged bodySource vertex groups
→
②Transfer weightsUse nearby surface
→
③Clothing meshSame armature bones
Not moving yet? Check that the shirt has the right bone-named vertex groups and an Armature modifier referencing the kit armature. Painting colors alone doesn't bind the garment.
03
STEP THREE
Smooth the Weights Where the Fabric Bends
With the shirt selected, enter Weight Paint Mode. Choose a relevant bone's vertex group (for example, chest, shoulder, upper arm or forearm) from the vertex-group list.
Use the Draw brush gently to add or reduce influence. Start with low Strength so the change is gradual. The Blur/Smear or smoothing tools can help soften jagged weight transitions.
Focus on motion areas: shoulders, armpits, elbows, waist and hips. For skirts and dresses, test the pelvis-to-thigh transition especially carefully.
Use Weights → Normalize All so the total influence on vertices is consistent. Use Weights → Limit Total with a limit of 4 for a conservative SL/OpenSim workflow. Then use Clean to remove negligible leftovers and normalize again if necessary.
For symmetrical garments, use weight mirroring only when the mesh, rest pose and bone naming are set up for it. Check both sides afterward.
Paint gently: pick a bone-named group, use a low-strength brush, then normalize and test.
Too much red at a joint?
One bone may be pulling the whole area. Blend influence toward its neighboring bone.
Unexpected sharp crease?
Smooth the weights and make sure the garment has enough geometry to bend.
Clothing pokes through?
Adjust the fit, paint more carefully, and use body alpha cuts where appropriate.
04
STEP FOUR
Pose the Avatar and Look for Trouble
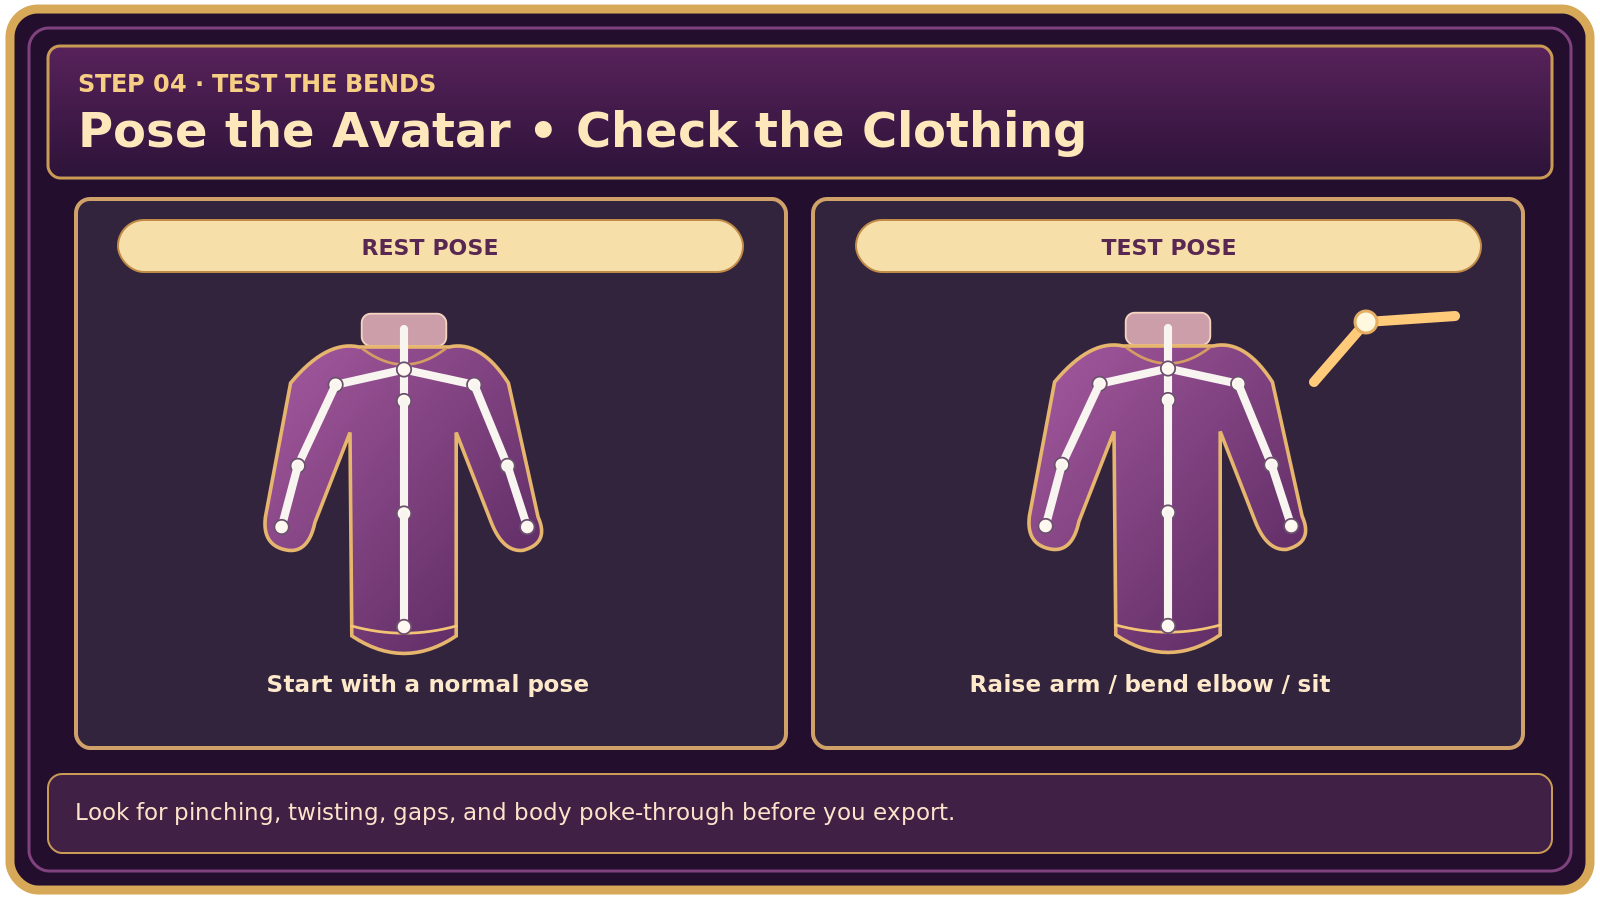
Select the existing armature, enter Pose Mode, and test a few gentle poses. Watch the clothing, not just the body.
↗Raise an armCheck shoulders & armpits.⤴Bend an elbowCheck sleeves & cuffs.⌁Bend a leg / sitCheck hip and skirt folds.↔Turn at the waistLook for collapse or gaps.
Test the actual deformation: check shoulders, elbow bends, waist turns, sitting, and clipping.
Try different poses, then return the armature to its original rest pose before exporting (clear any test pose transforms, e.g. in Pose Mode select the posed bones and use Alt+R for rotation). Save the corrected shirt as a new version.
Body sliders need their own test: Fitted-mesh sliders behave differently from pose-bone rotations. Always test slider extremes in the target viewer, even when Blender poses look perfect.
05
STEP FIVE
Export a Rigged GLB & Prepare the DAE Files
Our Mesh Refinery has a rigged-clothing path: it can read a skinned .glb with armature and bone weights, preserve weights while preparing LOD meshes, and package Collada .dae files. This is different from its static-prop workflow in Lesson 11.
In Blender, verify the shirt is weighted and its Armature modifier points to the kit armature. Keep the rig in its intended rest pose. Hide reference body geometry from export if it isn't meant to be worn.
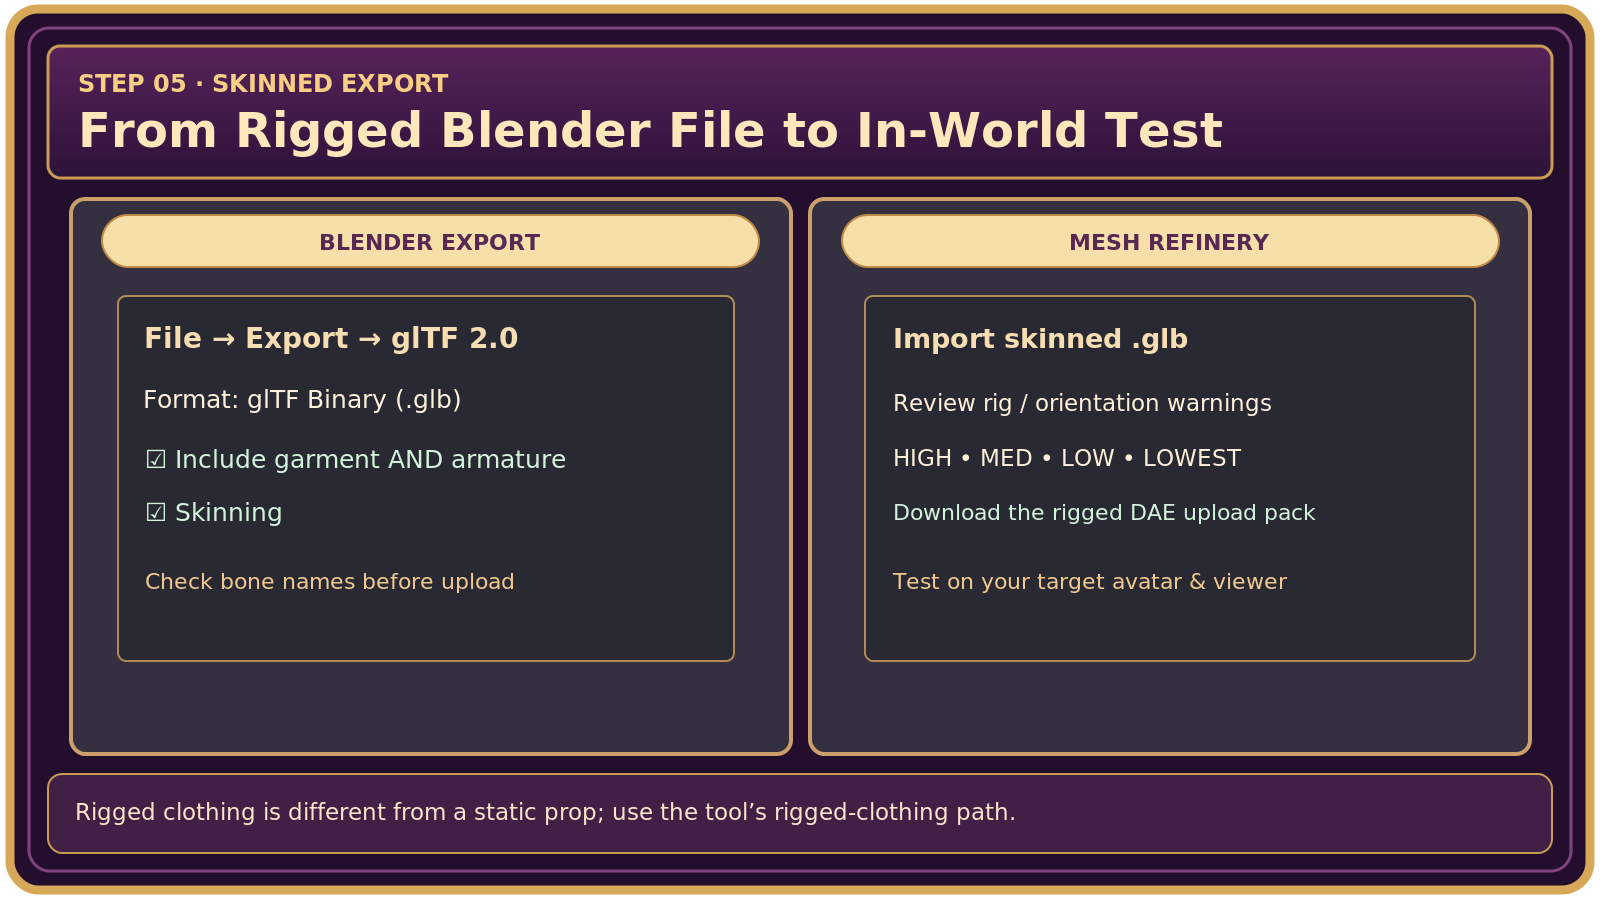
Choose File → Export → glTF 2.0; select glTF Binary (.glb). Include the shirt and its needed armature (use a selective export only if all necessary rig objects are included). Enable Skinning and export bone influences conservatively; avoid baking unrelated test animations.
Open The Mesh Refinery on this website. Import the .glb and make sure the tool recognizes it as rigged clothing with bones. Inspect the tool's rig-check warnings and the avatar-facing setting.
Review all four rigged LODs, material faces and textures. Export the rigged .dae upload ZIP. Do not assume a static-only converter will preserve skin weights—use the tool's rigged output.
In a compatible OpenSim or Second Life viewer, open the model uploader, load the high LOD and appropriate lower LODs, and check the Include skin weights / rigging option. For ordinary clothing using the existing avatar skeleton, generally leave Include joint positions unchecked unless the developer kit or grid explicitly instructs otherwise.
After uploading, Add/Wear the clothing on the intended body, play animations, sit, move, and check the fit with body sliders. Make adjustments in Blender and repeat a test upload as needed.
Skinned export: include both the weighted clothing and its armature; check the rigged output in Mesh Refinery.
Blender + Dev Kit→Skinned .glb→The Mesh Refinery→Rigged .dae→Wear & test
Compatibility note: Skeleton and bone support vary by avatar body, viewer and OpenSim grid. A successful conversion doesn't guarantee perfect deformation, fitted-mesh slider behavior or cross-body compatibility. Test a small sample before finalizing a wardrobe.