A few well-placed lines can make a world of difference! Discover how to give your mesh new faces and edges, then use them to make a sweet little cottage window.
Beginner-friendlyAbout 30 minutesBlender 5.2
WHAT YOU'LL LEARN
Your next modeling essentials
Where to activate a loop cut
How to center, slide, and multiply loops
How Subdivide is different from Loop Cut
How to make a cottage window from a grid of faces
YOU ONLY NEED
Blender and a default cube
Start with Blender 5.2 → New File → General. We’ll use Edit Mode and the mouse over the 3D Viewport.
✦
START HERE
Before we begin
Open Blender 5.2 and choose File → New → General. Keep the default cube. We are building on Lesson 02 and Lesson 04, so you'll be working mostly in Edit Mode.
Click the cube, move your mouse into the 3D Viewport, and press Tab. Remember that Blender's number-row 1, 2, and 3 select vertices, edges, and faces; Numpad 1 changes to the front view.
Workshop wisdom: Adding geometry gives you more places to shape a model. It does not automatically make it prettier or smoother. Add only the detail you need.
✦
QUICK REFERENCE
Your geometry spellbook
Ctrl + R
Loop Cut
Preview a new edge loop through the mesh.
Mouse wheel
Multiple cuts
Set how many loops you want before confirming.
Right-click
Center the loop
After the first left-click, right-click to center the sliding cut.
F3
Find Subdivide
Search Blender's command menu when a menu is hard to find.
3
Face Select
Number row 3 lets you select the window's center face.
Ctrl + Z
Undo
Try again without worrying about a mistaken cut.
01
THE BUILDING BLOCKS OF EVERY MESH
What Does “Adding Geometry” Mean?
A mesh is made from vertices (points), edges (lines), and faces (surfaces). A new cut creates more of these parts while keeping the shape connected.
One face
A simple flat surface
One loop cut
Two smaller faces
More geometry
Nine editable faces
These are simplified front-view teaching drawings. Your actual cube has faces on every side.
Our aim today: Place extra edges where a window belongs, instead of making a huge mess of tiny polygons all over the model.
02
ONE NEW LINE, NEW POSSIBILITIES
Your First Loop Cut · Ctrl+R
Loop Cut adds an edge loop through a connected row of four-sided faces. It's wonderful for dividing walls, making space for windows, and preparing details.
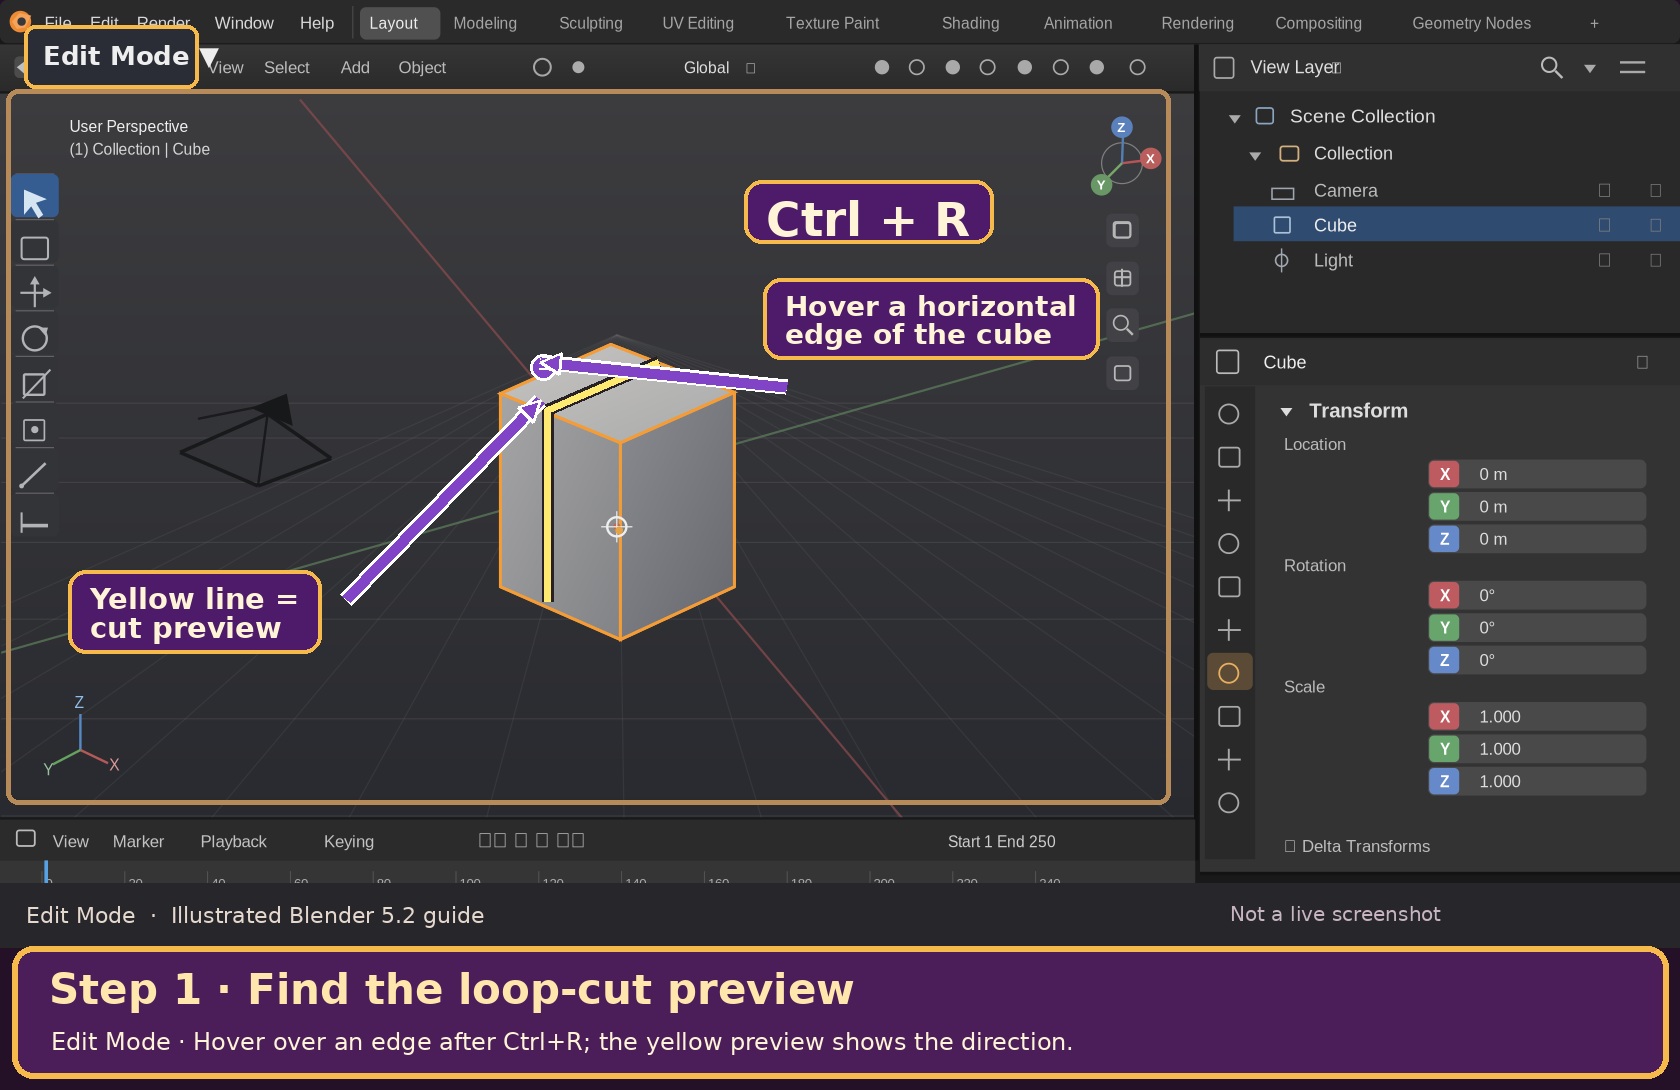
Look here first: Ctrl+R shows a yellow line, and hovering over different edges changes the direction of the proposed cut.
With the cube selected, press Tab for Edit Mode (unless you're already there).
Move the cursor into the cube and press Ctrl + R. Hover over a horizontal edge of the cube to preview a vertical cut running through the mesh. The preview is yellow.
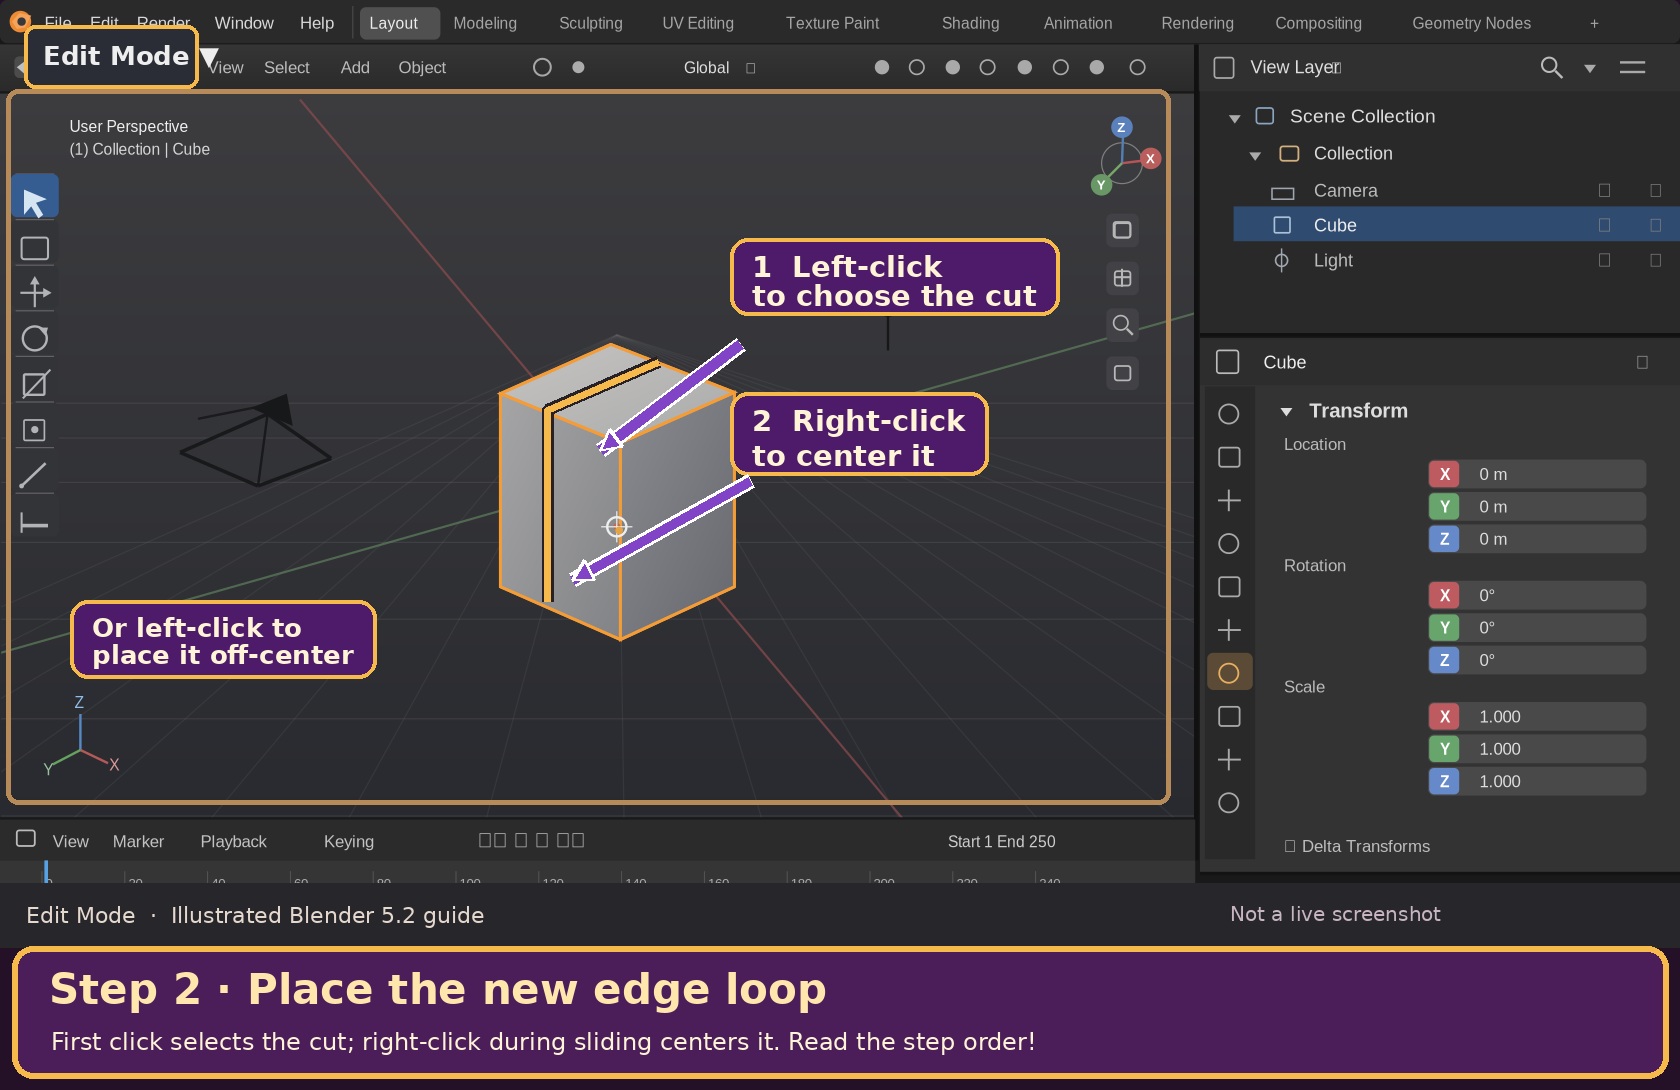
Left-click once to choose the cut. Move the mouse to see the new loop slide from side to side.
Right-click during this slide step to place the loop exactly in the middle. (You may also left-click again to accept a custom position.)
Orbit a little and admire your new edges. Press Ctrl + Z once to undo the practice cut before the next exercise.
The order matters: first left-click to choose the cut; while it slides, right-click to keep it centered.
YOUR FIRST LOOP CUT
Ctrl+R→Hover edge→Left-click→Right-click to center
Right-click before the first click cancels; right-click after the first click centers the sliding loop.
Why didn't I get the direction I expected? The preview runs across faces perpendicular to the edge you're hovering over. Try a different edge to change the cut's direction.
03
LET'S MAKE A LITTLE ROOM FOR DETAILS
Two Cuts, Three Sections
You can create several evenly spaced loops in one step, instead of repeating the tool again and again.
On the plain cube in Edit Mode, press Ctrl + R and hover over a horizontal edge.
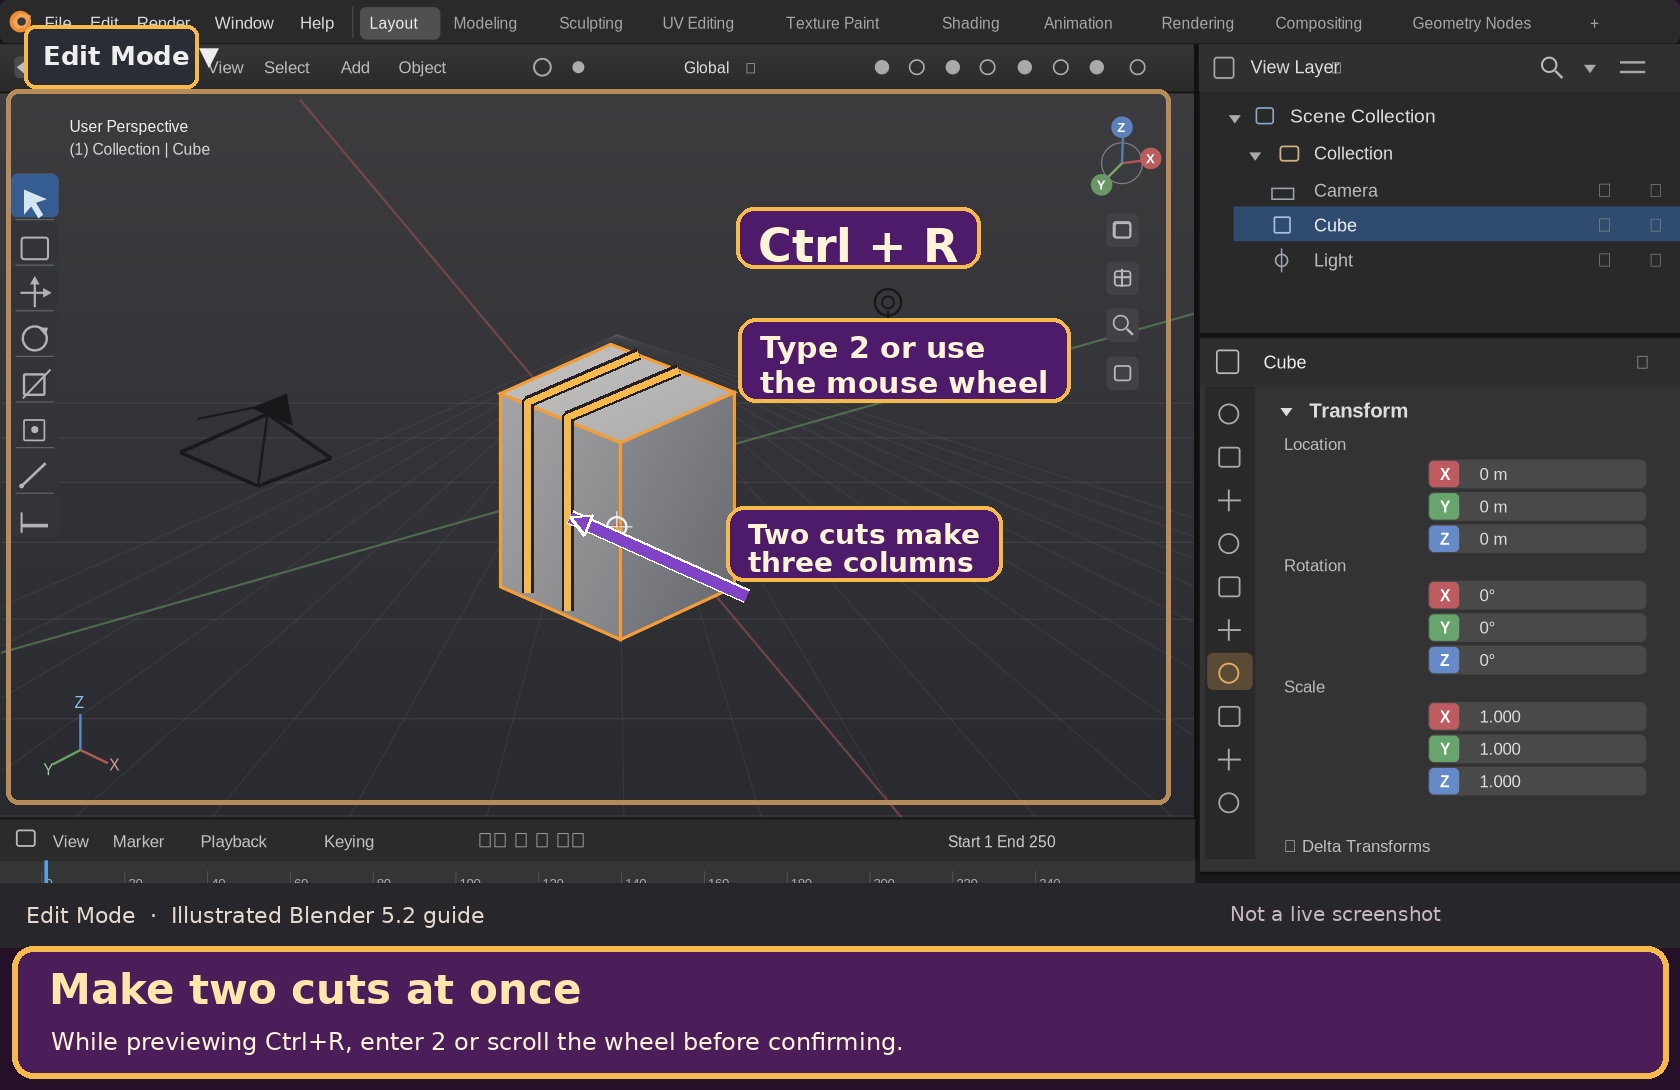
While the yellow line is showing, type 2 using the number row, or scroll the mouse wheel until Blender previews two cuts.
Left-click to confirm and right-click to leave the cuts in their centered, evenly spaced positions.
You've split the cube's front into three vertical sections. Press Ctrl + Z to return to the plain cube for the next tool.
Set two cuts before the first click. Blender makes three evenly spaced sections.
Two vertical cuts
Now there are three columns.
Two horizontal cuts
Now there are three rows.
A loop cut follows connected quads (four-sided faces). It can stop or take a different path when it meets triangles or faces with more than four sides.
04
A DIFFERENT WAY TO ADD POLYGONS
Subdivide · Split a Selection
While Loop Cut travels along a row of quad faces, Subdivide splits the faces or edges you've selected. It's handy when you want more detail in a smaller area.
Press 3 on the number row for Face Select. Press Alt + A to deselect everything.
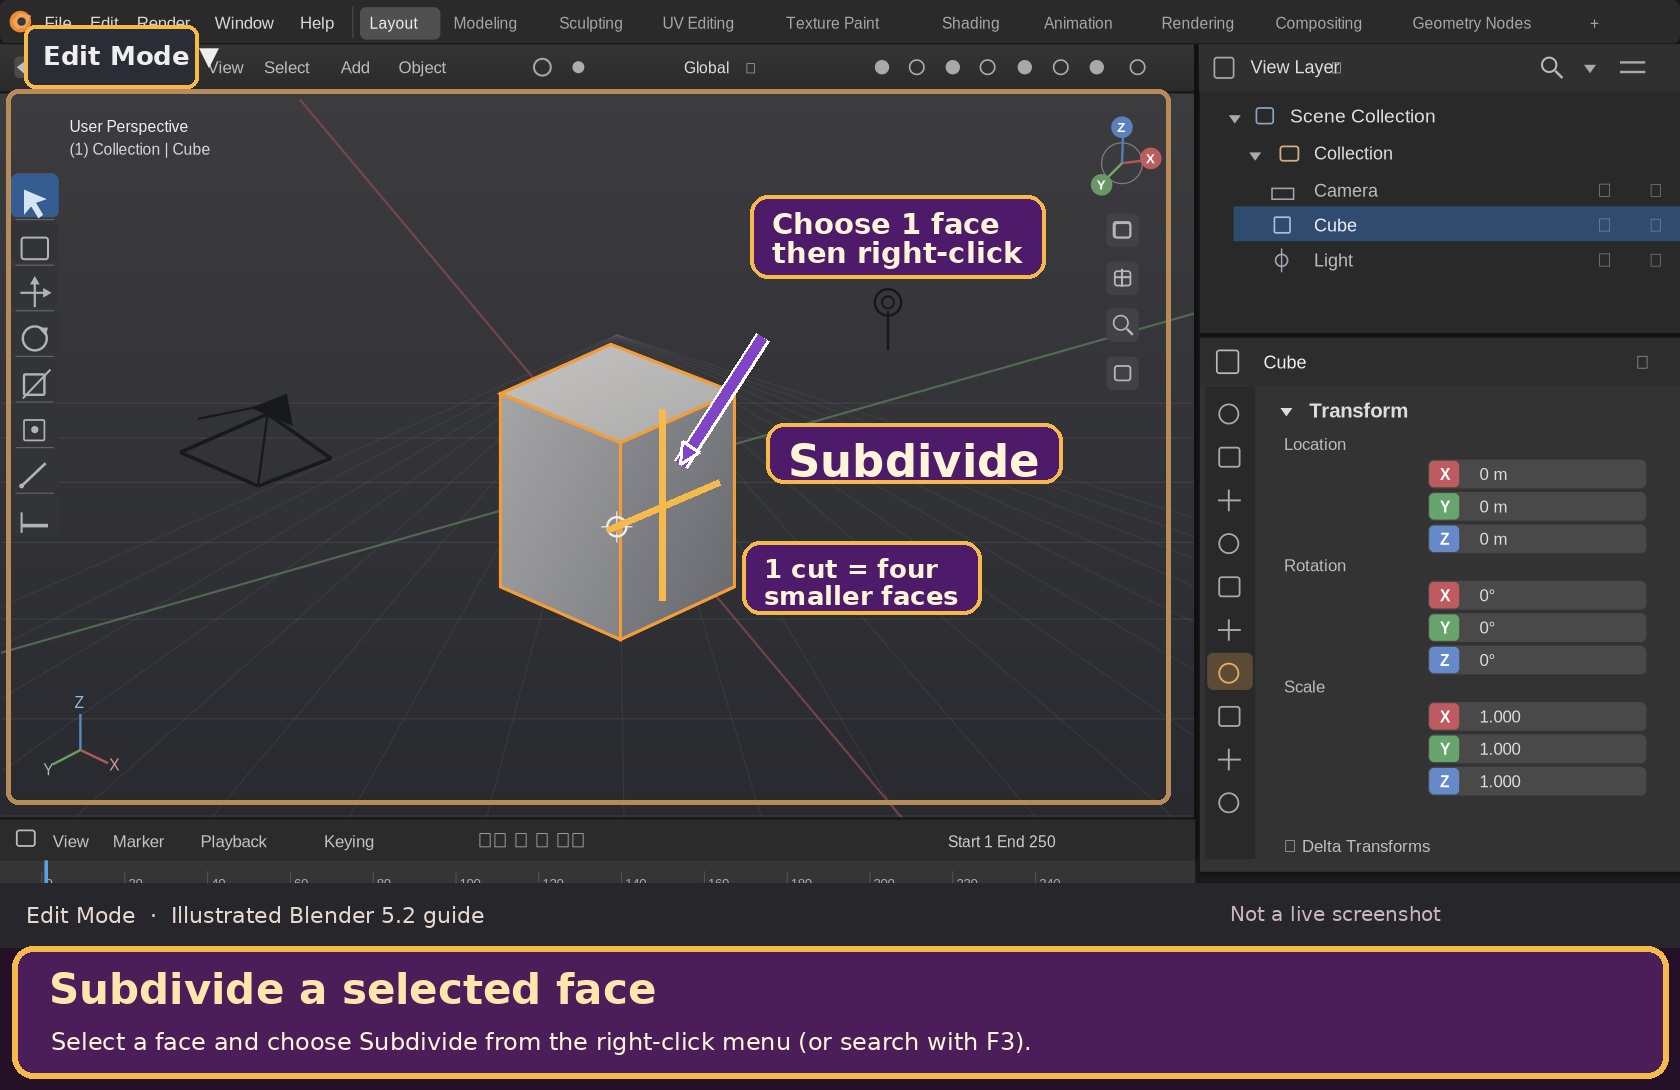
Click one visible face of the default cube to select it.
Right-click inside the 3D Viewport, then choose Subdivide from the menu. (Alternatively, use Edge → Subdivide from the editor menus.)
One big quad face becomes four smaller faces with the usual default of one cut. Try the little tiles with Face Select.
Want more or fewer cuts? Just after subdividing, press F9 to open Adjust Last Operation and change Number of Cuts. Undo with Ctrl + Z to practice again.
Subdivide works on the geometry you select, unlike a loop cut that travels across connected faces.
When do I use which?
Loop Cut: one clean line or set of loops traveling through connected quads. Subdivide: add smaller pieces to the edges and faces you have selected.
Be mindful: Subdividing only one face of a larger mesh may create extra edges that don't continue neatly across its neighbors. That's okay for a first experiment, but plan your topology when modeling important surfaces.
05
YOUR LITTLE WORKSHOP MAKE-ALONG
Create a Cottage Window Wall
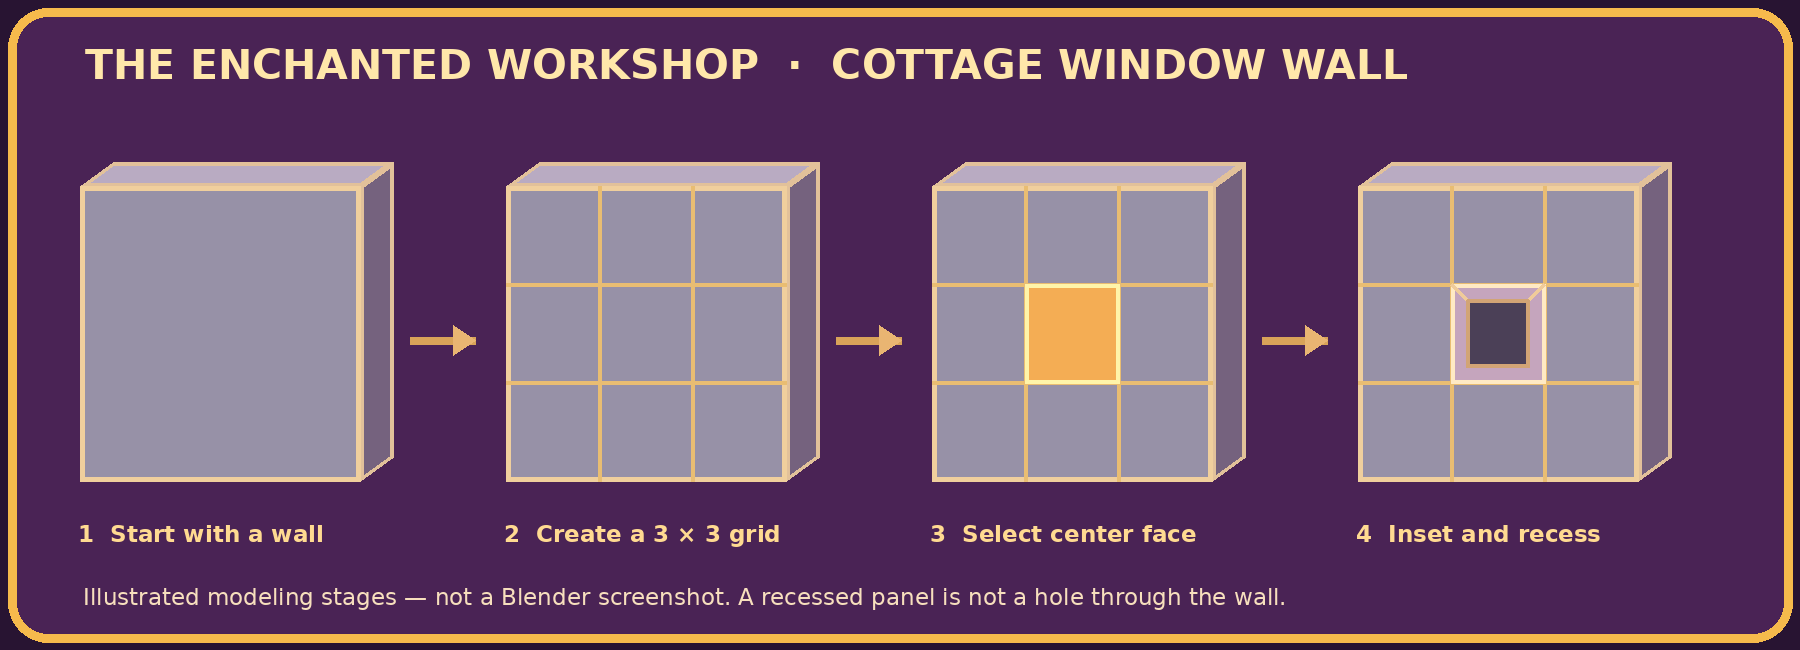
Now we'll combine two vertical loop cuts, two horizontal loop cuts, and a little inset to make a recessed window panel. The cottage illustration on the banner is inspiration; your Blender model will be a simple gray wall until we learn materials.
A simple geometry exercise; this is not an exact Blender screenshot.
A quick visual map of your cottage wall: a flat shape becomes a 3×3 grid, then a framed recess.
Start fresh. Choose File → New → General. Select the cube, press Tab to enter Edit Mode, and press A to select the whole mesh.
Shape a flat wall. Press S, X, 1.5, Enter to widen it. Then S, Y, 0.15, Enter to make it thin; then S, Z, 1.2, Enter to make it taller. You're scaling the mesh in Edit Mode.
Face the wall. Press Numpad 1 for Front View. If you don't have a numpad, use View → Viewpoint → Front.
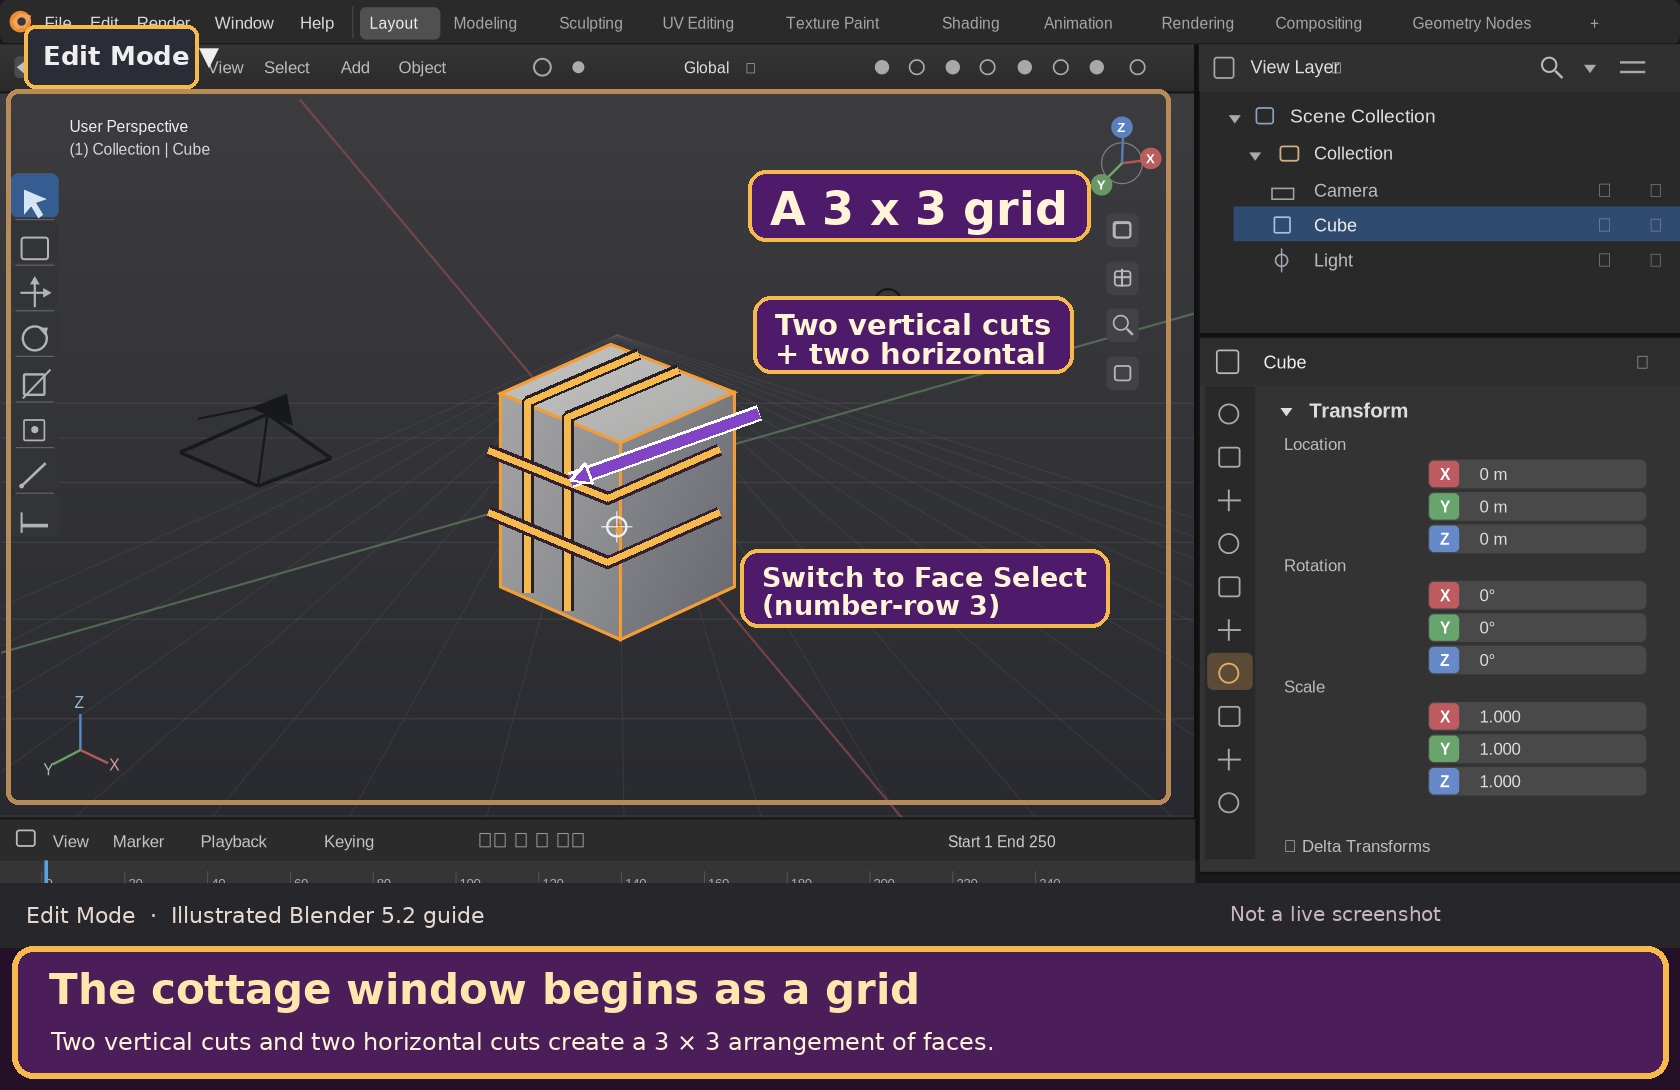
Make three columns. Press Ctrl + R, hover over the top horizontal edge, type 2 for two vertical cuts, then left-click and right-click to center them.
Make three rows. Press Ctrl + R again. Hover over a vertical edge on the front, type 2, then left-click and right-click. You should see a 3 × 3 grid on the front of the wall.
Pick the window. Press number-row 3 for Face Select, press Alt + A to deselect, and left-click the center face of the grid.
Add a window frame. Press I, type 0.12, and press Enter. The inner face remains selected. Press E, type -0.07, and press Enter to push the panel inward a little. This creates a recess, not a see-through hole.
Try a small extra detail. Deselect with Alt + A, then click one of the upper corner faces of the front wall. Right-click and choose Subdivide to split just that face into four smaller tiles. You can undo this optional detail if you prefer a cleaner wall.
Save your work. Press Tab to return to Object Mode, press F2 to rename your object Enchanted Cottage Wall, and press Ctrl + S to save Enchanted Cottage Wall.blend.
The cut grid gives you individual faces to select. Choose the middle one for your window.
✧
Your cottage is starting to take shape!
You've added loops where you needed them, selected one of the new faces, and used it to create a window panel. That's how small modeling decisions become delightful details.
06
A LITTLE HELP FOR TRICKY MOMENTS
Quick Fixes & Gentle Reminders
Ctrl+R isn't doing anything.
Check that you're in Edit Mode, your mouse is over the mesh in the 3D Viewport, and you're hovering over an actual edge. Loop Cut needs a suitable connected path of quad faces.
I can't find the yellow cut preview.
Move your cursor slowly to another edge or orbit the view. The proposed line follows a different direction depending on the edge you hover.
My loop went somewhere strange.
Press Ctrl + Z, then try again. Right-click only after the first click to center the cut. Triangles and N-gons can interrupt a loop.
My Subdivide menu is missing.
Make sure at least one face or edge is selected in Edit Mode. You can also choose Edge → Subdivide or search the command using F3 and type “Subdivide.”
I can't select the center window face.
Use the number-row 3 for Face Select, not Numpad 3. Press Alt + A and then click the center square. Numpad 1 helps you look straight at it.
Should I add lots of cuts everywhere?
Usually not. Extra geometry increases mesh complexity. Start with the fewest cuts that create the detail you need, especially when making assets for OpenSim.