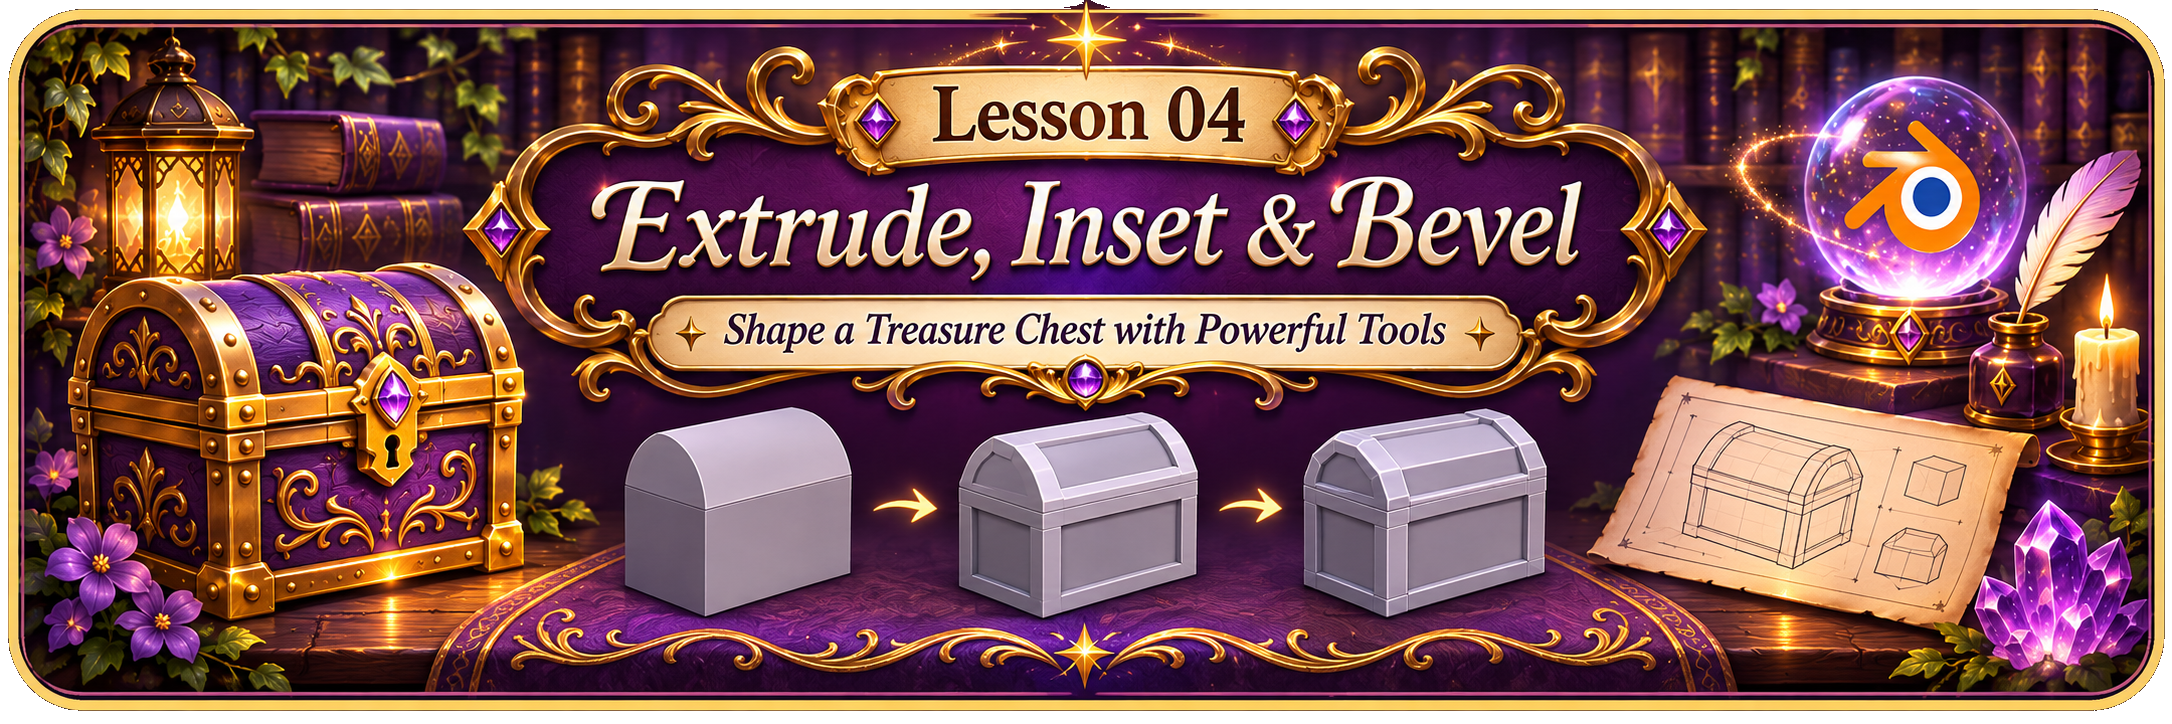
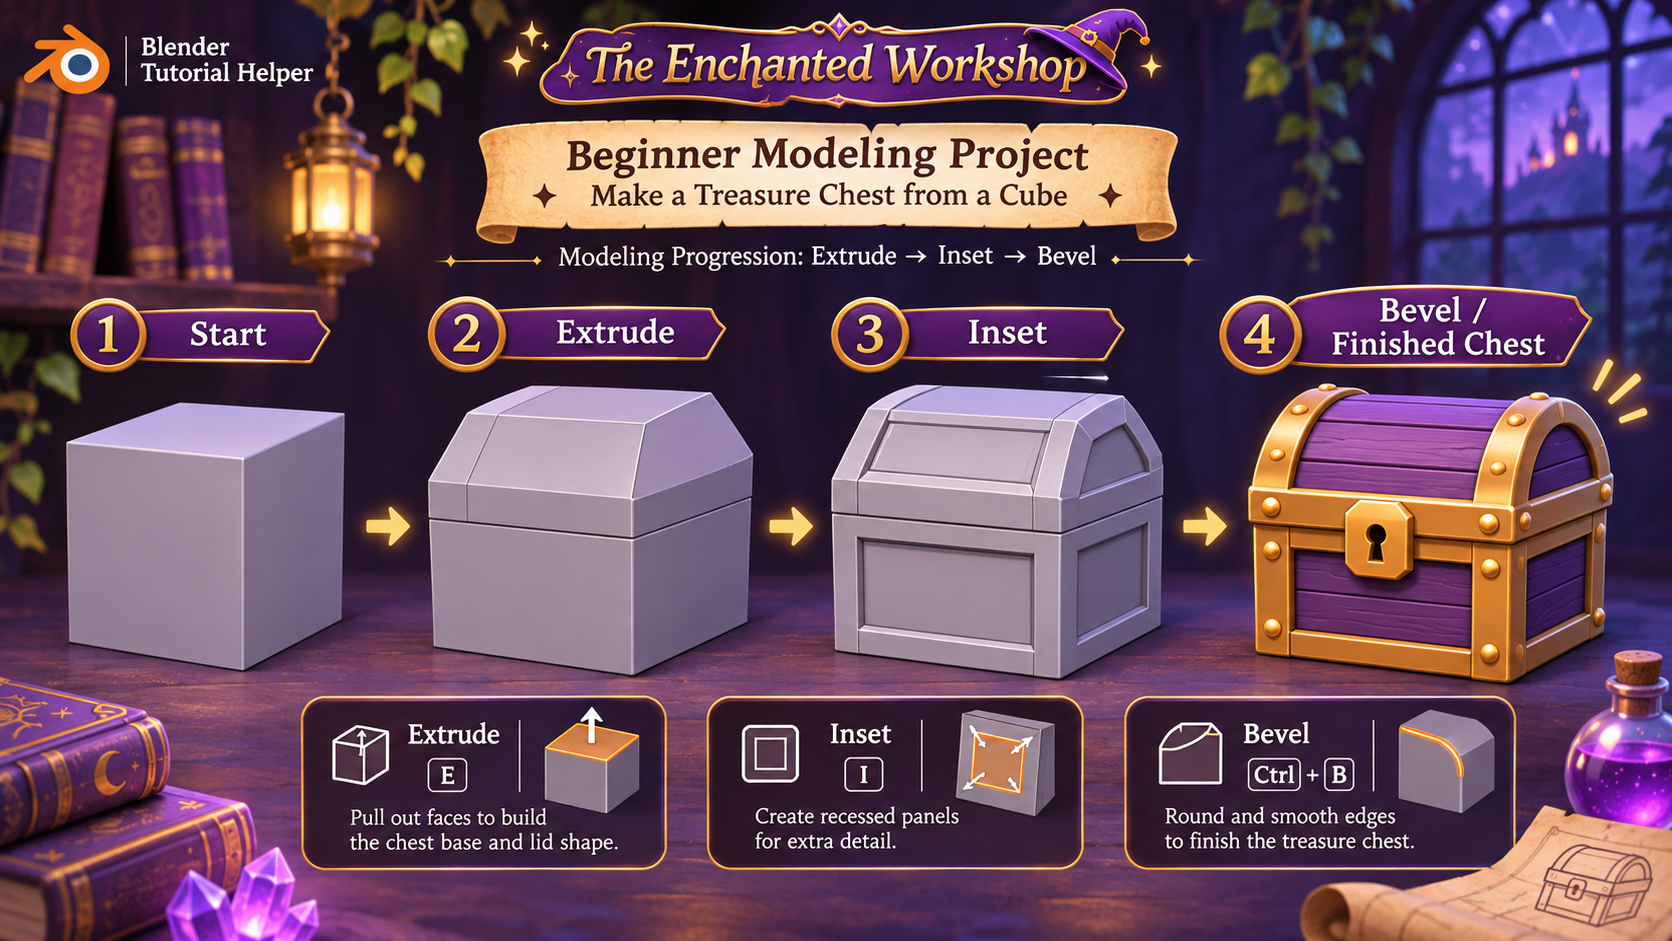
Your first treasure chest awaits! Learn three essential Edit Mode tools, then use them to create a rounded lid, recessed panels, and decorative trim.
Beginner-friendlyAbout 45–60 minutesBlender 5.2
WHAT YOU’LL LEARN
Three essential modeling tools
Use Extrude (E) to add connected geometry
Inset (I) faces to make decorative panels
Bevel (Ctrl+B) edges into a rounded lid
Add separate trim pieces and a front clasp
Blender 5.2, the default cube, and a little patience. We’ll model the chest in gray first; the shiny purple-and-gold finish is optional and comes later.
Just Blender and a cube
Blender 5.2 with the default General scene. We’ll work in Edit Mode—no special add-ons needed.
✦
START HERE
A little preparation
Open Blender 5.2, then choose File → New → General. We'll use the default cube. This lesson builds on Lesson 02 (Object & Edit Mode) and Lesson 03 (Move, Rotate & Scale).
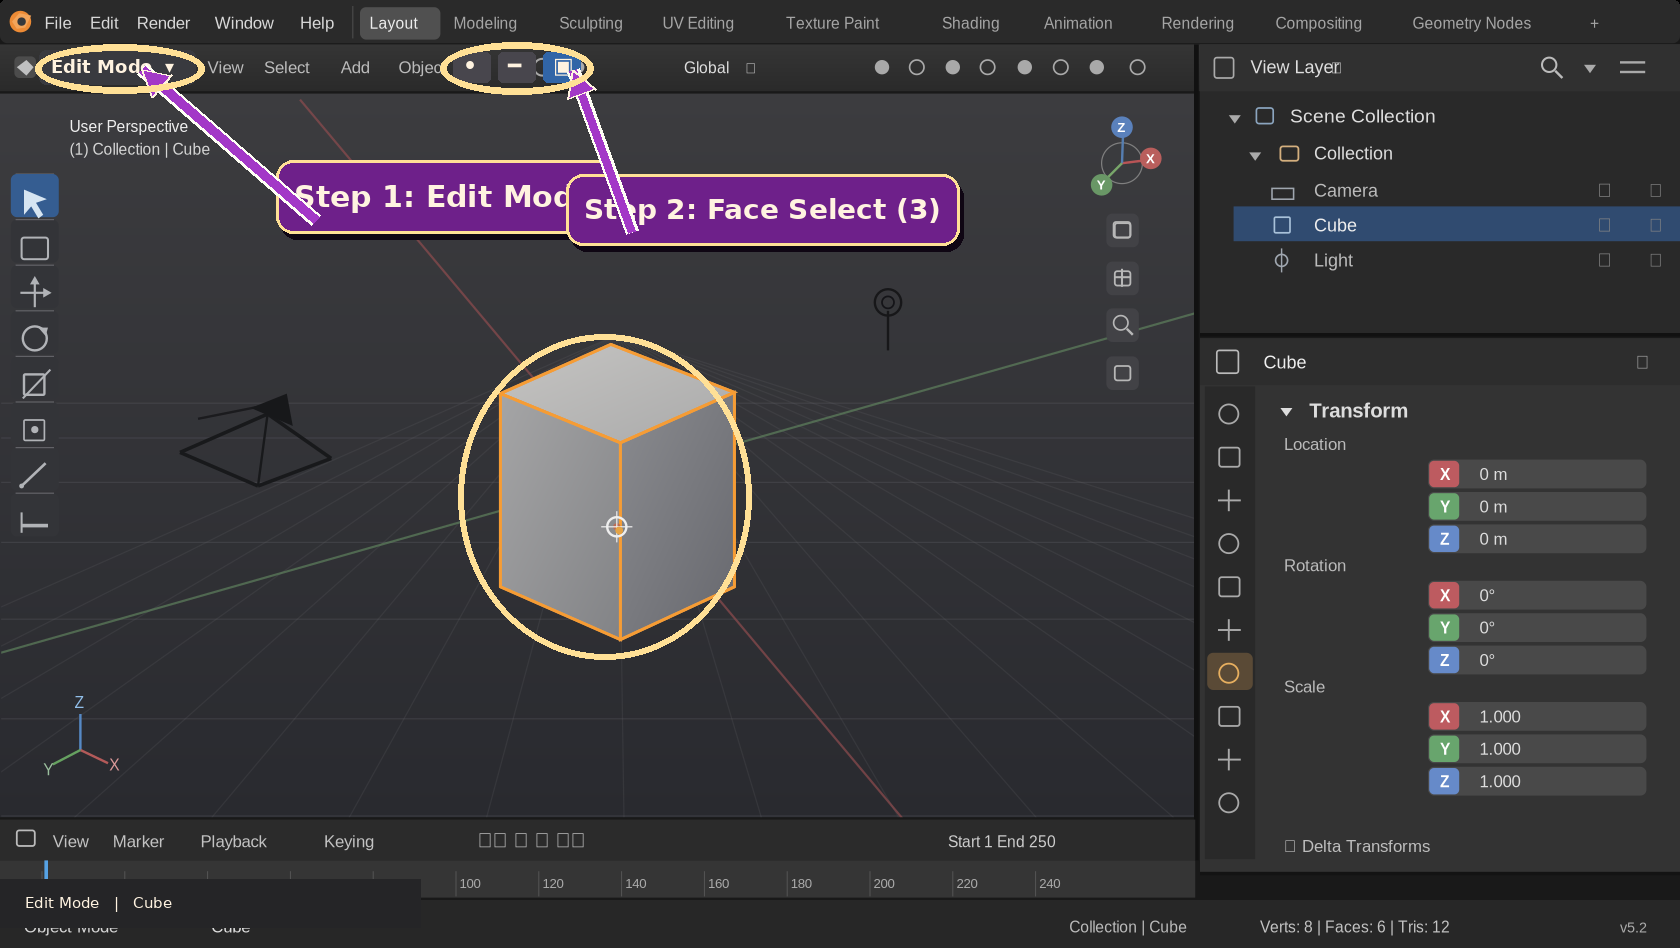
All three of today's shortcuts work on the mesh in Edit Mode. Click the cube, hover over the 3D Viewport, and press Tab to enter Edit Mode. Press 3 on the number row to enable Face Select.
Little reminder: Blender uses a separate set of numpad keys for changing views. When we write 3 for Face Select, we mean the number above the letters, not Numpad 3.
✦
KEEP THIS HANDY
Your modeling shortcut spellbook
E
Extrude
Pull a selected face outward to make more shape.
I
Inset
Create a neat smaller face within a selected face.
Ctrl + B
Bevel
Cut or soften selected sharp edges.
01
THREE NEW MODELING SPELLS
Meet E, I & Ctrl+B
These tools create new geometry. Unlike moving or resizing an entire object, you're adding and shaping the actual parts of the mesh.
E Extrude
Pull out new geometry from a selected face, edge, or vertex.
I Inset
Create a smaller face with a neat border around it.
Ctrl + B Bevel
Trim sharp edges into small chamfers or smooth curves.
Simple teaching drawings show the idea; your Blender viewport will look more technical.
Look here first: Choose Edit Mode and Face Select before using E or I. The 3 shortcut is the number row, not the numpad.
Shortcut spellbook:E = Extrude · I = Inset · Ctrl + B = Bevel. These are Edit Mode tools—make sure the right mesh elements are selected first!
02
GROW A NEW SHAPE
Extrude · Press E
Extrude creates new connected faces as you pull a selected face outward. It's how we turn a flat section into a ledge, lid, step, panel, or branch.
Select the cube in Object Mode, press Tab, then press 3 to enter Face Select.
Press Alt + A to deselect, rotate your view to see the top, and left-click the top face.
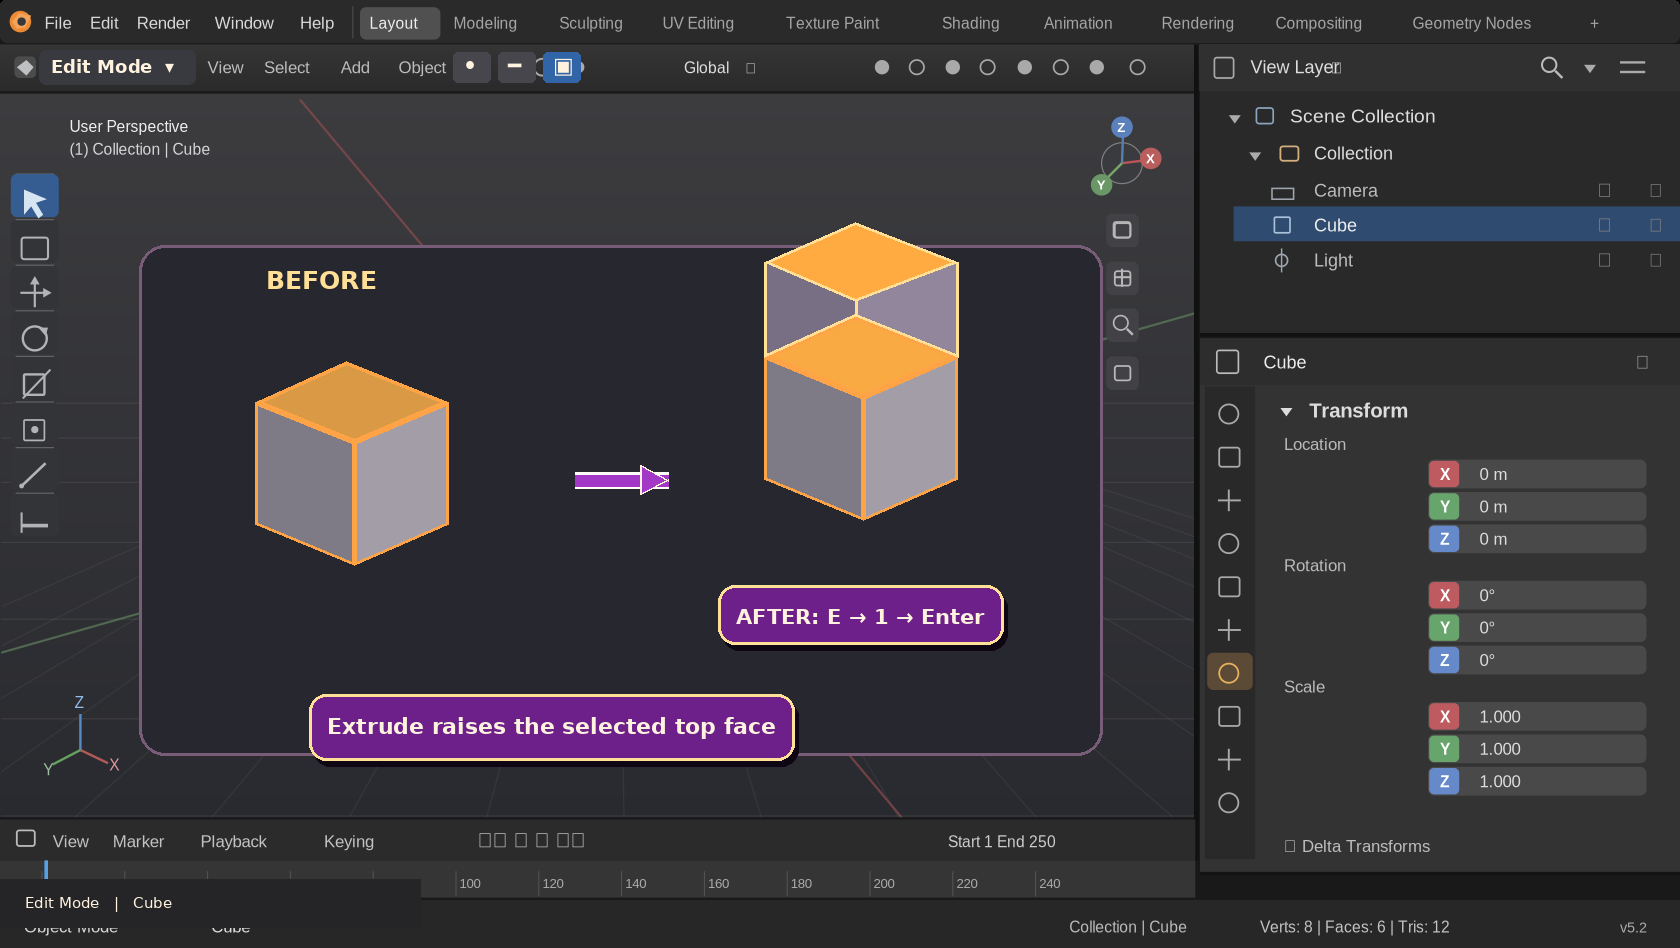
Press E, type 1, then press Enter. The top face rises by 1 Blender unit, while new side faces connect it to the cube.
Press Ctrl + Z to undo that practice extrusion, so we can start fresh for the next tool.
TRY THIS SEQUENCE
E→1→Enter
The top face grows upward while staying part of the same mesh.
Extrude: The selected top face moves upward and new faces connect it to the original cube. This is a teaching illustration.
Important! After pressing E, pressing Esc cancels the movement but can leave the new extrusion in place. If you change your mind, use Ctrl + Z to undo it completely. That prevents overlapping faces.
03
MAKE ROOM FOR DETAIL
Inset · Press I
Inset gives a selected face an interior border. It is perfect for windows, door panels, decorative trim, and decorative chest panels.
Still in Edit Mode and Face Select, press Alt + A and select the cube's top face again.
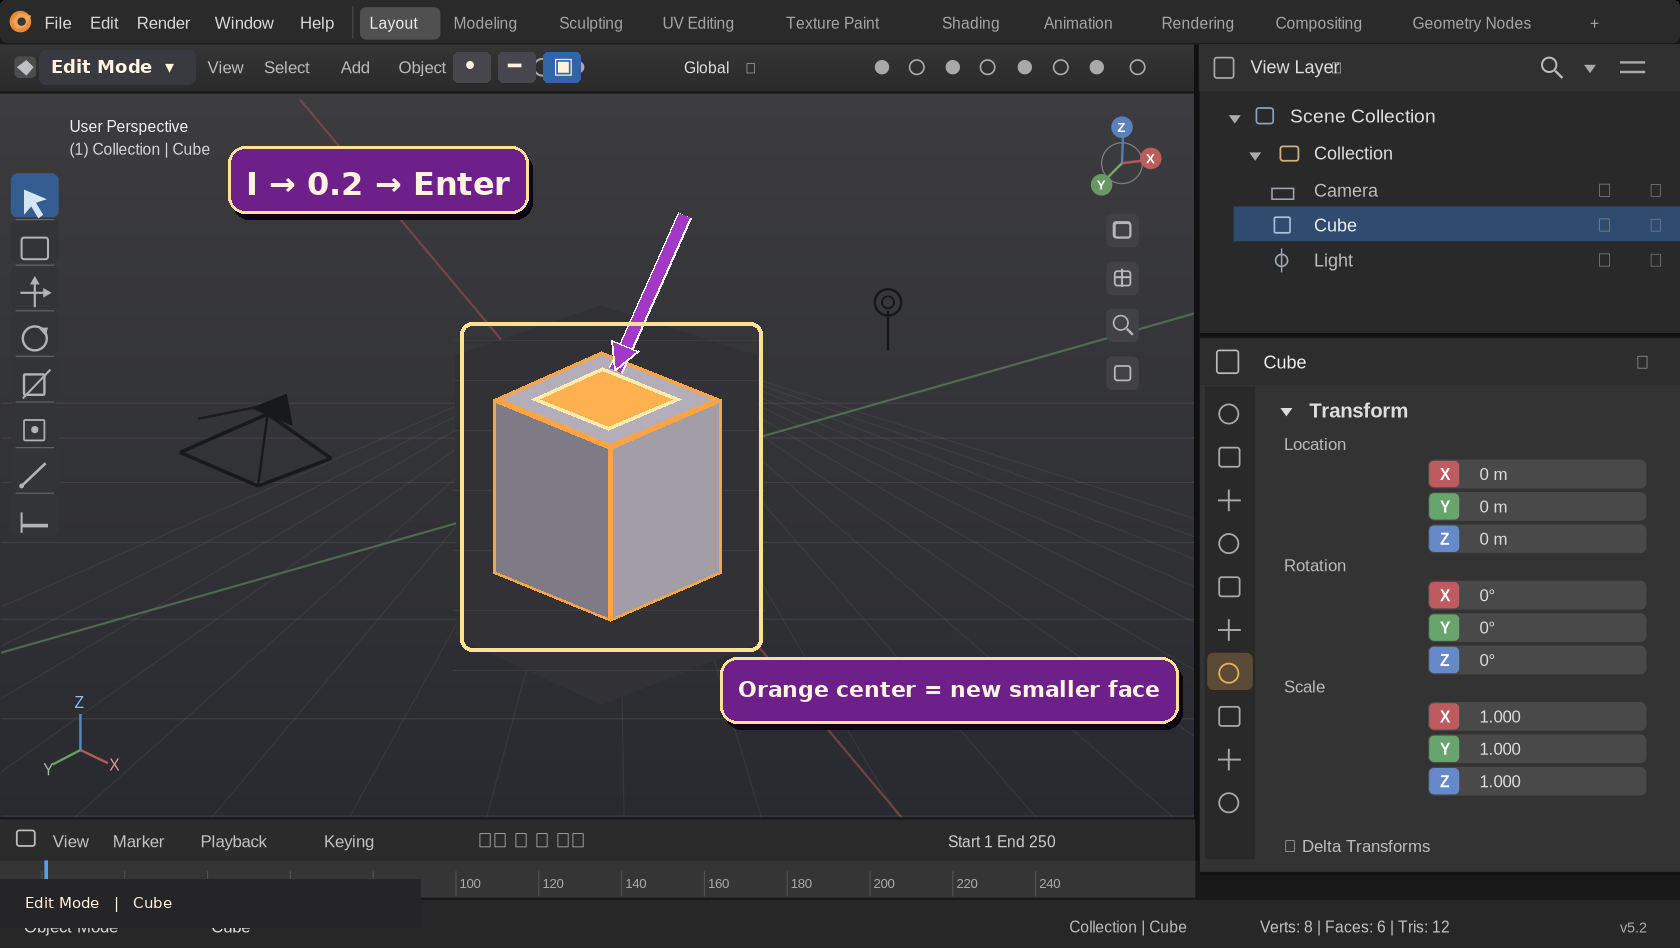
Press I, type 0.2, then press Enter.
Look closely: the new smaller face is selected in the middle, with a border around it. No extra object has been created.
Press Ctrl + Z to undo your practice inset before trying Bevel.
TRY THIS SEQUENCE
I→0.2→Enter
A narrow new frame surrounds the smaller face.
Inset: Look for the new orange inner face and the outline around it. No separate object was created.
Extra bit of magic: You can Inset, then Extrude inward to make a recessed panel. That combination is the secret behind the recessed chest panels in our project below!
04
SOFTEN THE CORNERS
Bevel · Press Ctrl+B
A tiny bevel catches light and makes a hard-edged cube feel less blocky. In Edit Mode, Bevel works on selected edges and corners.
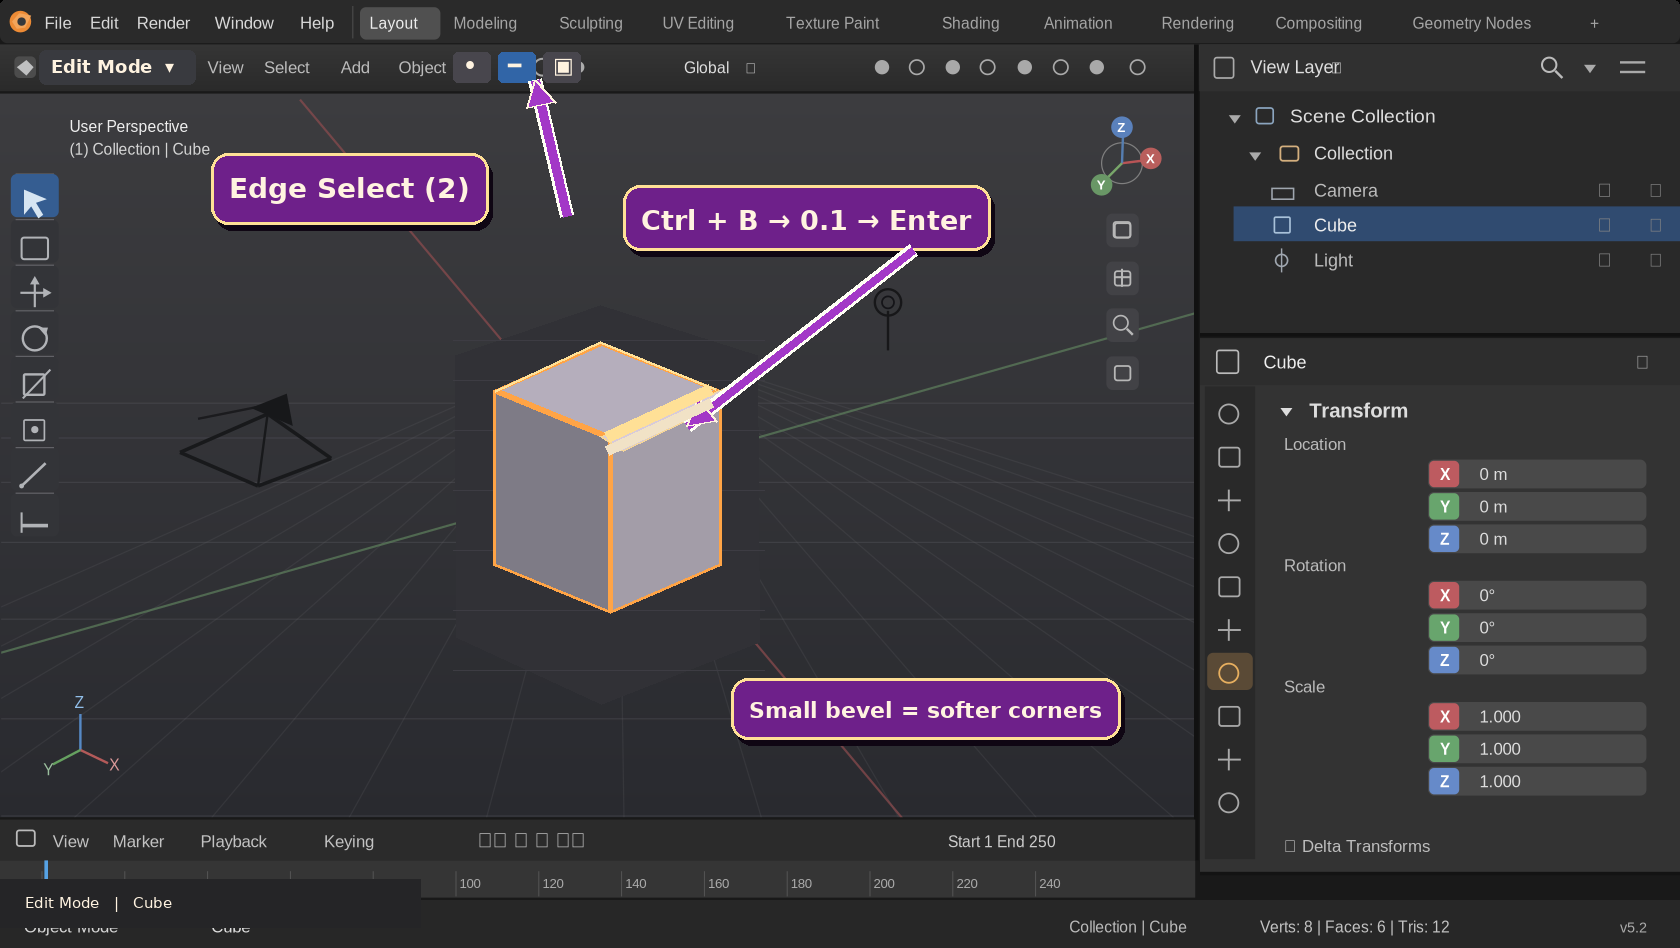
Press 2 on the number row to switch to Edge Select, then press A to select all the cube's edges.
Press Ctrl + B, type 0.1, then press Enter.
The cube's sharp edges become small flat chamfers. Use the mouse wheel while Bevel is active to increase the number of segments if you want a rounder effect.
Press Ctrl + Z to undo the practice bevel. We're ready for the actual chest!
TRY THIS SEQUENCE
Ctrl+B→0.1→Enter
Start small: a very large bevel can overlap nearby details or get clamped.
Bevel: Switch to Edge Select (2) before beveling the cube’s edges. Start with a very small amount.
What's a segment? One segment creates a cut-off corner; multiple segments produce a smoother curve. Keep your first bevel simple—detail can always come later.
05
YOUR MINI MAKE-ALONG
Build Your Own Treasure Chest
We're making a rounded-lid treasure chest inspired by our Lesson 04 artwork. The body, lid, metal-like trim, and lock plate will be separate objects so they're easier to position and color. Every step uses beginner modeling tools you've already met.
Our treasure-chest inspiration. We'll make its basic shape and decorations in Blender; the purple textures, gold materials, ornate filigree, and working hinge are optional finishing touches for later lessons. This is an illustrated goal, not a Blender screenshot.
AMake the bodyResize, inset and bevel
BRound the lidBevel two long top edges
CAdd detailsTrim and clasp
DFinish itColor and save
✦ Part A · Make the chest body
Start clean. Choose File → New → General and click the default cube. Put your mouse inside the 3D Viewport and press Tab for Edit Mode. Press A so all the cube's geometry is selected.
Shape a wide, low box. With the whole cube selected, type these key sequences one at a time. Press Enter after each value:
SX1.4
SY0.85
SZ0.6
GZ0.6
Your cube is now wider than it is tall, and its bottom rests near the ground grid. These numbers assume Blender's default 2-unit cube.
Carve the front panel. Press the number-row 3 for Face Select, then Alt + A to deselect. Orbit so you can click the big front face. Press I, type 0.15, Enter. With that smaller inner face still selected, press E, type -0.07, Enter. The negative value pushes the panel slightly inward, not through the chest.
Add an optional side panel. Orbit to either side, select its big face and repeat I → 0.12 → Enter; then E → -0.05 → Enter. For a tiny polish, press number-row 2 for Edge Select, press A, Ctrl + B, type 0.02, Enter. Keep this bevel small so the inset corners stay neat.
Where are we? We now have the lower chest body. We haven't made the lid yet. Press Tab to return to Object Mode, select the box, press F2 and name it Chest Body.
✦ Part B · Make a softly rounded lid
Add a second cube. In Object Mode, press Shift + A → Mesh → Cube. Name it Chest Lid with F2. Press Tab for Edit Mode and A to select all. One by one, use:
SX1.5
SY0.94
SZ0.32
GZ1.5
Press Enter after each number. The lid should sit just over the chest body, with a tiny overhang along its sides.
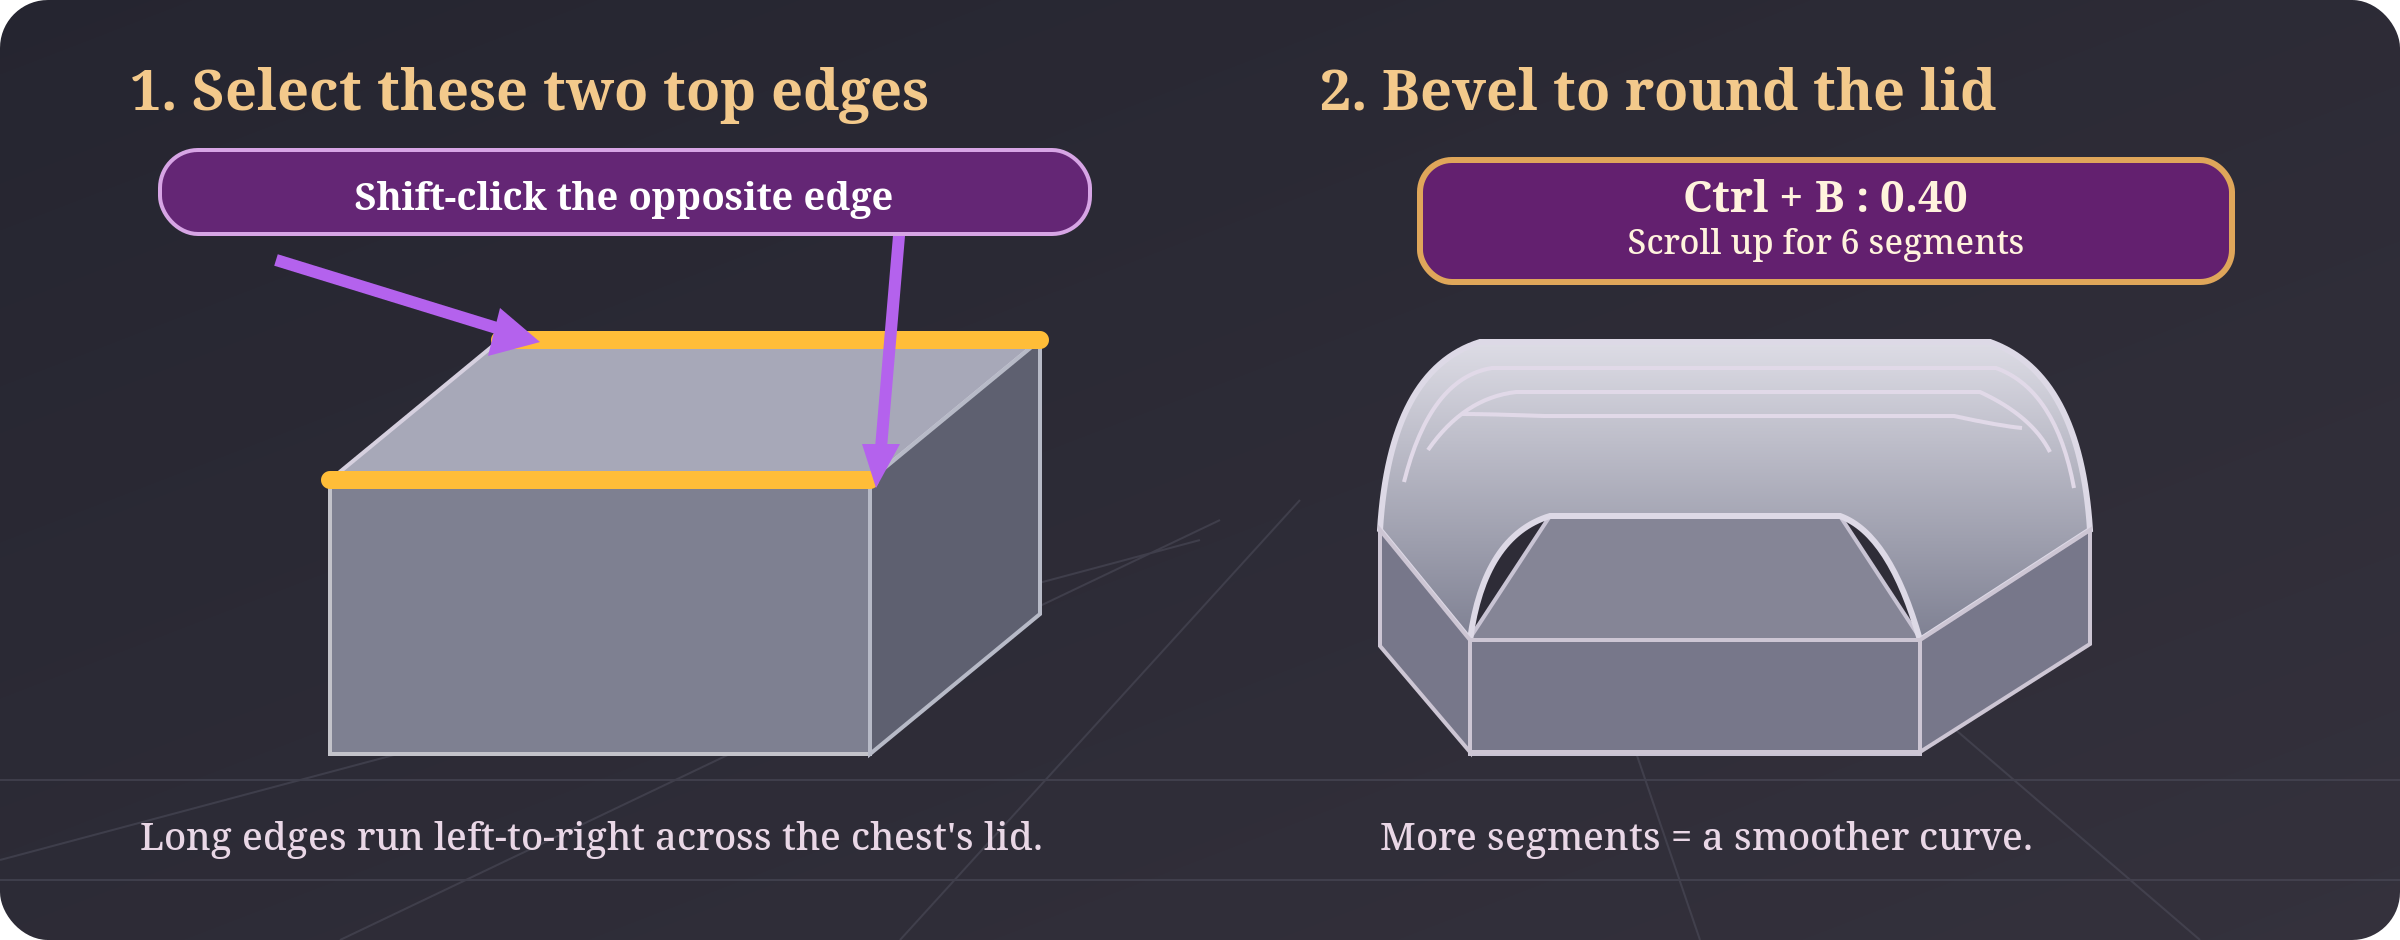
Select the two long top edges. Press the number-row 2 for Edge Select and Alt + A to deselect everything. Click the long top-front edge of the lid. Hold Shift while clicking the matching long top-back edge. Orbit first if the back edge is difficult to see. Only these two edges should be orange.Click both highlighted long edges, then bevel them together to round the roof. This diagram is a guide to the selection, not a literal screenshot.
Round the shoulders of the lid. Press Ctrl + B and type 0.4. Before confirming, scroll the mouse wheel upward to increase the bevel to roughly 6 segments, then left-click or press Enter. You'll get a curved lid shape with a flatter center. If Blender clamps the bevel too much, undo and try 0.3 instead.
Give the lid one inset detail. Press number-row 3 for Face Select, then Alt + A to deselect. Select the remaining flat face on the very top of the lid (not a curved side segment). Press I, type 0.10, Enter; then E, type -0.025, Enter. Press Tab to return to Object Mode.
Why does the lid look rounded? Bevel with several segments creates extra little faces between the original top and side surfaces. They form a gentle curve. The lid is a separate object; it isn't animated or hinged yet.
✦ Part C · Add front trim and a little lock plate
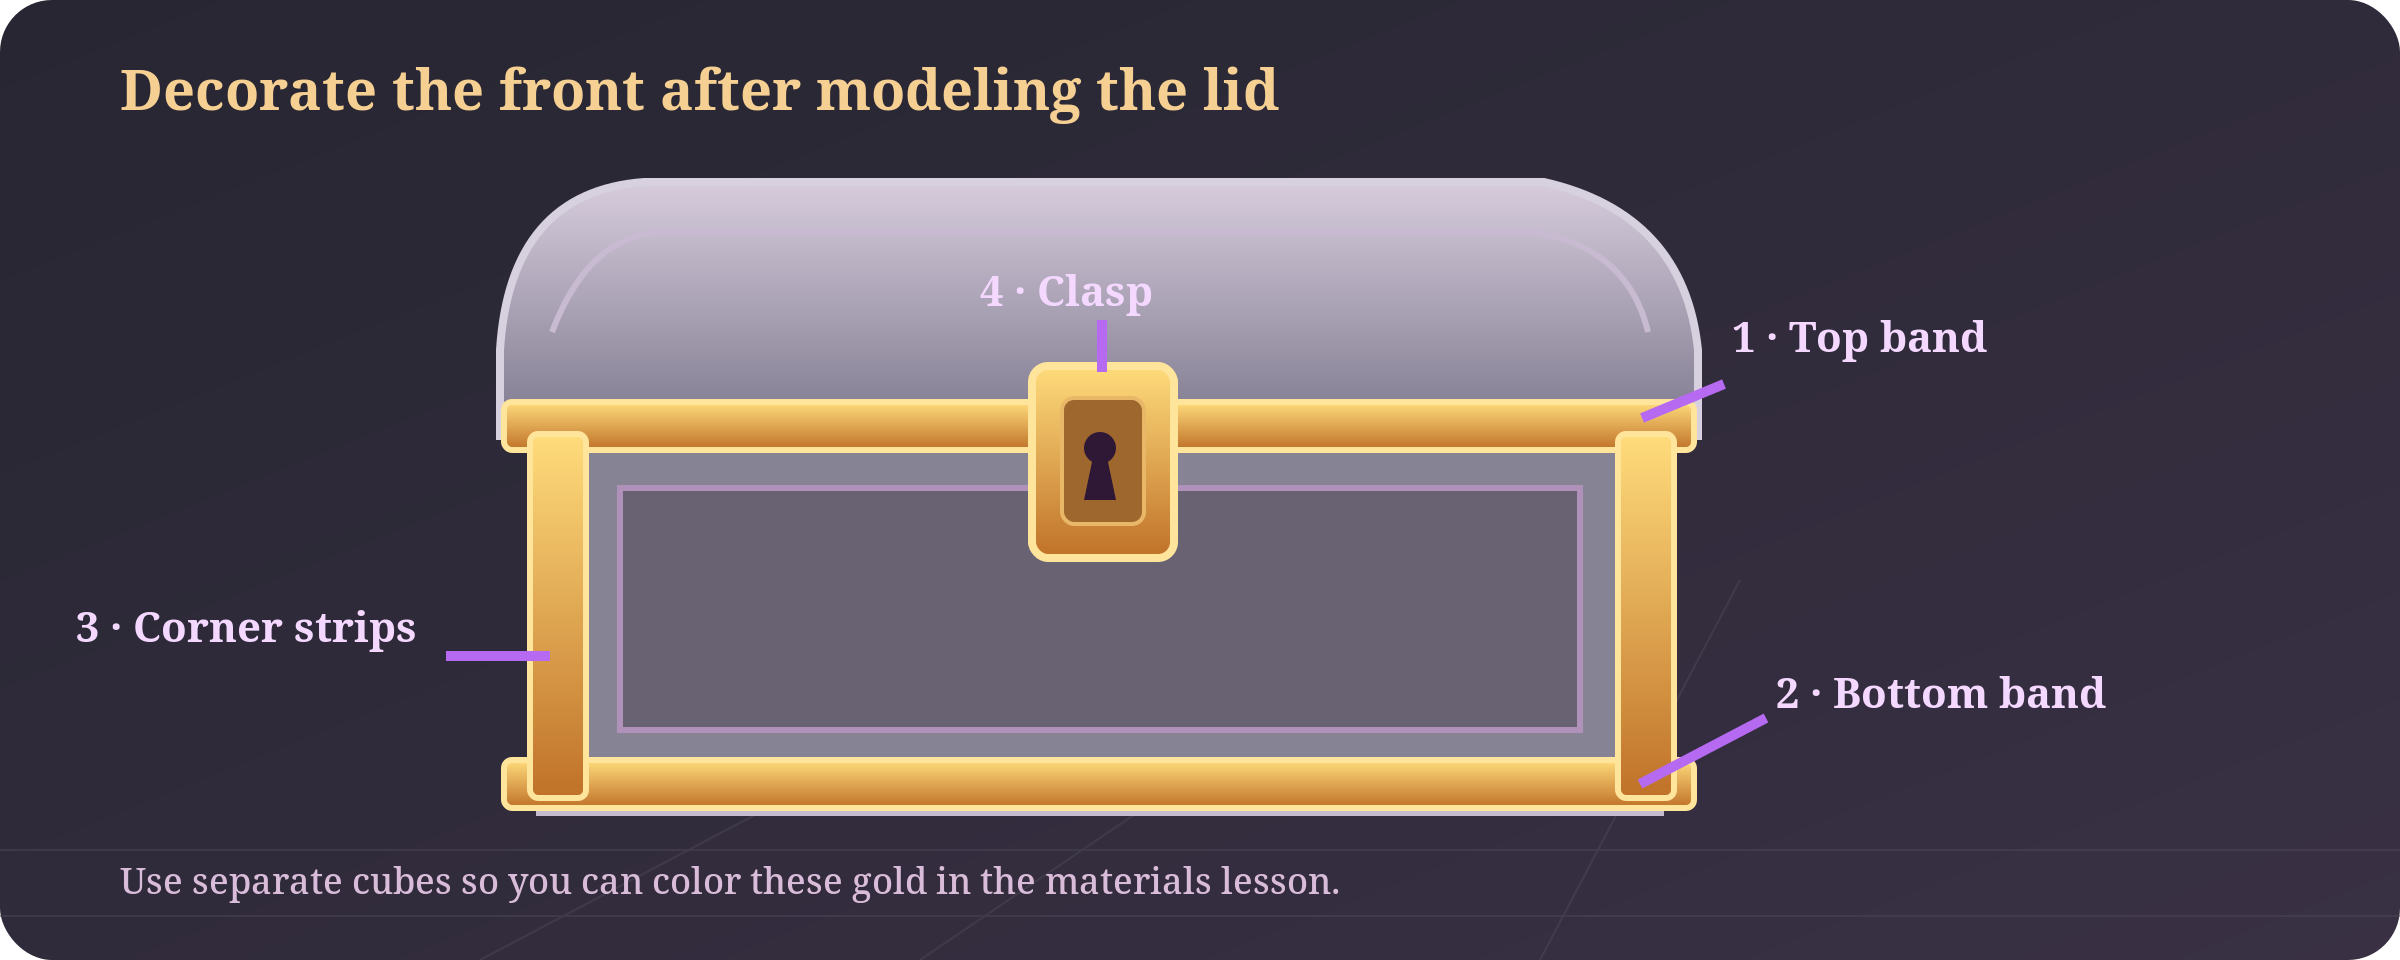
Front-view decoration plan. Each band and clasp starts as an ordinary cube. The gold colors are shown here to make the pieces easier to identify.
Create the upper front trim band. In Object Mode, press Shift + A → Mesh → Cube, then Tab for Edit Mode and A. With each sequence, type the number and press Enter:
SX1.5
SY0.065
SZ0.065
GY-0.90
GZ1.14
Press Tab for Object Mode and F2 to name it Upper Trim. The thin bar should sit across the top front of the chest body. If you're looking from the wrong side, use Numpad 1 for Front View.
Duplicate the bottom band. With Upper Trim selected, press Shift + D, then Z, type -1.02, Enter. Rename the copy Lower Trim. It should appear close to the bottom of the chest.
Add matching corner strips. In Object Mode add another cube. Press Tab, A, then scale it with SX0.07; SY0.07; SZ0.56. Move it using GX-1.28, GY-0.91, and GZ0.6 (confirm each). Leave Edit Mode, rename it Left Corner Trim. Then press Shift + D, X, 2.56, Enter for the right-hand strip. You should see two vertical lines of trim framing the front panel.
Make the front clasp. Add one more cube in Object Mode. Press Tab, A, then use SX0.22, SY0.08, SZ0.22, GY-1.00, and GZ1.16. Confirm each value. The little plate should overlap the seam between chest and lid. For a recessed lock detail, switch to Face Select, click its visible front face, I → 0.05 → Enter, then E → -0.02 → Enter. Press Tab and name the object Chest Clasp.
Optional extra sparkle: If you want two bands on top of the curved lid like the reference artwork, you can add them as separate decorative pieces later. Making bands wrap perfectly around a curved lid takes a little more geometry; we don't need to learn that just to finish this beginner project.
✦ Part D · Finish your creation
Make it purple and gold (optional). In Object Mode, select Chest Body, open the Material Properties tab (the red-checkered sphere icon), click New and change Base Color to a rich plum. Do the same for Chest Lid. For the trim and clasp, create gold-colored materials. Switch the viewport to Material Preview to see the colors. We'll teach materials in detail in Lesson 07.
Save your treasure chest. Press Ctrl + S, choose a folder and save as My Treasure Chest.blend. Well done—you've made a recognizable rounded chest from basic shapes. The ornate gold filigree, sculpted keyhole, hinges, and special textures in the banner are inspiration for later, not required for this lesson.
What did we practice?Extrude created the inset panel recesses; Inset added clean borders; Bevel rounded the lid and softened the edges. We used separate objects for trim and the clasp so they're easy to edit or color later.
✧
Your first magical treasure chest is complete!
You've made the chest body, curved lid, recessed panels, trim, and clasp. Now that you can create those forms, the next lessons will give you more ways to refine them.
06
EVERY MAKER LEARNS BY TRYING
A Few Quick Fixes
E, I, or Ctrl+B didn't work.
Make sure you are in Edit Mode with the mesh selected and your mouse over the 3D Viewport. For the first two, select a face; for bevel, select edges.
My cube moved instead of growing.
You may have pressed G instead of E, or used Object Mode. Press Ctrl + Z, return to Edit Mode, and select the face again.
I see a strange line or shading.
If you canceled Extrude with Esc, it may have left overlapping geometry. Undo the extrusion with Ctrl + Z rather than simply moving it back.
Bevel barely changed my chest.
A 0.03 to 0.04 bevel is intentionally subtle. Zoom in to look at the edges. Use a slightly larger value on a copy if you want a softer lid shape, and undo if the geometry pinches.