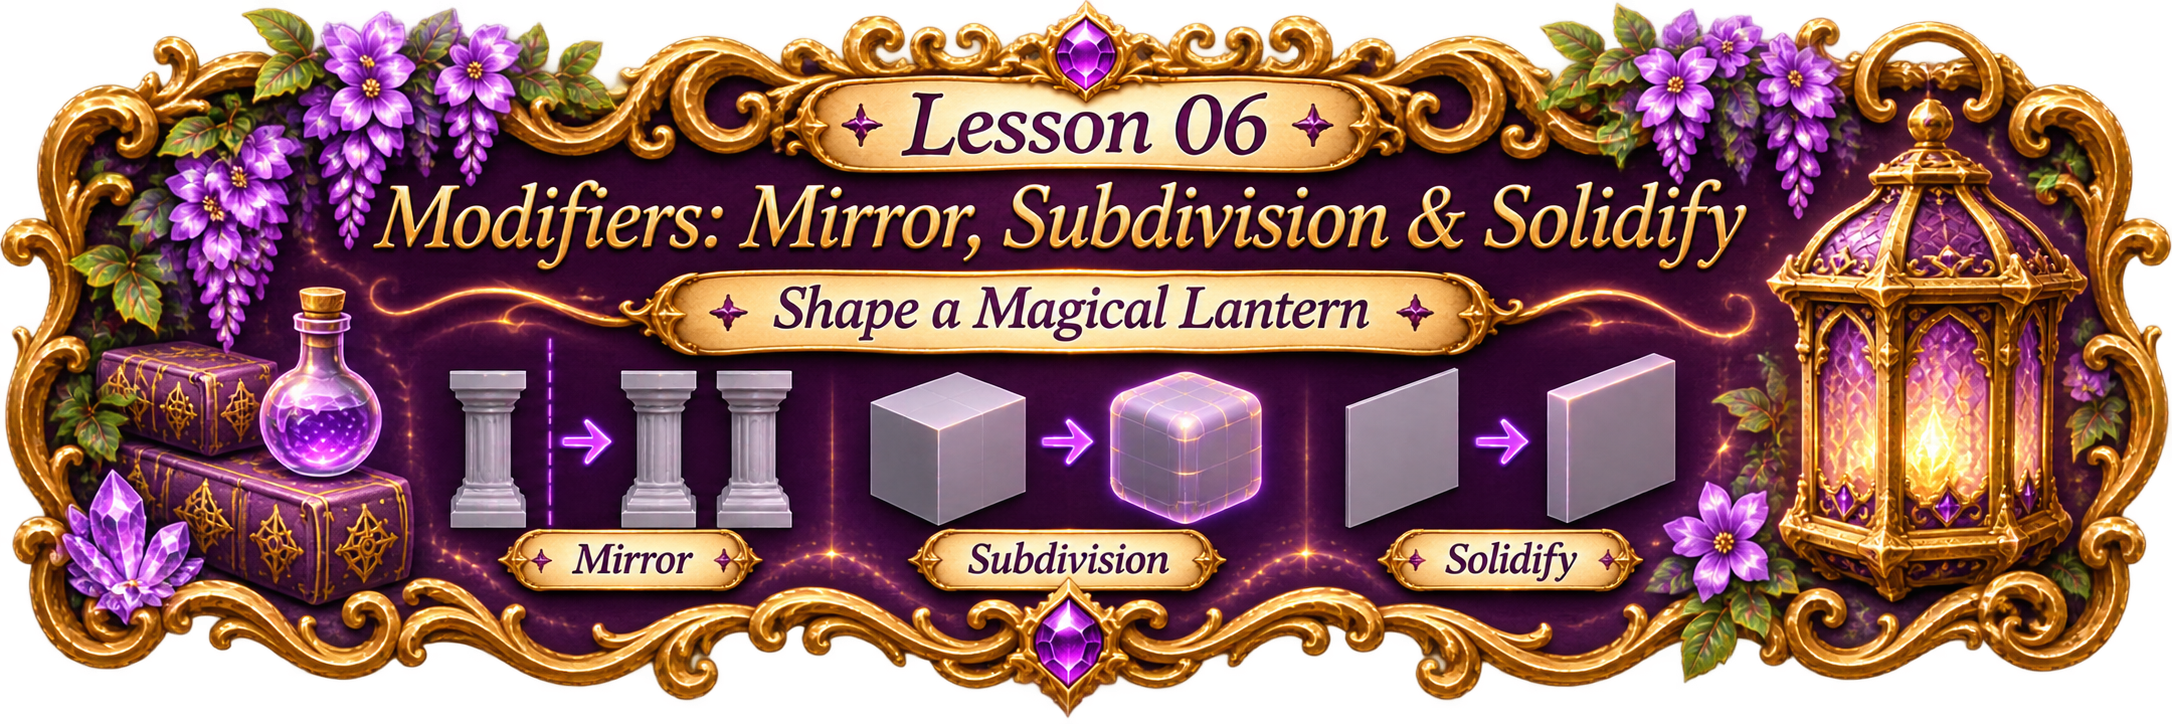
Three wonderfully useful helpers! Create perfect matching shapes, soften hard edges and give flat surfaces real thickness—without losing your original mesh.
Beginner-friendlyAbout 35–45 minutesBlender 5.2
WHAT YOU'LL LEARN
Your next three modeling helpers
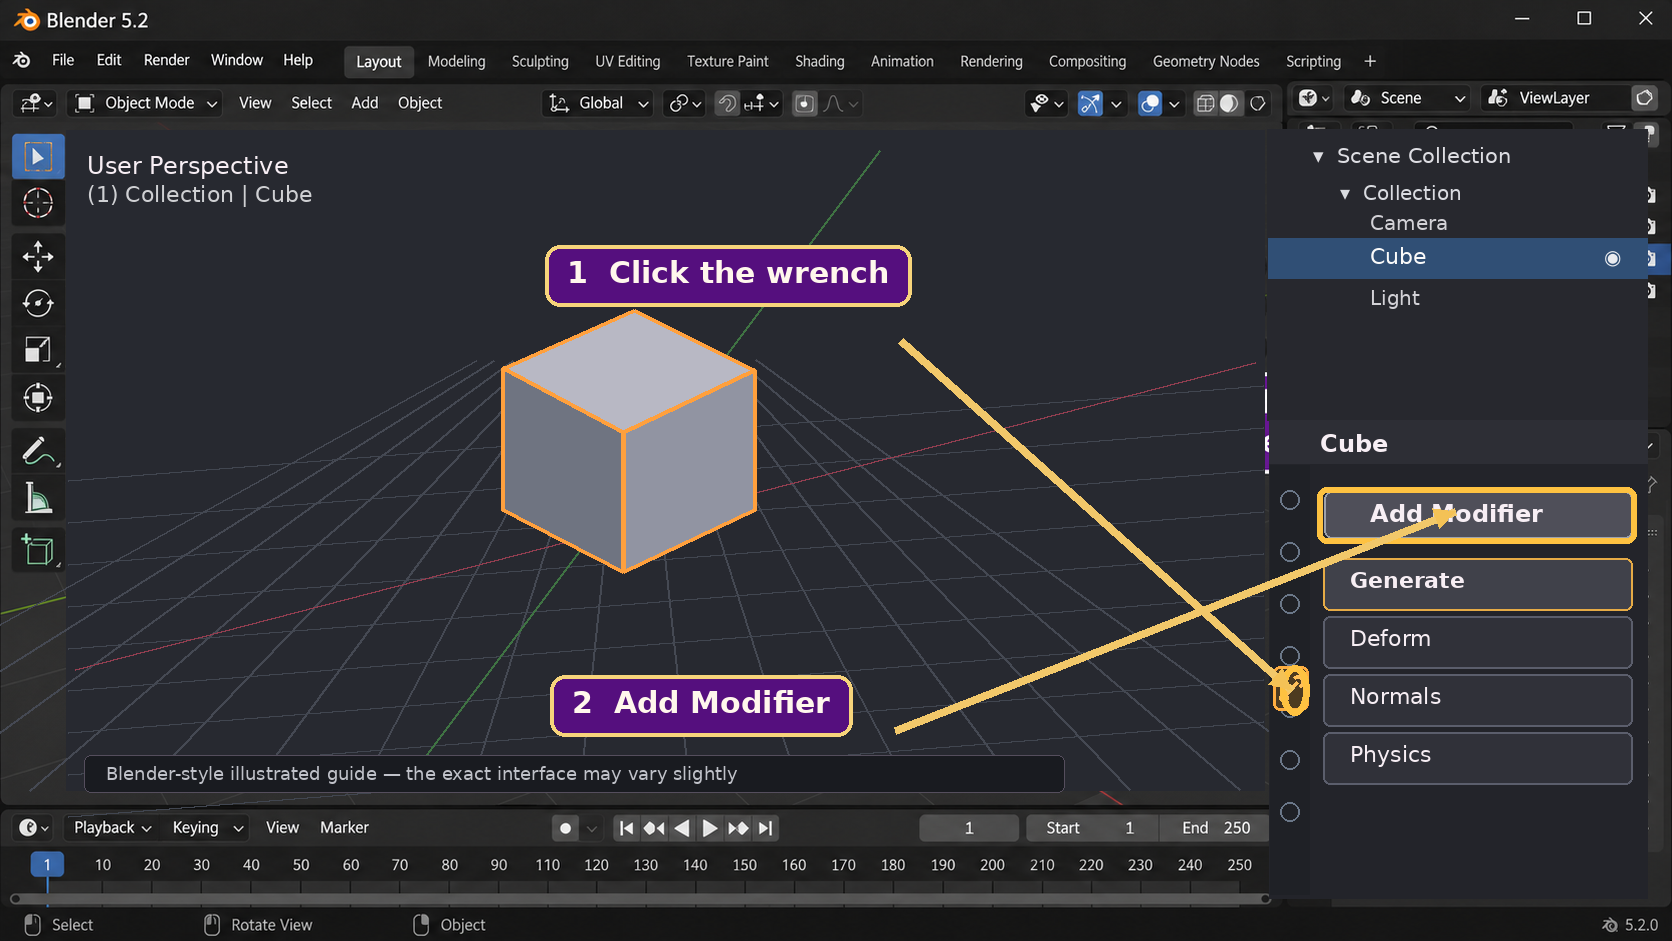
Find the Modifier Properties wrench and Add Modifier menu
Mirror a lantern post across the object's origin
Smooth a crystal with Subdivision Surface
Give a flat panel thickness with Solidify
YOU ONLY NEED
Blender and the default cube
Start from Blender 5.2 → New File → General. We'll work between Object Mode and Edit Mode, then assemble a small lantern frame.
✦
START HERE
Before We Begin
Open Blender 5.2 and choose File → New → General. Keep the default cube. We'll build on Lesson 02 (Object and Edit Mode), Lesson 03 (Move, Rotate and Scale), and Lesson 05 (Adding Geometry).
Our project is a magical lantern frame. We'll make two matching posts from one mesh, round a little crystal, and give thickness to a decorative panel. It will still be gray for now; we'll add materials in Lesson 07!
Workshop wisdom: A modifier is a live effect. You can change or hide it without immediately changing the original mesh.
✦
KEEP THIS HANDY
Your modifier spellbook
X
Mirror
Reflect the source geometry across the object's origin. Keep the X axis enabled for our lantern posts.
2
Subdivision
Use Viewport level 2 to see a smoother crystal, then lower it if Blender slows down.
0.10 m
Solidify
Give the lantern panel gentle thickness and use Offset 0 for centered depth.
01
MAGIC THAT YOU CAN CHANGE LATER
What Is a Modifier?
A modifier changes how your object looks or is generated, usually without immediately changing the editable base mesh. Find the Modifier Properties tab in the Properties editor on the right side of Blender. Its symbol is a wrench.
Click the cube in Object Mode. Look for the Properties editor on the right.
Choose the wrench icon to open Modifier Properties.
Click Add Modifier and choose an option. Mirror, Subdivision Surface and Solidify are found in the Generate category.
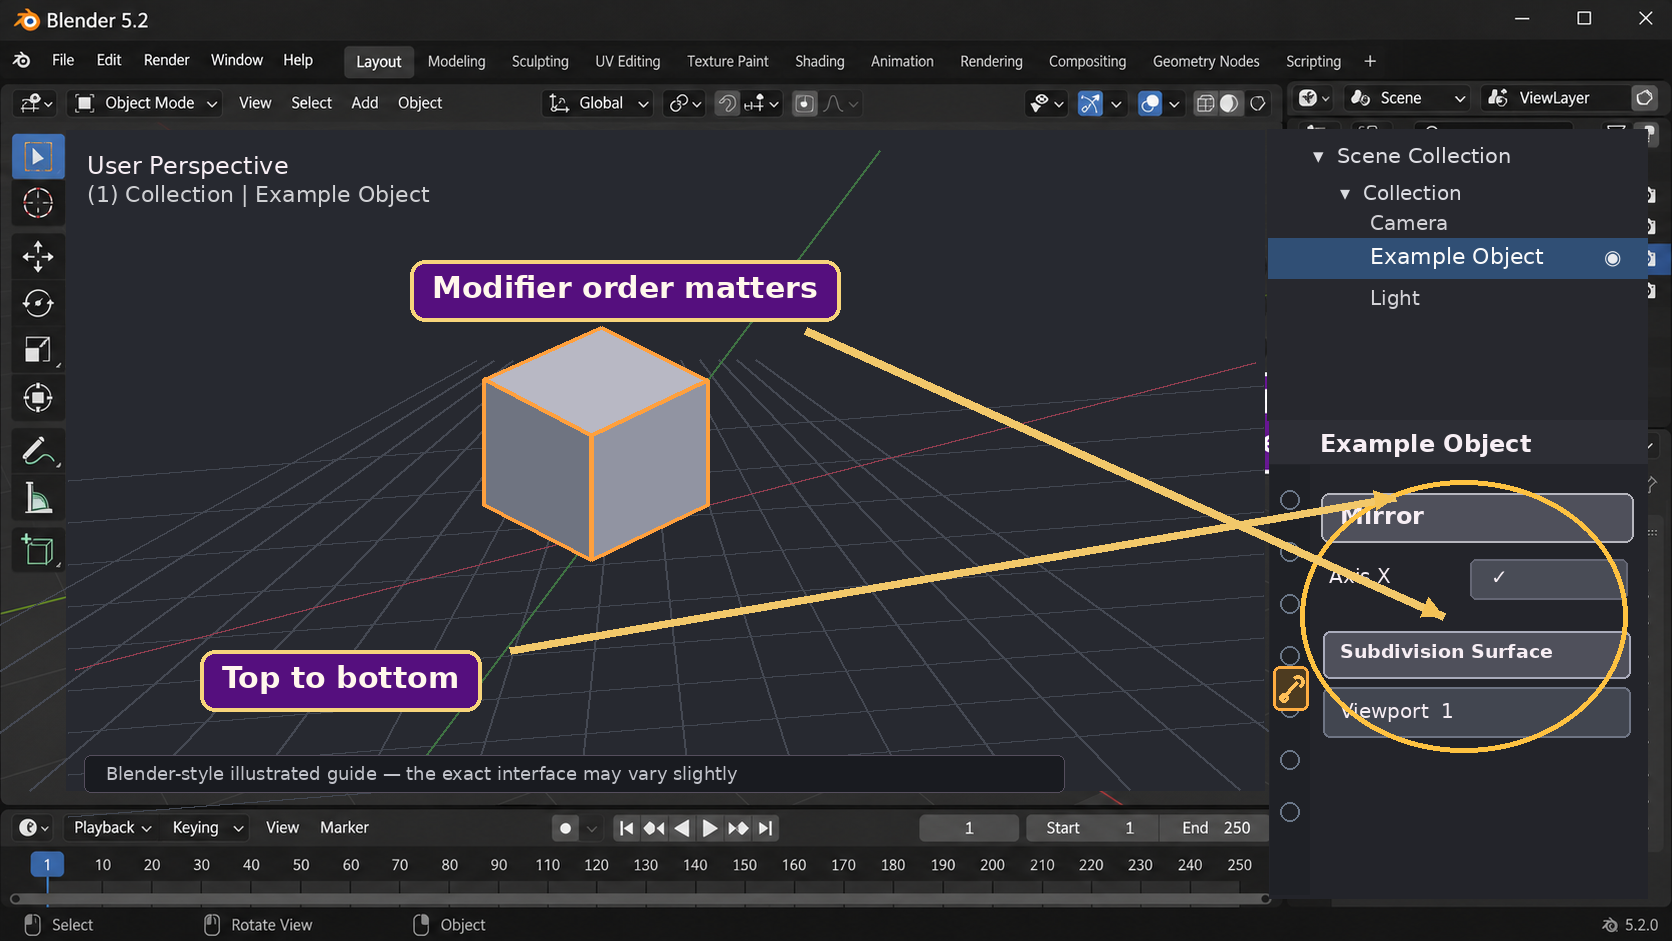
Modifiers appear as a stack. You can change settings, hide a modifier in the viewport, or rearrange its order.
First select an object, then find the wrench icon and choose Add Modifier.
Mirror
One side makes its partner.
Subdivision
A block becomes smoother.
Solidify
A flat sheet gains thickness.
Modifiers form a stack that runs from top to bottom. This is a separate example showing how the order can matter.
These are simplified teaching illustrations. Your live mesh and modifier settings may look a little different.
02
ONE HALF, TWO MATCHING SIDES
Mirror Modifier
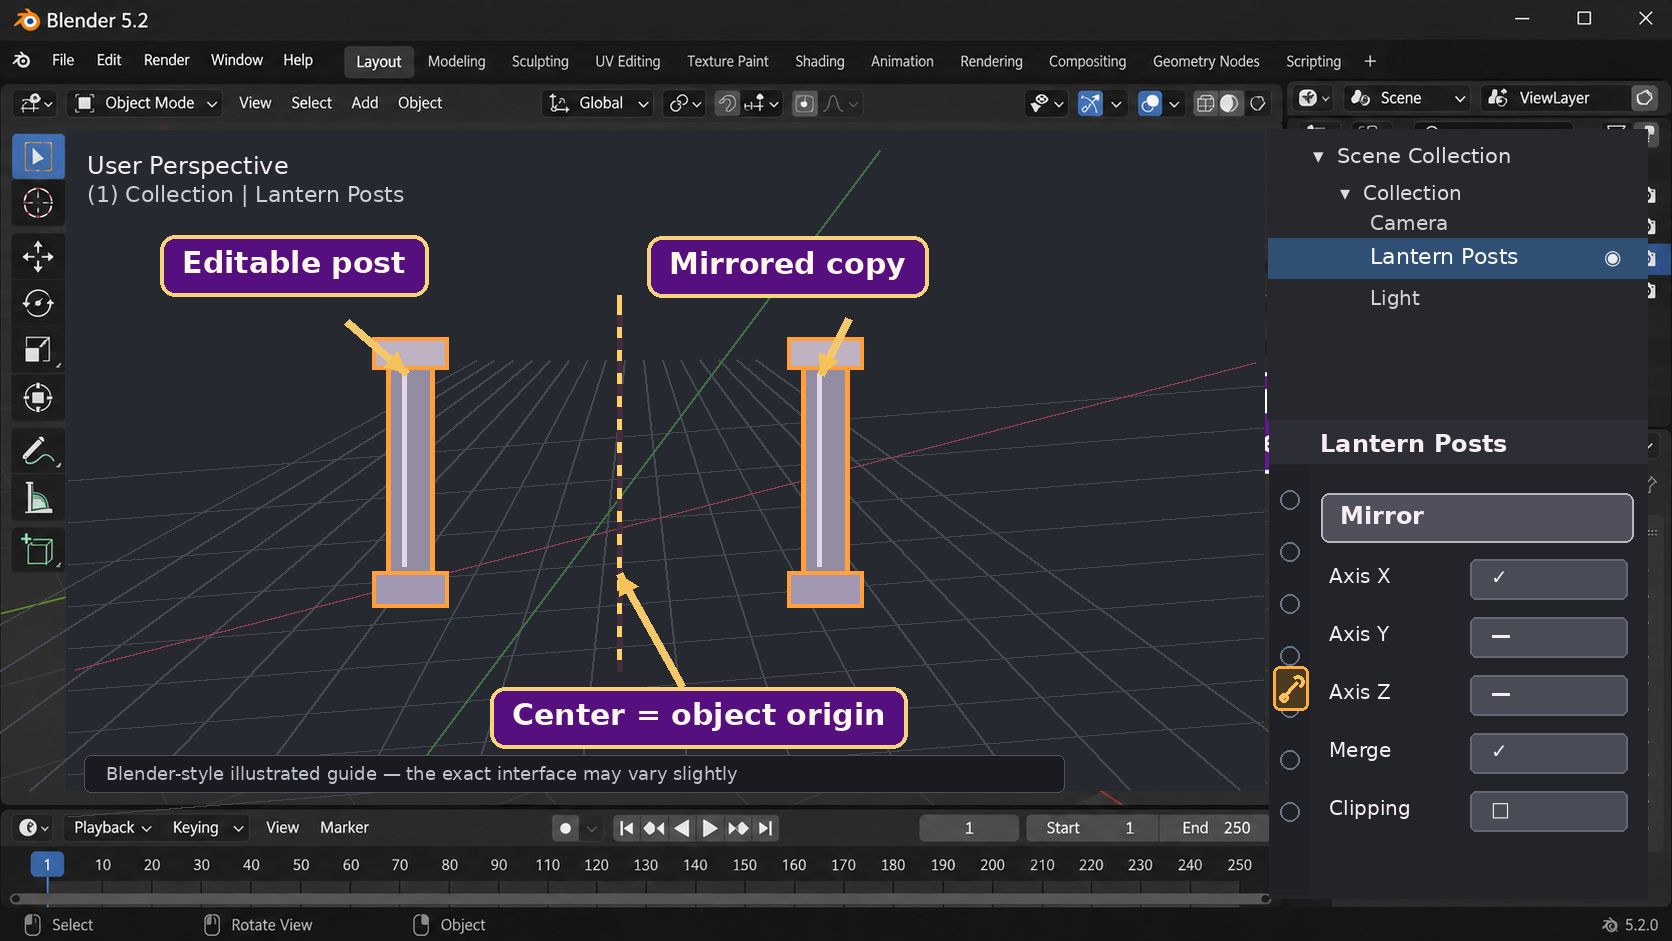
Mirror is wonderful for matching lantern posts, wings, furniture, and anything symmetrical. It reflects the mesh across the object's origin, usually along the local X axis to begin with.
Start with the default cube. In Object Mode, press F2 and rename it Lantern Posts.
Press Tab to enter Edit Mode, then press A to select all the cube's geometry.
Make a tall, thin post by entering SX.12Enter, then SY.12Enter, then SZ1.1Enter.
Still in Edit Mode, move the post to the right: GX1.4Enter. The geometry moves, but the object origin stays at the center.
Press Tab for Object Mode. Open the wrench tab → Add Modifier → Generate → Mirror. Keep X checked. A matching post appears on the other side of the origin.
In Edit Mode, try moving the right post a little. The matching post updates instantly! Press Ctrl + Z if you want to restore its original position.
Move the original post in Edit Mode; the Mirror modifier copies it across the object origin.
Why Edit Mode for Step 4? If you had moved the entire cube in Object Mode instead, the origin would have moved along with it. Then the Mirror modifier would reflect around the wrong place for this particular project.
Useful settings:Merge joins vertices that meet at the mirror plane; Clipping helps prevent vertices from crossing it while editing. Our two posts do not touch at the middle, so neither setting is necessary for this exercise.
03
MAKE HARD SHAPES SOFTER
Subdivision Surface Modifier
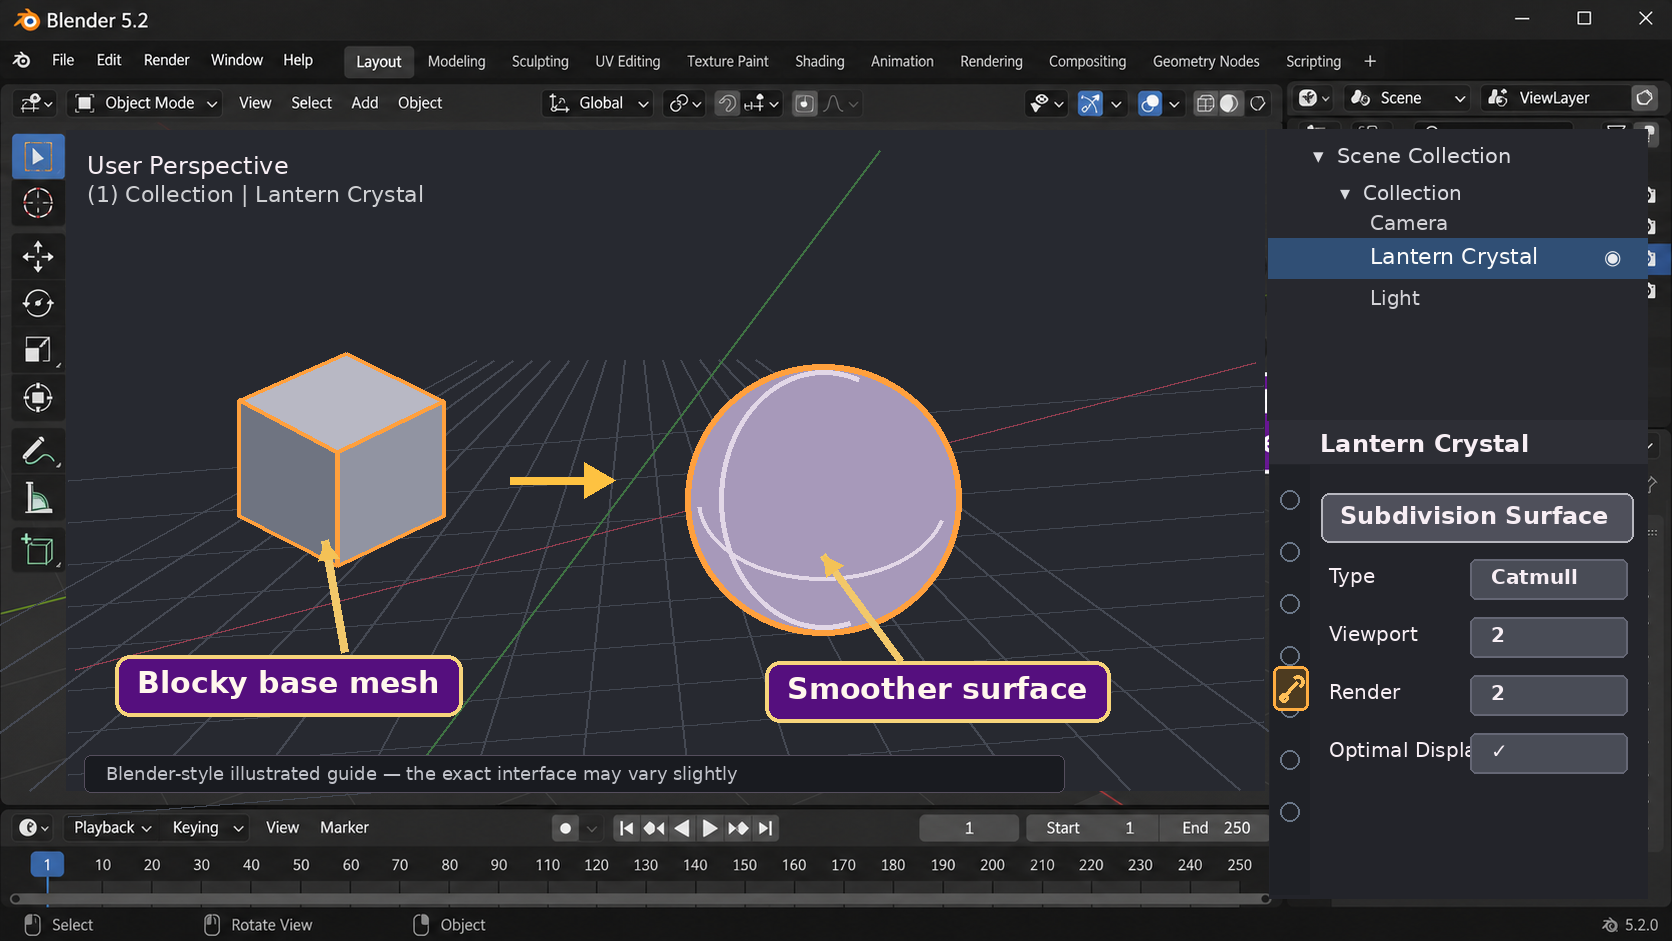
Subdivision Surface adds calculated geometry and can smooth a blocky shape. With the usual Catmull–Clark setting, a cube becomes rounded; with Simple, Blender adds divisions without that smoothing.
Press Tab if needed to return to Object Mode. Press Shift + A → Mesh → Cube to create another cube. Rename it Lantern Crystal with F2.
Press Tab, A, then S.4Enter to make the mesh smaller. For a slightly gem-like angle, try RZ45Enter. Press Tab again.
In Modifier Properties, click Add Modifier → Generate → Subdivision Surface. Set the Viewport level to 2 and keep Catmull–Clark.
See how the crystal becomes rounded? Try levels 0, 1, and 2 to compare. Optional: right-click the object and choose Shade Smooth for smoother-looking lighting.
Add Subdivision Surface, keep Catmull–Clark and set Viewport to 2 for the crystal.
Important: Subdivision Surface is not the same as right-click → Subdivide from Lesson 05. One is a live modifier; the other edits the mesh itself. Subdivision can also round corners more than you want—supporting loops help hold sharper shapes.
For OpenSim creators: Higher subdivision levels produce denser meshes when evaluated for export, so stay conservative while learning and check the final polygon count.
04
GIVE A FLAT SURFACE REAL DEPTH
Solidify Modifier
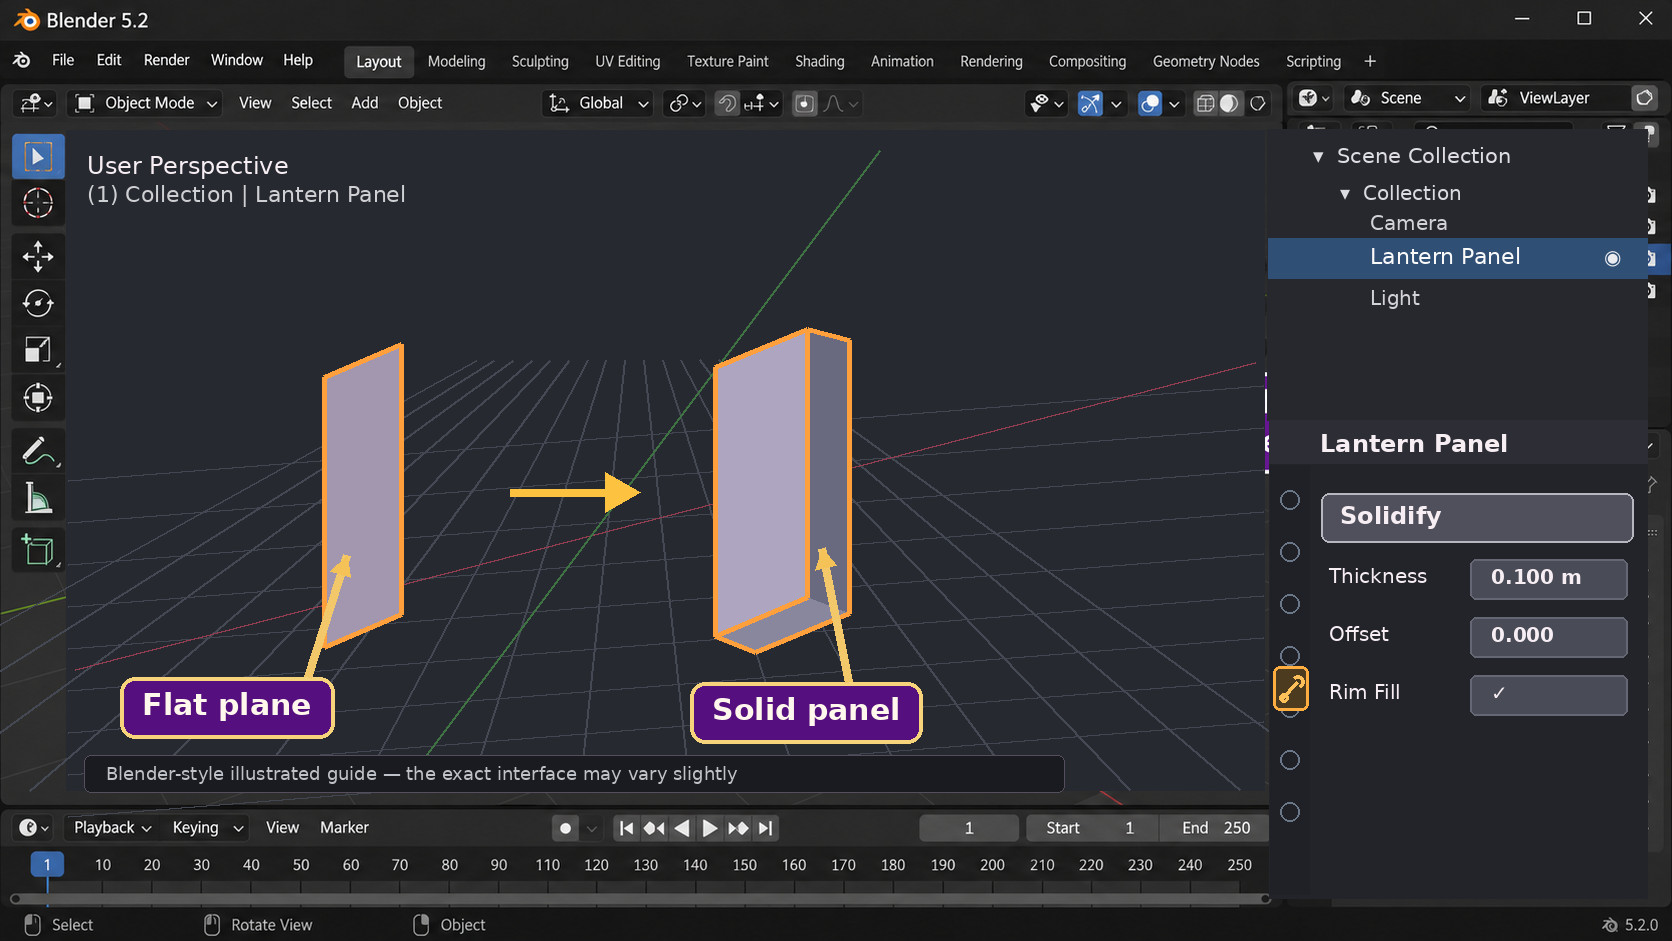
A plane starts as a perfectly flat sheet with no thickness. Solidify makes a thin shell, which is handy for window panels, fabric, armor, leaves, and decorative pieces.
In Object Mode, press Shift + A → Mesh → Plane. Rename it Lantern Panel.
Press Tab, then A. Press SX1.2Enter. The plane is now a little wider than tall.
Still in Edit Mode, stand it upright with RX90Enter. Then move it slightly behind the crystal with GY.45Enter.
Set Thickness to about 0.10 m (with the default scene scale). Set Offset to 0 to center the thickness around the original plane. Leave Fill Rim on so the panel has sides.
Orbit the view to see the edge of the panel. Toggle the modifier's viewport icon to compare the thin plane with its solid version.
The flat plane becomes a solid-looking panel: Thickness 0.10 m, Offset 0, and Rim Fill enabled.
A note about scale: Solidify uses local geometry, so non-uniform Object Mode scale can cause uneven thickness. For an object you have scaled in Object Mode, consider Ctrl+A → Scale before using Solidify. We shaped this panel in Edit Mode to avoid that issue.
05
A SMALL PIECE FOR OUR MAGICAL WORKSHOP
Practice Project · A Little Lantern Frame
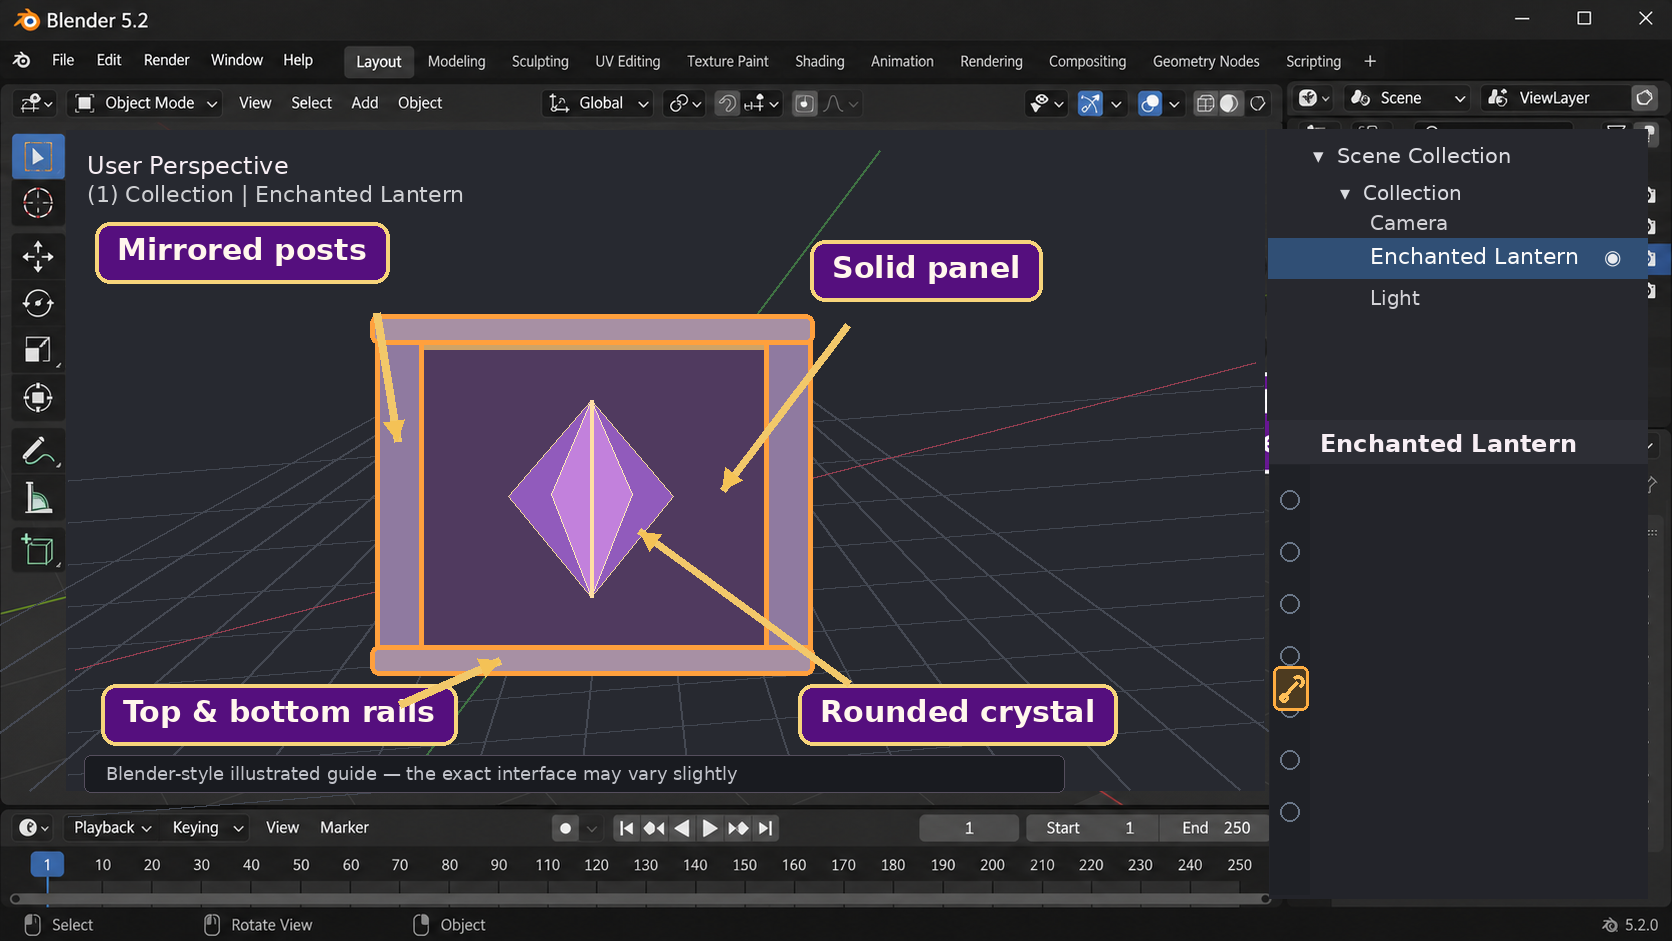
You now have three objects: two mirrored posts made from one mesh, one softened crystal, and one panel with thickness. Let's add two simple bars to make the shape read as a lantern.
Simple teaching diagram—not an exact Blender screenshot or a textured final render.
The finished lantern frame contains your mirrored posts, rounded crystal, thick panel and two rails. Materials come later.
Return to Object Mode. Press Shift + A → Mesh → Cube and rename it Top Rail.
With that new cube selected, press SX1.5Enter, then SY.18Enter, then SZ.13Enter. Move it up with GZ1.15Enter.
Press Shift + D, then Z-2.3Enter to duplicate the bar to the bottom. Rename the duplicate Bottom Rail.
Orbit the view. You'll see a basic lantern frame with two posts and a panel. The crystal is a rounded decorative form in the middle—not yet glowing.
Save your creation with Ctrl + Shift + S (Save As) and name it Enchanted Lantern Practice.blend.
✧
Three modifiers, one little creation!
You made symmetry from one side, a rounded form from a cube, and thickness from a plane—and all three effects can still be adjusted. That is the power of modifiers.
06
WHEN THE MAGIC GOES A LITTLE SIDEWAYS
Quick Fixes & Helpful Reminders
The mirrored post appears in the wrong place.
Mirror uses the object's origin. In this exercise, the first post must be moved in Edit Mode, not Object Mode. You can restart from a new cube if needed.
My cube turns into a ball.
That is normal with Catmull–Clark subdivision. Use the Viewport setting to reduce smoothing, or add supporting edge loops (Lesson 05) to hold sharper corners.
I can't see the panel's thickness.
Orbit the view to look at an edge, then increase Thickness slightly. Check that Solidify's viewport icon is enabled.
The thickness looks uneven.
Check for non-uniform Object Mode scale. Consider Ctrl+A → Scale. If the shell looks inside-out, check normals in Edit Mode with Shift + N.
My viewport is suddenly slow.
Lower the Subdivision Viewport level to 1 or 0. More levels create much more evaluated geometry.
Will modifiers export to OpenSim?
Export behavior depends on the exporter and its settings. Keep your original .blend file; for a final game-world mesh, verify that the exported file contains the evaluated geometry and inspect its polygon count.