Your model has a shape and materials. Now learn how to unfold its surface into a flat map that tells Blender where an image texture belongs.
Beginner-friendlyAbout 40–55 minutesBlender 5.2
WHAT YOU'LL LEARN
Your UV unwrapping essentials
Find the UV Editing workspace
Mark seams where a mesh should unfold
Use Unwrap and recognize UV islands
Arrange and pack a treasure chest's UV layout
YOU ONLY NEED
A cube and Blender 5.2
Begin with File → New → General. You don't need a texture image yet—just your cube and a little patience.
✦
START HERE
Welcome to the Unwrapping Table!
Think of a little treasure chest wrapped in decorative paper. Before you can paint a pattern that fits its front, sides, and lid, you need to unfold that paper into a flat layout. UV mapping is Blender’s way of doing that.
We'll begin with a simple cube, then unwrap a two-piece enchanted treasure chest using the skills from Lesson 02 and Lesson 03. There are no add-ons and no image-texture nodes required for the main exercise.
Little workshop wisdom: UV unwrapping does not change the 3D shape. It changes coordinates that let 2D pictures line up with faces. We'll connect actual image textures to a material in Lesson 09.
✦
KEEP THIS HANDY
Your UV mapping spellbook
Tab
Edit Mode
Switch from working with an object to editing its mesh.
2
Edge Select
Use the number row to select edges for marking seams.
Edge → Mark Seam
Choose your cuts
Tell Blender where to unfold the surface.
U
Unwrap
Unfold the selected mesh faces into UV islands.
G / R / S
Arrange UVs
Move, rotate, and scale islands in the UV Editor.
UV → Pack Islands
Tidy the map
Arrange your islands with room between their edges.
01
FROM SOLID SHAPE TO FLAT PATTERN
What Is a UV Map?
A mesh exists in 3D space using X, Y, and Z. A texture image is flat, so Blender uses U and V for the two directions across that image. The UV map tells Blender where each mesh face sits on that flat picture.
An illustrated example: the six sides of a box can be laid flat without changing the original cube.
UV Map
The set of 2D texture coordinates stored on your mesh.
UV Island
A connected group of faces in the flat layout, like one piece of unfolded wrapping paper.
Seam
An edge you mark to suggest where Blender should cut the wrapping paper open.
02
WHERE WE UNFOLD THE MAGIC
Find the UV Editing Workspace
Open Blender 5.2 and choose File → New → General. Keep the default cube.
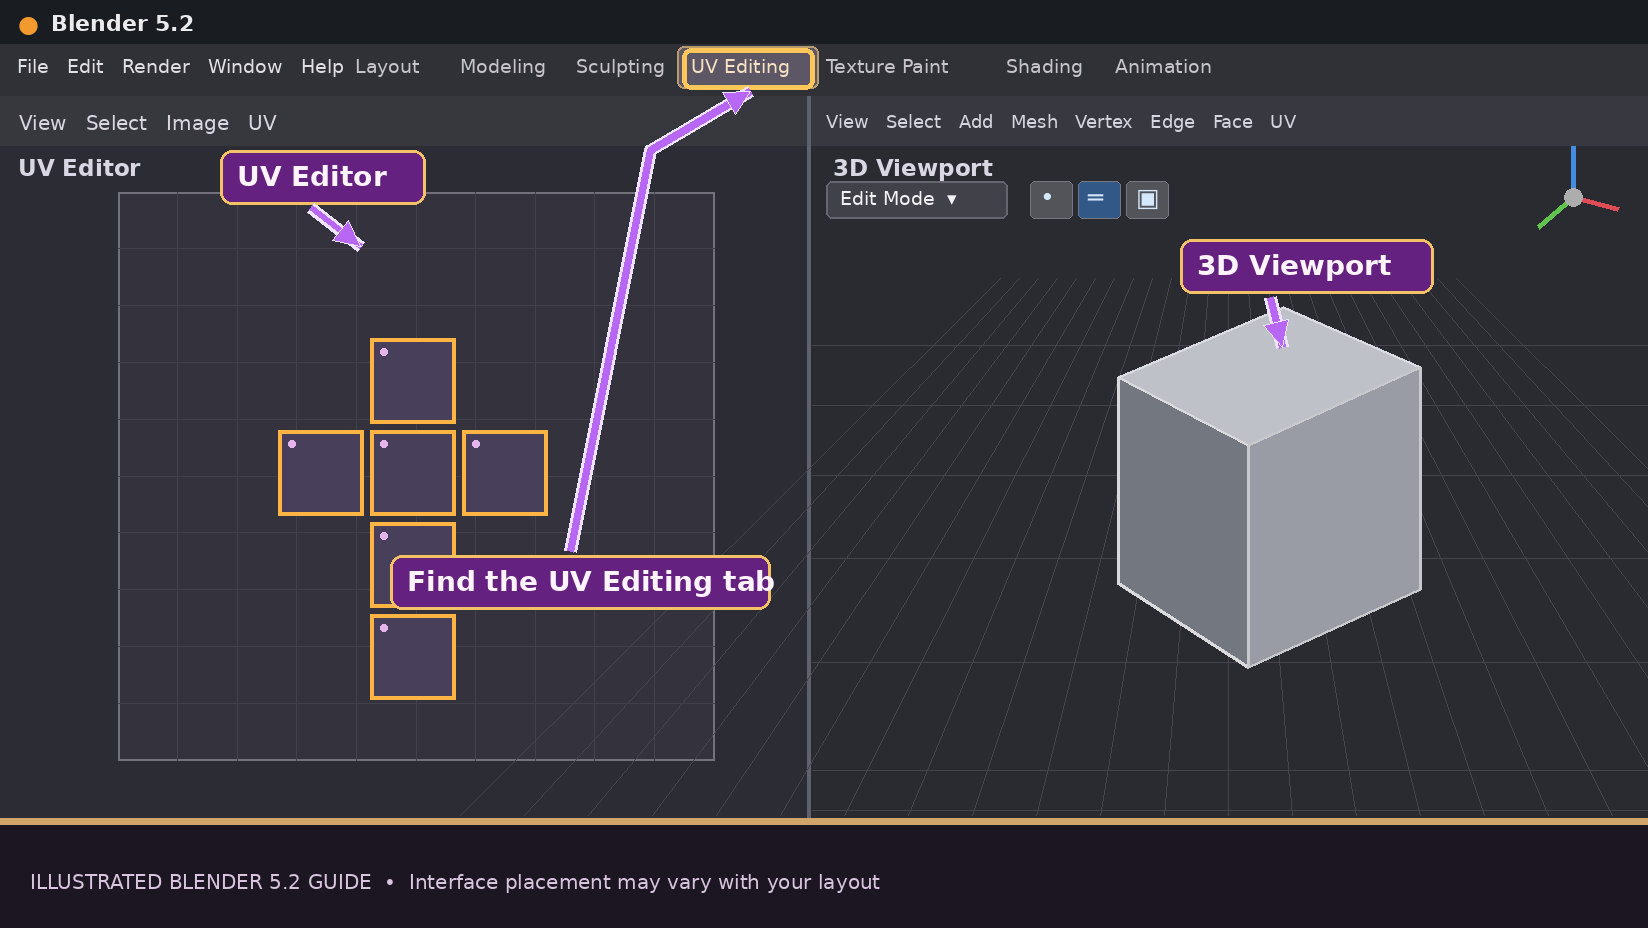
Click the UV Editing workspace tab across the top. If it isn't visible, scroll the workspace tabs horizontally.
The workspace has two important areas: a UV Editor (usually on the left) and a 3D Viewport (usually on the right). The exact arrangement may vary with your layout.
Move your pointer over the 3D Viewport and press Tab for Edit Mode. Press A to select the cube's faces.
Look at the UV Editor. The cube may already have a UV layout because Blender's default cube often comes with one. We'll make our own in the next steps.
Look for UV Editing along the top. The UV Editor is usually on the left; your 3D Viewport is beside it.A simplified map of the workspace, not a screenshot. Your Blender panels may look a little different.
Can't see any UV lines? Make sure a mesh is selected, the 3D Viewport is in Edit Mode, and the faces you want to view are selected. Hover over the viewport before using the keyboard shortcuts.
03
A NEAT PLACE TO OPEN THE WRAPPING
Mark Your First Seams
Imagine cutting a cardboard box so you can lay it flat. Seams tell Blender where to separate connected faces when it unwraps your model. Marking a seam doesn't actually cut your mesh or add new geometry.
Keep the default cube in Edit Mode, then press 2 on the number row to enter Edge Select (not Numpad 2).
Press Alt + A to deselect all edges. Select the four edges around the cube's top face. Hold Shift to add each edge to the selection.
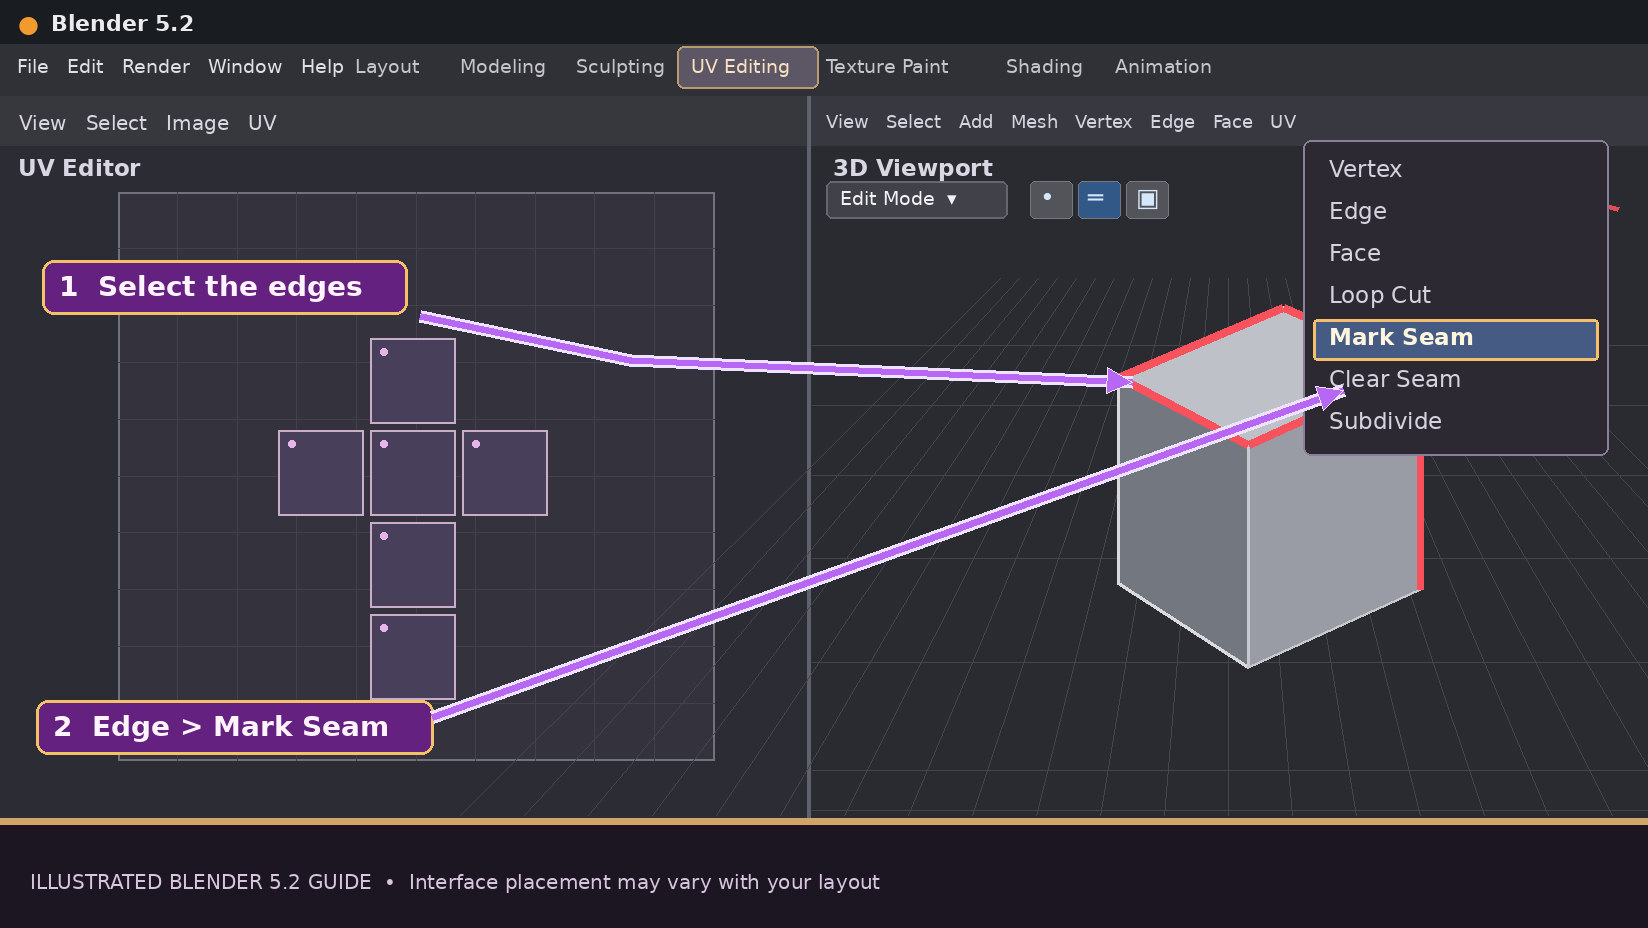
In the 3D Viewport, choose Edge → Mark Seam (or Ctrl + E and choose Mark Seam from the Edge menu).
Repeat for the four edges around the bottom face, then mark one vertical edge at the back. If a hidden edge is awkward, orbit with the middle mouse button.
Check your seams: in a typical viewport theme, marked seams appear as red edge lines. They form a cut along which the side faces can open into a strip, while top and bottom can unfold separately.
Use Edge Select (number-row 2), select the edges, and choose Edge → Mark Seam. Marked seams are usually shown in red.
Don't worry about being perfect: You can choose Edge → Clear Seam on selected edges, then mark different ones and unwrap again. More complex objects may need different seam patterns.
04
NOW LET BLENDER DO THE UNFOLDING
Unwrap Your Mesh
Move your pointer into the 3D Viewport. Stay in Edit Mode and press A to select all faces of your cube.
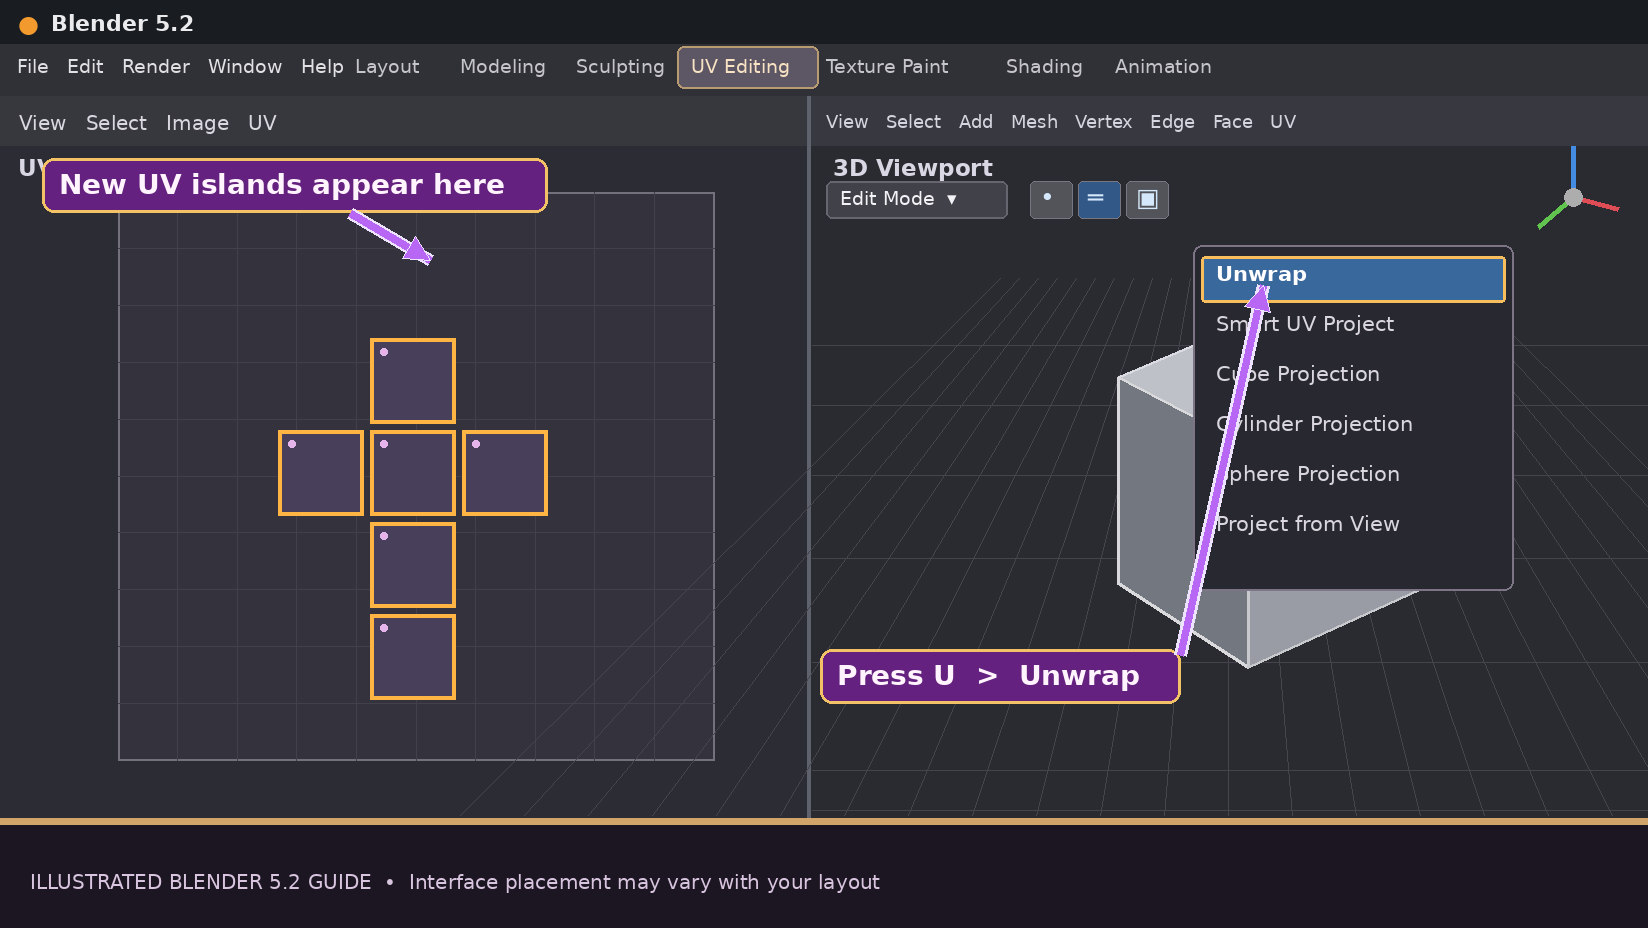
Press U to open the UV mapping menu. Choose Unwrap (the Angle Based option works well for this lesson). You can also use the 3D Viewport's UV menu.
Look in the UV Editor. Your cube's faces should now appear in flattened groups called UV islands. Their exact positions and orientations can vary.
If you don't like the result, mark or clear a seam and repeat the Unwrap command. That's a normal part of UV mapping!
Save your file as UV Practice.blend using Ctrl + Shift + S (Save As), so you can return to your experiment.
With mesh faces selected, hover over the 3D Viewport and press U → Unwrap.
Helpful shortcut:U is for unwrapping, not for switching to the UV workspace. To display and edit your layout, click the UV Editing workspace tab.
05
A LITTLE ORGANIZING ON THE PARCHMENT
Move, Rotate & Scale UV Islands
Use the UV Editor just like a flat arrangement table. Your mesh stays in place while you rearrange the UV outlines over the square image area.
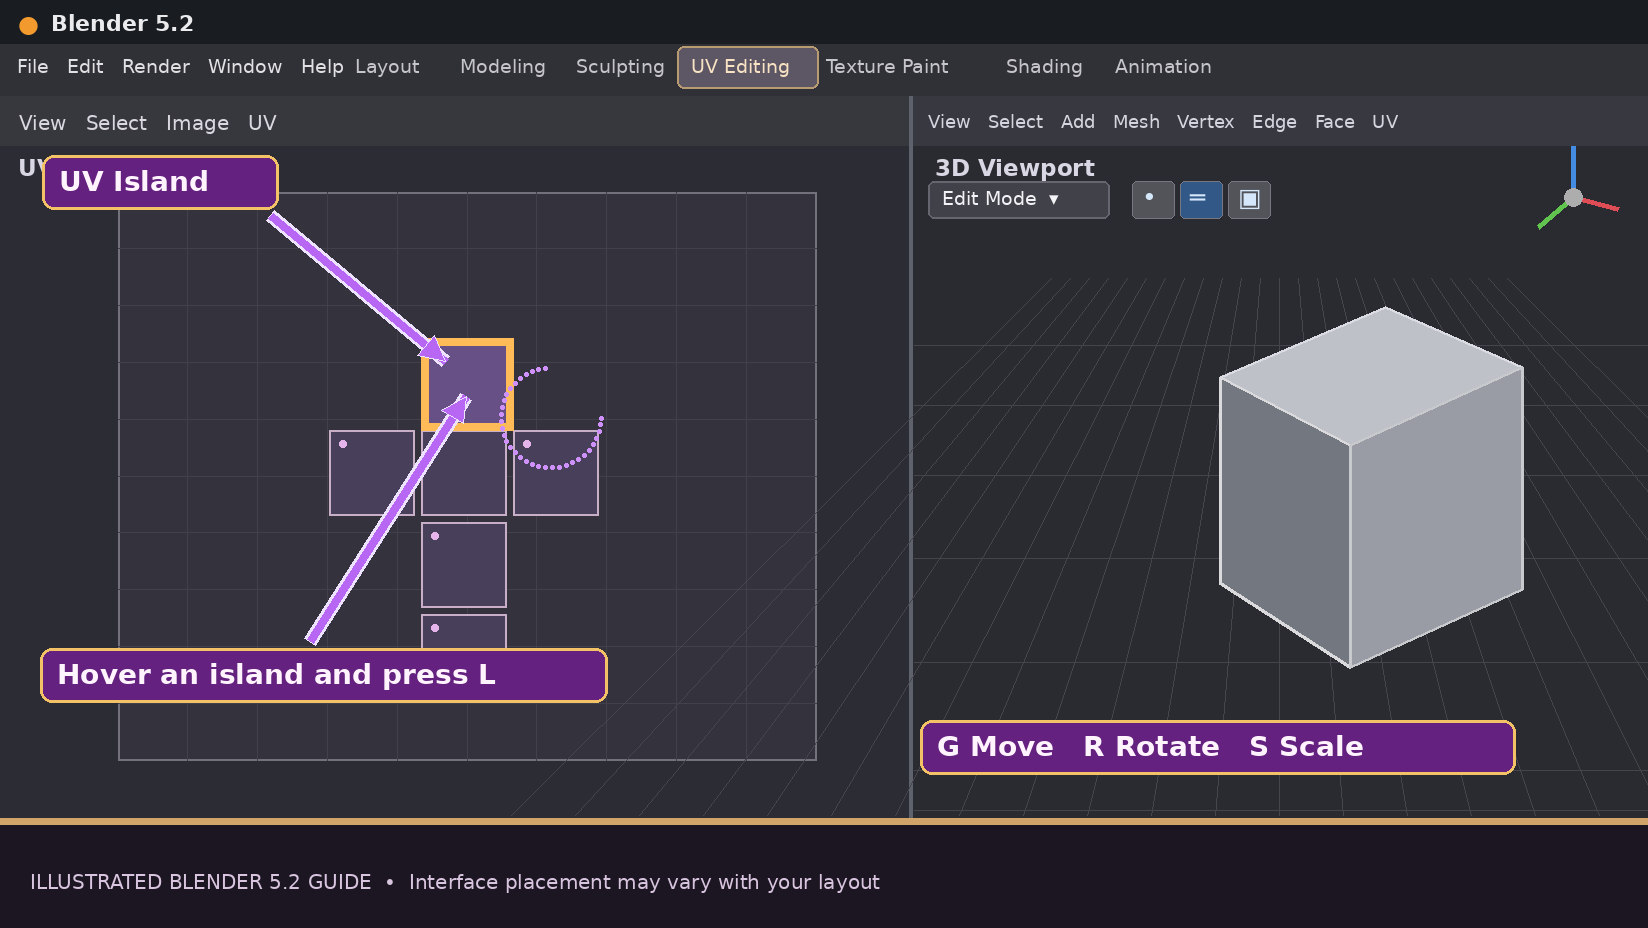
G Move UVsR Rotate UVsS Scale UVsA Select all UVsL Select connected island
Click in the UV Editor so shortcuts act there instead of in the 3D Viewport.
Press A to select the visible UVs. Press G and move your pointer to reposition them; click to confirm, or press Esc to cancel.
Hover over one island and press L to select its linked UVs (depending on selection settings, you may need to clear the previous selection first). Use R to rotate or S to resize that island.
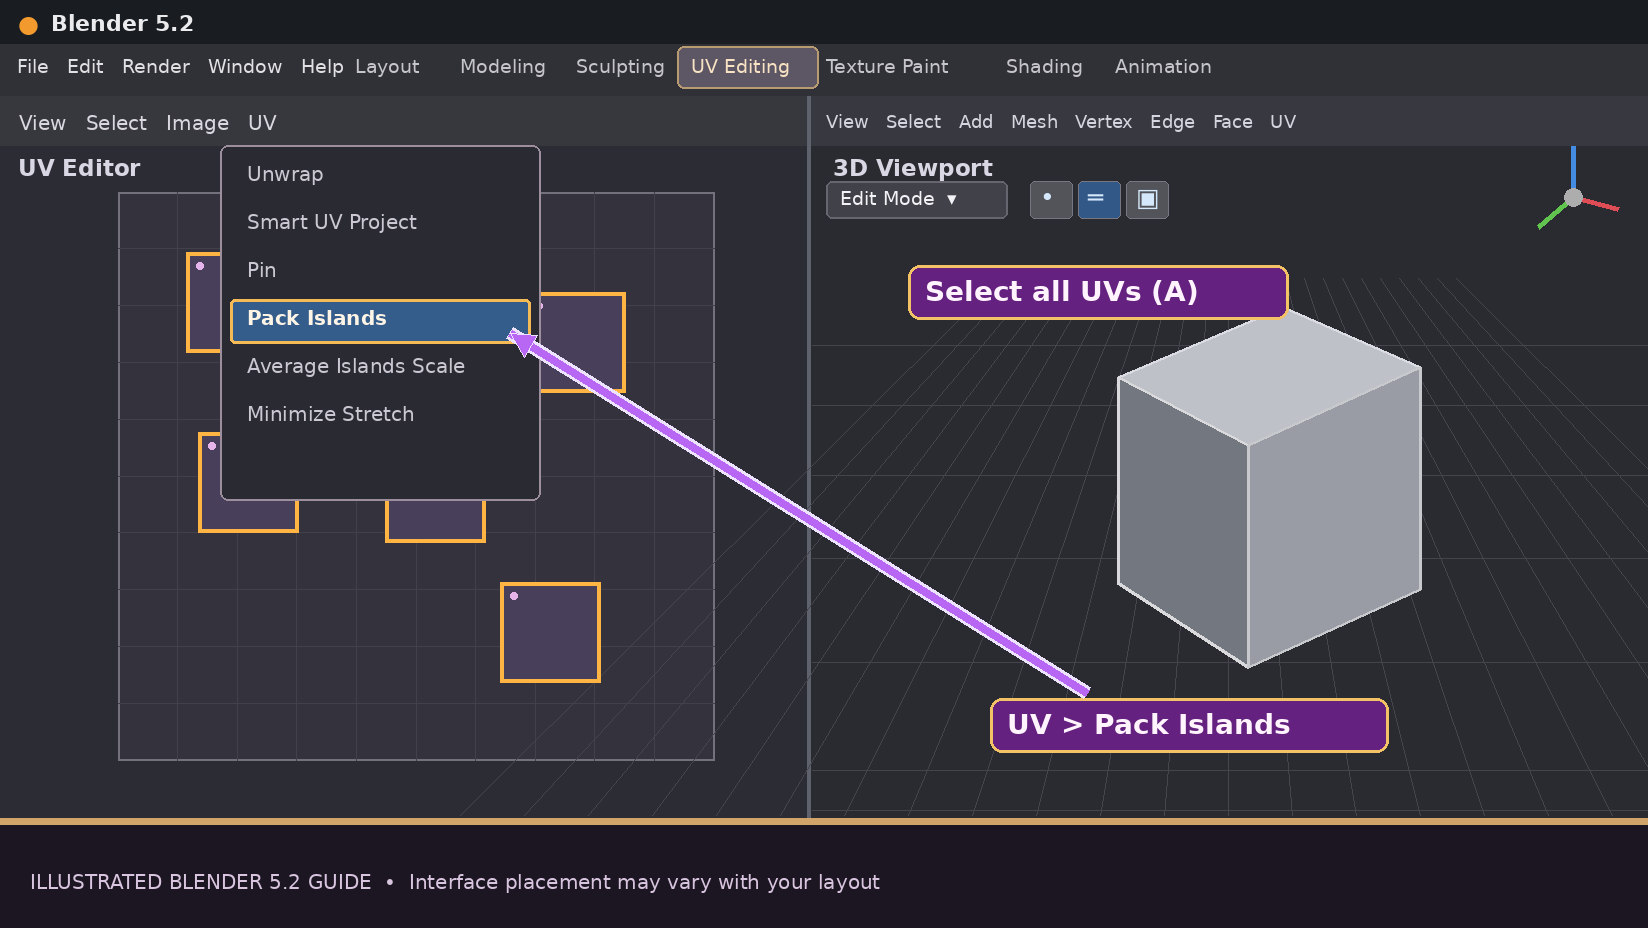
To automatically arrange everything, select all with A and choose UV → Pack Islands. Leave a small margin between islands so textures don't bleed from one section into another.
Try to keep islands inside the main 0–1 square for a regular single-image texture. Avoid unnecessary overlap when separate faces will need different painted details.
In the UV Editor, hover over an island and press L to select linked UVs, then use G, R, or S.After selecting your UVs, choose UV → Pack Islands to organize the layout with margins.
Important: Moving UV islands changes where a texture will appear, not the physical size or location of your 3D object. Different faces may share UV space deliberately, but unique painted designs usually need non-overlapping islands.
06
A LITTLE TREASURE FOR OUR WORKSHOP
Hands-On Project · Unwrap a Treasure Chest
The banner shows a decorated curved chest, but our first UV practice uses two simple rectangular shapes—a chest body and a lid. This keeps the focus on unwrapping. Later you can add curves, fittings, and all the magical details.
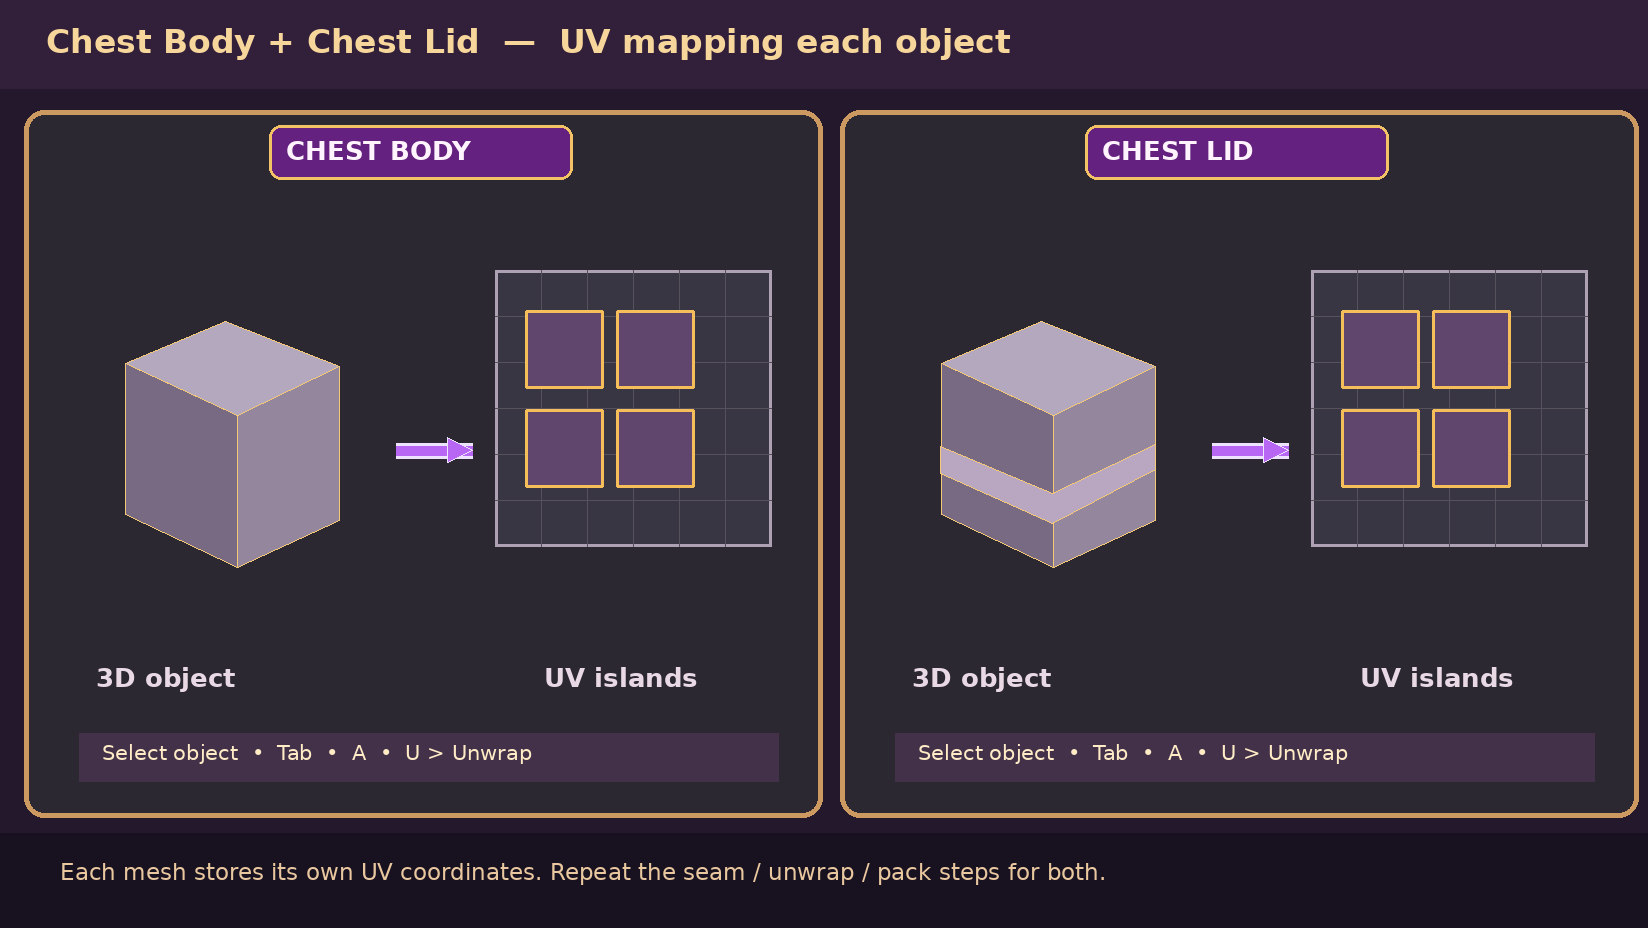
A simplified teaching model, not a screenshot. The lid and body will be unwrapped individually.The Chest Body and Chest Lid are separate objects. Select and unwrap each one in turn.
Start fresh: Choose File → New → General. Rename the default cube Chest Body in the Outliner. Stay in Object Mode.
Shape the body: Press SX1.5Enter, then SY0.9Enter, then SZ0.6Enter. This makes a broad, low rectangular chest body.
Apply its scale: Still in Object Mode, press Ctrl + A → Scale. This makes Blender's object scale read 1 on each axis while keeping the size you see.
Make a lid: Press Shift + A → Mesh → Cube. Rename it Chest Lid. Scale with S X 1.55, S Y 0.95, S Z 0.18, and move upward with G Z 0.78. Apply its scale with Ctrl + A → Scale.
UV unwrap the body: Select Chest Body, go to UV Editing, enter Edit Mode, and mark seams around its top and bottom perimeter plus one back vertical edge, as practiced above. Select all with A, then U → Unwrap.
UV unwrap the lid: Press Tab to return to Object Mode, select Chest Lid, and repeat the same seam-and-unwrap steps. Because the lid is a separate object, it has its own UV map in this exercise.
Pack and check: In the UV Editor, select all UVs for the currently edited object and choose UV → Pack Islands. Repeat for the other object. Keep a little margin between islands.
Save your treasure: Choose File → Save As and name it Enchanted Chest UV Practice.blend. You now have a chest body and lid with UVs ready for image textures in Lesson 09.
Bonus: Try the Workshop UV Checker
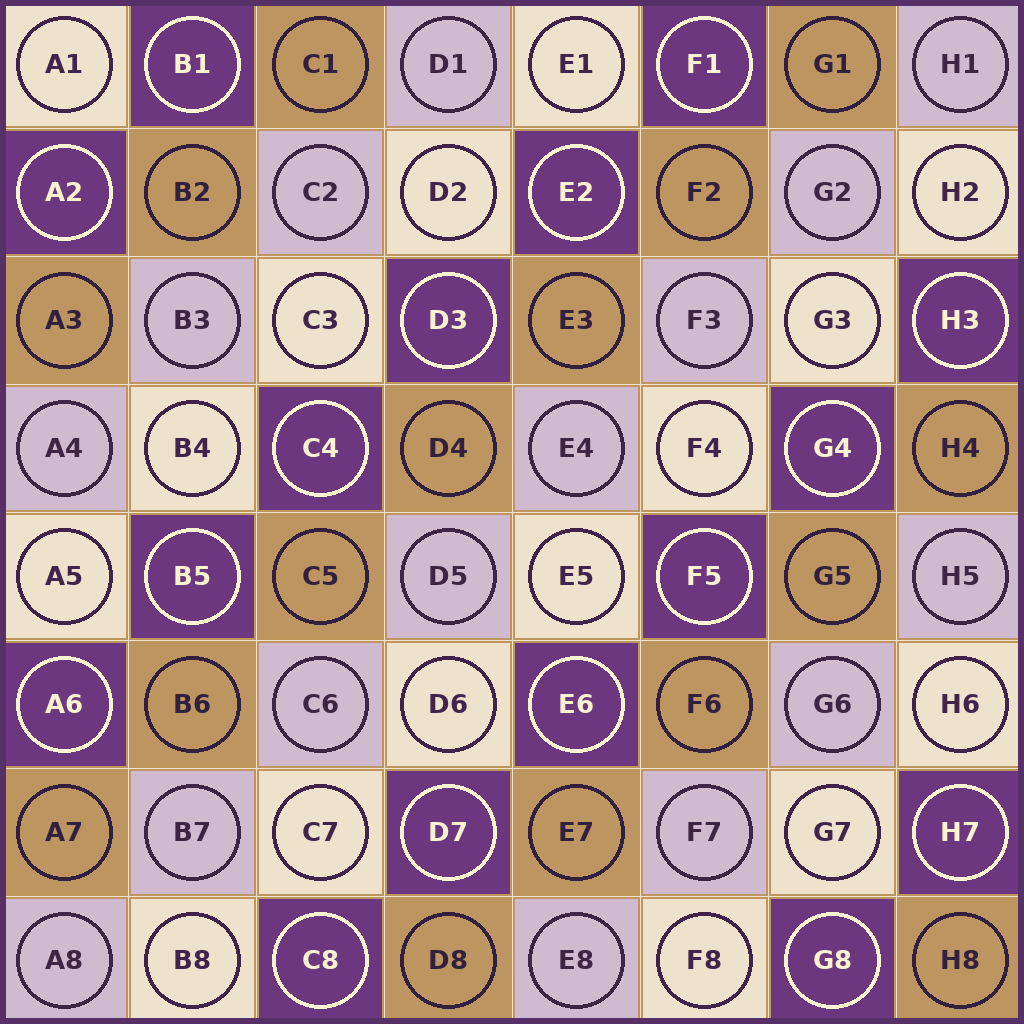
Use our little labeled grid to inspect your UV islands. Save the picture, then in the UV Editor use Image → Open to load it as an image behind your UV layout. The letters and circles can help you see how an island sits on the image.
Important: Loading an image in the UV Editor does not automatically make it appear on your 3D chest. We'll connect images to materials in the next lesson.
Each mesh shows UV islands when selected in Edit Mode.
The islands have a little space between them.
You saved a working .blend file for the next lesson.
07
IF YOUR WRAPPING PAPER HAS A MIND OF ITS OWN
Quick Fixes & Helpful Reminders
My UV Editor is empty.
Select a mesh, enter Edit Mode in the 3D Viewport, and select its faces. Try unwrapping again if needed.
I pressed G and moved the whole chest!
Your pointer was likely over the 3D Viewport. Undo with Ctrl + Z, click inside the UV Editor, then try again.
My UV islands overlap.
Select the islands in the UV Editor and choose UV → Pack Islands. If needed, mark additional seams and unwrap again.
The islands look odd or stretched.
Review your seams, apply non-uniform object scale where appropriate, and unwrap again. Long narrow faces may legitimately have narrow islands.
The checker image is not on my 3D chest.
That's expected. Opening it in the UV Editor only displays a reference image there. The material connection comes in Lesson 09.
Did I cut holes in my mesh?
No. Mark Seam guides the UV calculation; it does not delete faces, split edges, or create actual holes.
✦
Another little bit of Blender magic mastered!
You can now find the UV Editor, place seams, unwrap a shape, and arrange islands. These are the foundations for making your own beautifully textured creations.